This article is an application of the ESP32CAM board to perform continuous photo shooting with a fixed interval between shots, known as time-lapse, in Python. By installing the firmware with the integrated camera library for connection to the camera module on the ESP32CAM, programming is simple and easy code configurable.

Equipment
- ESP32CAM
- OV2640 camera module
- USB-RS232 module


Connection to RS232 Module
To connect the RS232 module so that the ESP32CAM board can communicate with the computer for firmware writing and programming, the following table is required.
| โมดูล RS232 | ESP32CAM |
|---|---|
| 5V | 5V |
| GND | GND |
| Tx | Rx |
| Rx | Tx |
Install firmware
Thanks to Mauro Riva, firmware is available for us on GitHub where readers can download esp32_idf4.x_ble_camera.bin firmware and write ROMs like in this article.
Once the firmware has been installed, test it and run it as follows, And if the result is True, it means the camera module is ready.
import camera
camera.init(0, format=camera.JPEG)
Note
To write firmware, the ESP32CAM’s GPIO0 pin must be connected to GND and reset to enter ROM write mode.
ไลบรารี camera
Running the camera module requires calling the camera library. The library has the following commands:
- camera.init(0,format=camera.JPEG) to get the camera ready to work
- camera.gramesize( size ) For setting the image size which affects the amount of memory on the board. Image sizes are listed as follows.
- camera.FRAME_96X96
- camera.FRAME_QQVGA
- camera.FRAME_QCIF
- camera.FRAME_HQVGA
- camera.FRAME_240X240
- camera.FRAME_QVGA
- camera.FRAME_CIF
- camera.FRAME_HVGA
- camera.FRAME_VGA
- camera.FRAME_SVGA
- camera.FRAME_XGA
- camera.FRAME_HD
- camera.FRAME_SXGA
- camera.FRAME_UXGA
- camera.FRAME_FHD
- camera.FRAME_P_HD
- camera.FRAME_P_3MP
- camera.FRAME_QXGA
- camera.FRAME_QHD
- camera.FRAME_WQXGA
- camera.FRAME_P_FHD
- camera.FRAME_QSXGA
- camera.whitebalance( WB_Type ) For the camera module to adjust the white balance (WB: White Balance). There are options as follows:
- camera.WB_NONE
- camera.WB_SUNNY
- camera.WB_CLOUDY
- camera.WB_OFFICE
- camera.WB_HOME
- camera.saturation( color_intensity ) The intensity of the color gradient which is the grayscale value range from -2 to 2.
- camera.brightness( brightness_value ) It is used to reduce or increase the brightness of the image obtained from the camera module. The value is -2 to 2.
- camera.contrast( color_contrast ) For adjusting the color contrast to be less or more with a value range of -2 to 2.
- camera.quality( quality_level ) For determining image quality. It ranges from 10 to 63, where a lower value means much higher image quality due to less compression.
- camera.flip( flip_value ) To flip the top/bottom image by setting a value of 0 or 1.
- camera.mirror( mirror_value ) To flip the left/right image by setting a value of 0 or 1.
Example Code 1
The example code21-1 is to read the values from the camera module and then write the resulting image file named capture.jpg to the SDCard.
#code21-1
import camera
import machine
import os
import time

camera.init(0,format=camera.JPEG)
camera.framesize(camera.FRAME_VGA)
camera.whitebalance(camera.WB_NONE)
camera.saturation(0)
camera.brightness(0)
camera.contrast(0)
camera.quality(10)

sd = machine.SDCard()

time.sleep_ms(100)
os.mount(sd, '/sd')
buf = camera.capture()
f = open('/sd/capture.jpg', 'w')
f.write(buf)
time.sleep_ms(100)
f.close()
sd.deinit()
camera.deinit()
Example Code 2
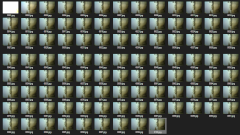
Example code21-2 is a continuous recording of 100 images every 1 second (approximately).
# code21-2 time-laps
import machine as mc
import time
import camera
import os

camera.init(0,format=camera.JPEG)
camera.framesize(camera.FRAME_VGA)
camera.whitebalance(camera.WB_NONE)
sd = mc.SDCard()
time.sleep_ms(100)
if ('sd' in os.listdir()):
    os.umount('/sd')
os.mount(sd, '/sd')
frameCounter = 0
for i in range(100):
    frameCounter += 1
    buf = camera.capture()
    fname = "/sd/{:04d}.jpg".format(frameCounter)
    f = open(fname, 'w')
    f.write(buf)
    time.sleep_ms(100)
    f.close()
    print("Frame No.{}".format(frameCounter))
    time.sleep_ms(1000)
sd.deinit()
camera.deinit()


Conclusion
From this article, you will find that programming Python to control the camera module is very easy and simple. even though it needs to install firmware for ESP32CAM specifically, the speed of the camera module is faster than coding in Python alone. And one thing that our team found is that the use of the module requires a power supply that can supply higher current than normal, so the reader must check the current that is supplied to the board when it is actually used.
Finally, we hope this article is more or less useful for readers. And readers will be happy with the program and apply it in the future.
(C) 2020, By Jarut Busarathid and Danai Jedsadathitikul
Updated 2021-09-07