This article uses the Python programming language of the Raspberry Pi board with OpenGL to render a 3D image of a rectangular box rotated towards the X, Y and Z axes.
Equipment
- Raspberry Pi 3 or 4
OpenGL
OpenGL is an open-source 2D and 3D graphics library. It works with multiple platforms and has been continuously developing since 1992. The OpenGL pipeline consists of two parts: the part of the image that is used as texture or pixel data and the algebraic data used to determine the location of vertex coordinates, texture coordinates, and so on, the library takes the vertex data for computing to create the resulting image and store it in a buffer. Finally, the programmer directs the output buffer to display on an output device.
There are two types of pipeline libraries that each version of OpenGL supports differently. However, in later versions of OpenGL, there is a principle of shader programming to operate each shader, allowing the programmers to operate on their own. Unlike earlier pipelines, it was called a fixed function that programmers could use in the library’s basic capabilities but if you want to use other special abilities, you need to run specific libraries that the graphic card supports. So it’s a huge challenge for graphics programmers who have to program with a wide variety of graphics cards, and each company has different models.
OpenGL libraries have developed across different platforms and are called differently, for example, OpenGL ES is a library for mobile platforms (including Raspberry Pi), and WebGL is an adaptation of OpenGL ES to render on web browsers. However, both OpenGL ES and WebGL operate based on the new pipeline, so understanding one platform can be applied to other platforms, however, this article does not use this capability because it has opted for a function-restricted execution that works with OpenGL since version 1.1, allowing most graphic cards to process instruction sets.
PyOpenGL is a Python library that supports Python’s cross-platform functionality allowed us to code once and worked with Windows, macOS, Linux, Raspberrypi. PyOpenGL also supports OpenGL versions 1.1 to 4.4, GLES versions 1 to 3.1, GLU, EGL, WGL, GLX, GLUT/FreeGLUT and GLE3 PyOpenGL is currently version 3.1.5 (2021-06-29).
Since the OpenGL library is just a library for 2 and 3D graphics, with PyOpenGL being the interface between the OpenGL library and Python, the rendering implementation must be called through another library. The PyGame library is used in this article to control the interface between the written program and the user.
Library installation
Installing OpenGL libraries for use with Raspberry Pi on Raspbian requires the following installation instructions.
sudo pip3 install pyopengl
If using Ubuntu 20.10 without Python 3 installed, use the following command.
sudo pip install pyopengl
Once the libraries are installed, it can be tested to be sure by entering a Python program and writing the following commands.
import OpenGL
print("PyOpenGL version {}".format(OpenGL.__version__))
You will get the result as shown in Figure 2.
Using OpenGL
To program an openGL interface using PyGame with PyOpenGL run on top of it, the PyOpenGL library must be invoked like this:
OpenGL.GL is an OpenGL implementation library and OpenGL.GLU is an OpenGL support library.
Prototype code
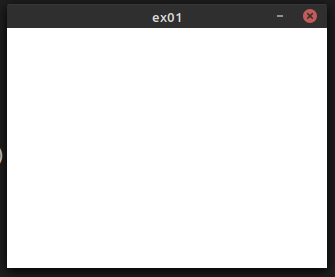
A prototype for using PyGame as a user interface and PyOpenGL as an interface to the graphic card to process graphics as ex01.py
# -*- coding: UTF-8 -*-
import pygame
from pygame.locals import *
from OpenGL.GL import *
from OpenGL.GLU import *

def render():
    pass

if __name__=="__main__":
    pygame.init()
    fpsClock = pygame.time.Clock()
    pygame.display.set_mode((320,240), pygame.DOUBLEBUF|pygame.OPENGL)
    pygame.display.set_caption("ex01")
    glViewport(0,0,320,240)
    gluOrtho2D(-1.0,1.0,1.0,-1.0)
    running = True
    while running:
        fpsClock.tick(30)
        glClearColor(1.0, 1.0, 1.0, 1.0)
        glClear(GL_COLOR_BUFFER_BIT)
        glMatrixMode(GL_MODELVIEW)
        glLoadIdentity()
        render()
        for event in pygame.event.get():
            if event.type == pygame.QUIT:
                running = False
        pygame.display.flip()
    pygame.quit()
From ex01.py we can see that set_mode is set to use Double Buffer because OpenGL is responsible for processing graphics. When processing is complete, the results are stored in memory. The programmer has to bring that result to the display. Therefore, a double buffer method or two-parts storage, the display and the result storage. The programmer commands display.flip() to put the output data into the display. After that, the graphics processor or OpenGL performs the next cycle of processing to store the result in the resulting memory and repeat it over and over, and exiting the program is done by clicking the Close button. The results are as shown in Figure 3.
Display
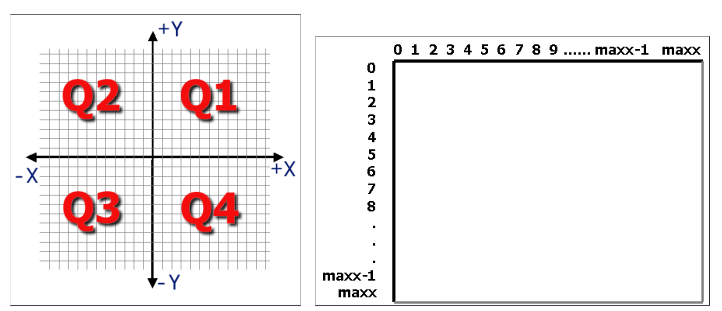
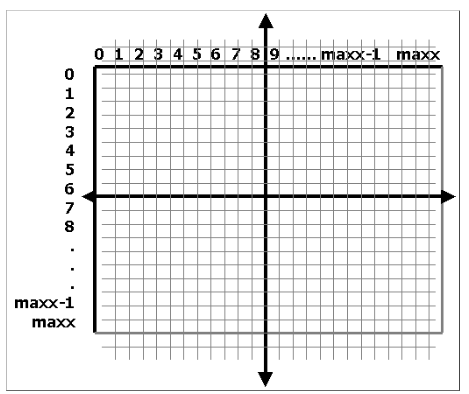
The display screen or view (View port) is the setting range of the display of OpenGL. This doesn’t have to be the same as the display’s resolution. For example, the display has a resolution of 1368×768 pixels, which means that the displayable dot values are (0,0) through (1367,767). If you want OpenGL to have a view with coordinates in the range (100,100) to (199, 199), then the position (200,200) will not be rendered because it is outside the specified view.
The set of commands for defining the OpenGL viewport are:

where
- x is the leftmost column value of the display. (usually set to 0)
- y is the top row value of the display. (usually set to 0)
- width is the width of the display.
- height is the height of the display.
So if you want to define the viewport as a range (100,100)-(299,299), the resulting command is

In addition to defining the viewport Programmers must define the nature of the active space, namely 2D and 3D spaces, which affect the shape displayed differently.
Rendering with 2D spaces
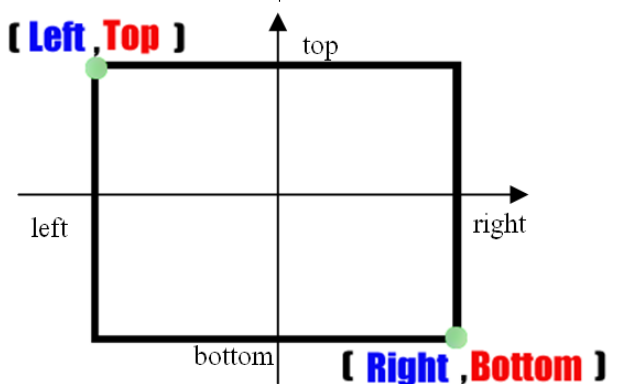
The rendering of a 2D space is based on the point position of the shape or an object using the position of the object on the X-axis and the Y-axis, which defines a range of values to the left (left or a minimum of the x-axis), right (right or the maximum of the x-axis), bottom (bottom or the minimum of the y-axis) and the top (top or the maximum of the y-axis) as shown in Figure 4. And the instruction set in OpenGL must use the following format:

If you want the left-hand value to be -10, the right-hand value to be 10, the bottom value to be -10, and the top value to be 10, you must execute the following command:
gluOrtho2D(-10, 10, -10, 10)
If you want the left-hand value to be 0, the right-hand value to be 100, the lower value to be 0, and the upper value to be 100, you must execute the following command:
gluOrtho2D(0,100,0,100)
The difference between the command gluOrthor2D and glViewport is shown in Figure 5 and in order to render, it must be converted from a 2D space into a viewport as shown in Figure 6.
Rendering with 3D spaces
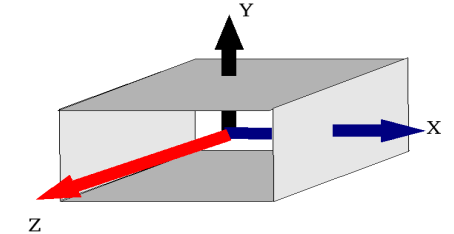
A 3D space references the coordinates of a point of a shape or object by using the position in the X-axis, Y-axis and Z-axis as reference values, as shown in Figure 7. Therefore, when bringing the data in a 3D space to be displayed in a 2D display, the coordinates of the points must be converted and select the point that is at the very front (In the OpenGL, called z-test) to use as the value of the visible pigment. which the conversion method is as shown in Figure 8.
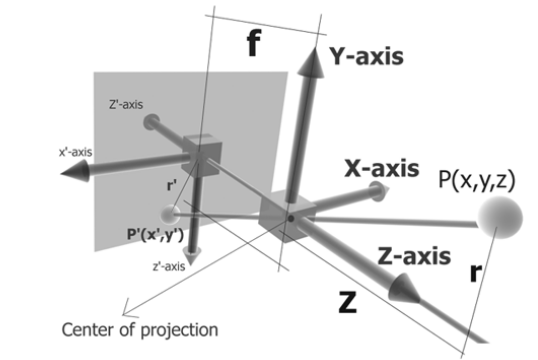
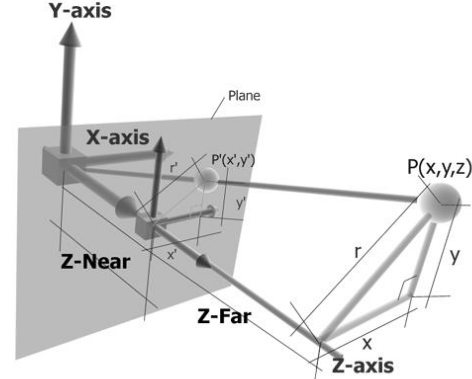
From Figure 8, point P(x,y,z) is a point in a 3D space, when converted from a 3D space to a 2D space or a projection to a point P'(x. , y) with the center point (0,0,0), where f is the distance between the bracket (display) and the midpoint. The calculation method according to Figure 8 is complicated, therefore we changed the orientation of the bracket to stay in the Z-axis as shown in Figure 9.
The ratio of a right triangle formed by the point P(x,y,z) acting on the Z-axis and from the point P'(x’, y’) with the Z-axis is the ratio of equal right triangles. and set the Z value from Figure 8 to be z-Far as in Figure 9 and the f-value from Figure 8 to be the z-Near value in Figure 9.
The command set for determining the 3D space is the same principle as the view from the camera, which is to set the angle of view (FOV: Field of View), the ratio of the screen, the closest and the farthest distance as the following command.

where
fovy is the angle of view of the Y-axis, where the fovy value is related to the f-value as follows:

aspect is the aspect ratio of the scene. (width to height)
zNear is the nearest Z-axis distance. (must be positive)
zFar is the furthest Z-axis distance (must be positive).
Drawing shapes
Drawing object shapes with OpenGL works as follows:
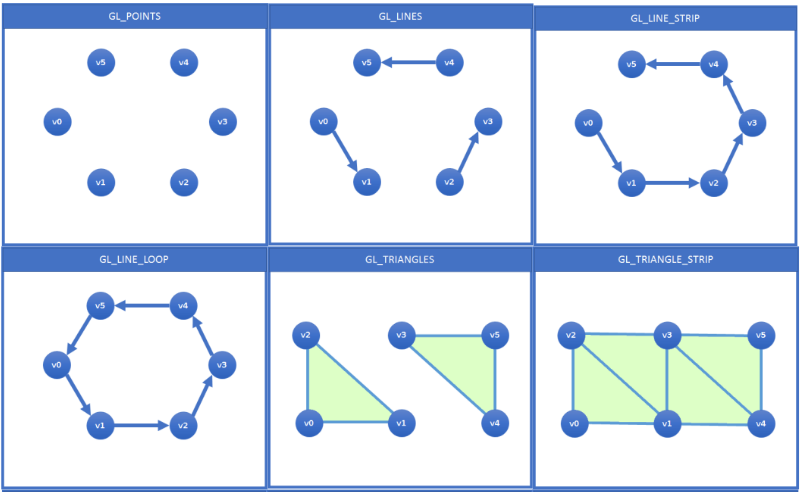
1. Choose a method of drawing to create a shape as shown in Figure 10.
2. Set the coordinates of the vertex according to the nature of the drawing.
The set of instructions for drawing shapes is as follows.
glBegin( drawing_method )
vertex_list glEnd()
Where drawing method is the name of the drawing constant which value is any of the following.
- GL_POINTS
- GL_LINES
- GL_LINE_STRIP
- GL_LINE_LOOP
- GL_TRIANGLES
- GL_TRIANGLE_STRIP
- GL_TRIANGLE_FAN

The set of instructions for configuring Vertex is as follows.
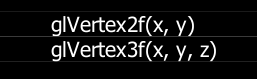
where
- x x is the vertex coordinate in the X-axis.
- y is the vertex coordinate in the Y-axis.
- z is the vertex coordinate in the Z-axis.
If you want to draw a triangle as shown in Figure 11, you can write the code as follows:

If you want to draw a square that requires drawing two interlaced triangles as shown in Figure 4.3 can be coded as follows
คำสั่งที่ทำหน้าที่สั่งให้ไดรเวอร์ดำเนินการส่งข้อมูลไปยังการ์ดแสดงผลเพื่อป้องการตกค้างของคำสั่งในบัฟเฟอร์ของไดรเวอร์เป็นดังนี้
glFlush( )The command that instructs the driver to send data to the graphic card to prevent the remainder of the command in the driver buffer is as follows.
glPointSize( size_of_point )
The command to set the width of the line has the following format:
glLineWidth ( size_of_width)
In addition to drawing a straight line as a continuous line, programmers can draw straight lines with patterns as needed by activating the function GL_LINE_STIPPLE (and turn off when not is use) and set the pattern style from the following command
glLineStipple( factor, pattern )
where
- pattern is a 32-bit numeric value that represents the pattern of the drawn pattern where bit 1 is colored (on) and bit 0 is blank (off).
- factor is a multiple of each bit, e.g. if the factor is set to 2, when bit 0 is found in the pattern value, the OpenGL is plotted as 2 blank points; if set to 4, it means plotted 4 blanks.
To enable and disable the pattern guides are:
glEnable( GL_LINE_STIPPLE )
glDisable( GL_LINE_STIPPLE )
Color designation
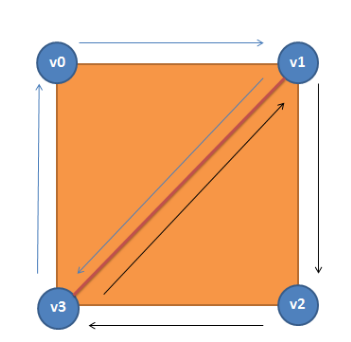
The colors used in the OpenGL are vectors of red, green, and blue, referenced by (R, G, B), and each has a decimal number from 0 to 1 to indicate the intensity of each color up to 16 million colors can be produced when blending. OpenGL color identification uses two chroma numeral principles: specified as an integer value that ranges from 0 to 255. and specify it as a decimal value from 0.0 to 1.0 as shown in Figure 13.
The set of instructions specifying color values in an integer openGL is as follows.
    glColor3b(r, g, b)
    glColor4b(r, g, b, a)
where
r is the intensity of red, ranging from d0 to 255
.g is the green intensity value, ranging from 0 to 255.
b is the blue intensity value, ranging from 0 to 255.
a is the Abfa color intensity, ranging from 0 to 255.
The set of commands specifying a decimal color value is as follows.
    glColor3f(r, g, b)
    glColor4f(r, g, b, a)
where
r is the intensity of red, ranging from 0.0f to 1.0f.
g is the green intensity value, ranging from 0.0f to 1.0f.
b is the blue intensity value, ranging from 0.0f to 1.0f.
a is the alpha color intensity, ranging from 0.0f to 1.0f.
The polygon’s color can be set by assigning a color value before entering the drawing glBegin/glEnd. For example, if you want to draw three green squares, you can write code like this:
glColor3f( 0.0f, 1.0f, 0.0)
glBegin(GL_TRIANGLES)
glVertex2f(… , … )
glVertex2f(… , … )
glVertex2f(… , … )
glVertex2f(… , … )
glVertex2f(… , … )
glVertex2f(… , … )
glEnd()
The color configuration of each vertex can be coded as follows.
glBegin(GL_TRIANGLES)
glColor3f( …, …, …)
glVertex2f(… , … )
glColor3f( …, …, …)
glVertex2f(… , … )
glColor3f( …, …, …)
glVertex2f(… , … )
glEnd()
If you want to change the background color of the display, you must use the command to clear the screen with the desired color as the following format
glClearColor( r, g, b, a )In addition to having to set the background color, programmers need to instruct OpenGL to clear the display buffer on the graphics card. The aforementioned command have the following usage patterns:
glClear( buffe_rcleanup_flag )where the buffer cleanup flag is the bit name that is used to represent the type of buffer to be cleared:
- GL_COLOR_BUFFER_BIT to clear the color buffer GL_DEPTH_BUFFER_BIT for clearing the depth buffer.
- GL_ACCUM_BUFFER_BIT for clearing the Accumulation buffer.
- GL_STENCIL_BUFFER_BIT for clearing the stencil buffer.
Therefore, to clear the buffer of color and depth, you must ordered as follows:
glClear( GL_COLOR_BUFFER_BIT | GL_DEPTH_BUFFER_BIT )or write it in 2 separate commands as follows:
glClear( GL_COLOR_BUFFER_BIT )
glClear( GL_DEPTH_BUFFER_BIT )
The default value of the depth in the depth buffer is set using the following command:
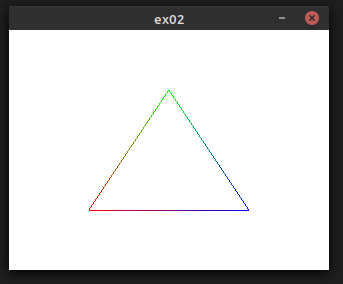
glClearDepth( depth )Example program ex02.py draws 3 lines, each with a color value based on the starting and ending vertices, resulting in the output as shown in Figure 14.
# -*- coding: UTF-8 -*-
import pygame
from pygame.locals import *
from OpenGL.GL import *
from OpenGL.GLU import *
def render():
    glBegin(GL_LINES)
    # Line No.1
    glColor3f(1.0,0.0,0.0)
    glVertex2f(-0.5, -0.5)
    glColor3f(0.0,1.0,0.0)
    glVertex2f( 0.0,  0.5)
    # Line No.2
    glColor3f(0.0,1.0,0.0)
    glVertex2f( 0.0,  0.5)
    glColor3f(0.0,0.0,1.0)
    glVertex2f( 0.5, -0.5)
    # Line No.3
    glColor3f(0.0,0.0,1.0)
    glVertex2f( 0.5, -0.5)
    glColor3f(1.0,0.0,0.0)
    glVertex2f(-0.5, -0.5)
    glEnd()

if __name__=="__main__":
    pygame.init()
    fpsClock = pygame.time.Clock()
    pygame.display.set_mode((320,240), pygame.DOUBLEBUF|pygame.OPENGL)
    pygame.display.set_caption("ex02")
    glViewport(0,0,320,240)
    gluOrtho2D(-1.0,1.0,1.0,-1.0)
    running = True
    while running:
        fpsClock.tick(30)
        glClearColor(1.0, 1.0, 1.0, 1.0)
        glClear(GL_COLOR_BUFFER_BIT)
        glMatrixMode(GL_MODELVIEW)
        glLoadIdentity()
        render()
        for event in pygame.event.get():
            if event.type == pygame.QUIT:
                running = False
        pygame.display.flip()
    pygame.quit()
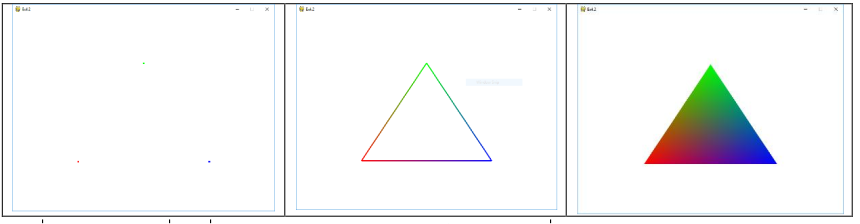
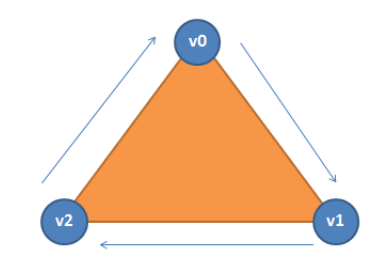
Example program ex03.py draws a triangle by drawing with GL_TRIANGLES, which allows only 3 sets of vertex data to be defined, so it uses less video card memory and transfers vertex data from the computer to the graphics card faster than drawing with straight lines in the program code ex02.py. In addition, when the user presses the number 1 keypad, the program displays only the vertex of the triangle, press the keypad number 2, the program will show the line of the triangle. And when press keypad number 3, the program will display a triangle filled with color in the triangle as shown in the left, middle and right in Figure 1.
# -*- coding: UTF-8 -*-
import pygame
from pygame.locals import *
from OpenGL.GL import *
from OpenGL.GLU import *
def draw_tri():
    glBegin(GL_TRIANGLES)
    glColor3f(1.0,0.0,0.0)
    glVertex2f(-0.5, -0.5)
    glColor3f(0.0,1.0,0.0)
    glVertex2f( 0.0,  0.5)
    glColor3f(0.0,0.0,1.0)
    glVertex2f( 0.5, -0.5)
    glEnd()
pygame.init()
fpsClock = pygame.time.Clock()
pygame.display.set_mode((800,600), pygame.DOUBLEBUF|pygame.OPENGL)
pygame.display.set_caption("Ex03")
glViewport(0,0,800,600)
gluOrtho2D(-1.0,1.0,1.0,-1.0)
running = True
glLineWidth(4)
glPolygonMode(GL_FRONT_AND_BACK, GL_LINE)
while running:
    fpsClock.tick(30)
    glClearColor(1.0, 1.0, 1.0, 1.0)
    glClear(GL_COLOR_BUFFER_BIT)
    glMatrixMode(GL_MODELVIEW)
    glLoadIdentity()
    draw_tri()
    for event in pygame.event.get():
        if event.type == pygame.QUIT:
            running = False
        if event.type == pygame.KEYDOWN:
            if event.key == pygame.K_1:
                glPointSize(5)
                glPolygonMode(GL_FRONT_AND_BACK, GL_POINT)
            if event.key == pygame.K_2:
                glLineWidth(4)
                glPolygonMode(GL_FRONT_AND_BACK, GL_LINE)
            if event.key == pygame.K_3:
                glPolygonMode(GL_FRONT_AND_BACK, GL_FILL)
    pygame.display.flip()
pygame.quit()
In the ex03.py, there are three commands to define polygon vertex drawing mode (GL_POINT), polygon vertex-only drawing mode (GL_POINT), polygon vertex-only drawing mode ( GL_LINE) and polygon fill-in-polygon drawing mode (GL_FILL). The format of the command for specifying the draw mode is as follows.
glPolygonMode( side_of_polygon, mode )
There are 3 values on the side of the polygon that need to set the mode of drawing: affect only the front of the polygon (GL_FRONT), affect only the back of the polygon (GL_BACK), and having it affects both the front and back of the polygon.
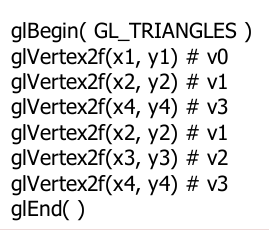
Example code ex04.py draws a square using two triangles by separating Vertex’s data into a variable instead of configuring it in glVertex2f(), which is easy to configure the data and don’t need to modify the subprogram for drawing polygons. The result of the program is as shown in Figure 15.
# -*- coding: UTF-8 -*-
import pygame
from pygame.locals import *
from OpenGL.GL import *
from OpenGL.GLU import *
vertices = ((-0.5, 0.5),
            (0.5,0.5),
            (0.5,-0.5),
            (-0.5,-0.5))
colors = ((1.0,0.0,0.0),
          (0.0,1.0,0.0),
          (0.0,0.0,1.0),
          (1.0,1.0,1.0))
rect = ((0,1,2),(2,3,0))
def draw(obj):
    glBegin(GL_TRIANGLES)
    for edge in obj:
        for v in edge:
            glColor3fv(colors[v])
            glVertex2fv(vertices[v])
    glEnd()
pygame.init()
fpsClock = pygame.time.Clock()
pygame.display.set_mode((800,600), pygame.DOUBLEBUF|pygame.OPENGL)
pygame.display.set_caption("Ex04")
glViewport(0,0,800,600)
gluOrtho2D(-1.0,1.0,1.0,-1.0)
running = True
while running:
    fpsClock.tick(30)
    glClearColor(1.0, 1.0, 1.0, 1.0)
    glClear(GL_COLOR_BUFFER_BIT)
    glMatrixMode(GL_MODELVIEW)
    glLoadIdentity()
    draw(rect)
    for event in pygame.event.get():
        if event.type == pygame.QUIT:
            running = False
    pygame.display.flip()
pygame.quit()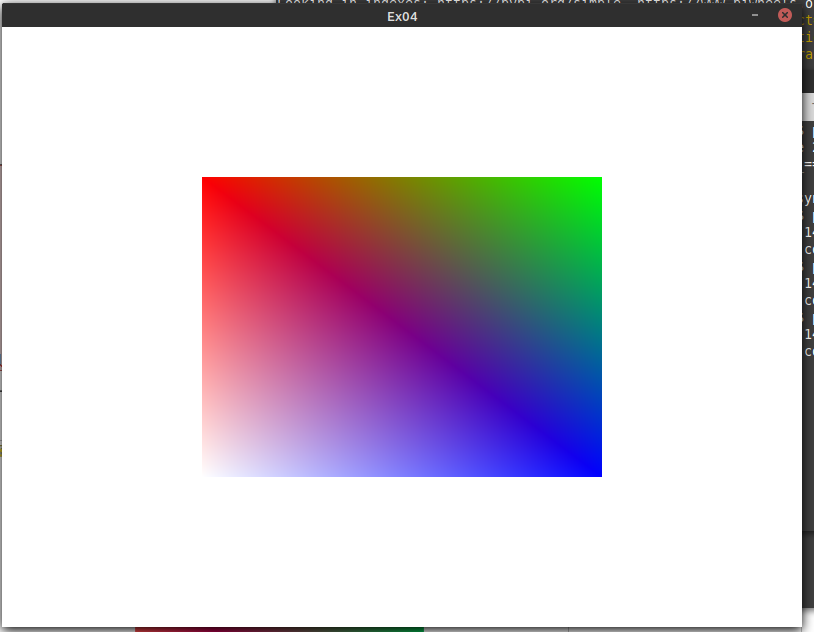
In addition, OpenGL has commands for programmers to choose to calculate specific side values to be displayed, for example, to calculate only the front of the surface, which will increase the speed of work. But when the back of the surface is facing the user’s view, it is not taken into account, resulting in not being able to see the back of the surface. The format of the command is as follows.
glCullFace( mode )
Where mode has 3 values:
- GL_FRONT,
- GL_BACK
- GL_FRONT_AND_BACK
The command to enable or disable the glCullFace( ) command has the following format:
glEnable( GL_CULL_FACE )
glDisable( GL_CULL_FACE )
The command to determine which side is the front is done by specifying the vertex’s position reference sequence as clockwise (GL_CW) or counterclockwise (GL_CCW) to the command in the following format where the value is usually GL_CCW.
glFrontFace( vertex_reference )
Example code ex05.py draws a square box in a 3D space by setting the box to rotate 1-degree increments on the x, y and z axes, as shown in Figure 16.
# -*- coding: UTF-8 -*-
import pygame
from pygame.locals import *
from OpenGL.GL import *
from OpenGL.GLU import *
vertices = ((-1,  1, -1),
            ( 1,  1, -1),
            ( 1, -1, -1),
            (-1, -1, -1),
            (-1,  1,  1),
            ( 1,  1,  1),
            ( 1, -1,  1),
            (-1, -1,  1))
colors = (  (1.0,0.0,0.0),
            (0.0,1.0,0.0),
            (0.0,0.0,1.0),
            (1.0,1.0,1.0),
            (1.0,0.0,0.0),
            (0.0,1.0,0.0),
            (0.0,0.0,1.0),
            (1.0,1.0,1.0))
cube = (    (0,1,2), #front
            (2,3,0),
            (1,0,4), # top
            (4,5,1),
            (3,2,6), # bottom
            (6,7,3),
            (4,0,3), # Left
            (3,7,4),
            (1,5,6), # right
            (6,2,1),
            (5,4,7), # back
            (7,6,5))
def draw3D(obj):
    glBegin(GL_TRIANGLES)
    for edge in obj:
        for v in edge:
            glColor3fv(colors[v])
            glVertex3fv(vertices[v])
    glEnd()
pygame.init()
fpsClock = pygame.time.Clock()
ratio = 8.0/6.0
pygame.display.set_mode((800,600), pygame.DOUBLEBUF|pygame.OPENGL)
pygame.display.set_caption("Ex4.4")
glViewport(0,0,800,600)
running = True
gluPerspective(30.0, ratio, 0.1, 50.0)
glTranslatef(0.0, 0.0, -10.0)
glClearColor(0.0, 0.0, 0.0, 1.0)
glEnable(GL_DEPTH_TEST)
while running:
    fpsClock.tick(30)
    glClear(GL_COLOR_BUFFER_BIT|GL_DEPTH_BUFFER_BIT)
    glRotatef( 1, 1, 1, 1)
    draw3D(cube)
    for event in pygame.event.get():
        if event.type == pygame.QUIT:
            running = False
    pygame.display.flip()
pygame.quit()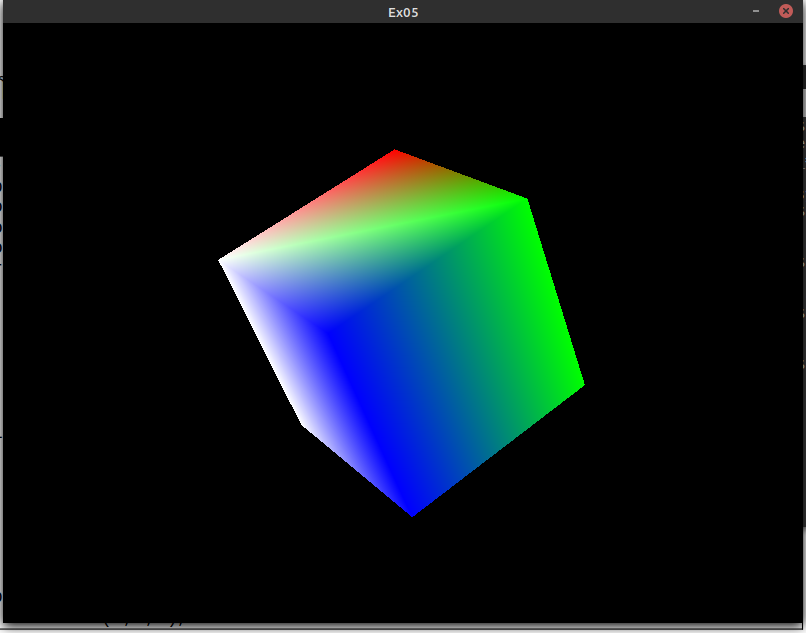
Message display
There are two popular methods of displaying text with OpenGL: draw by creating text textures, and draw with bitmap images. In this chapter we use the second method, which has the following working principles:
- Create a font variable.
- Text rendering for in-memory textures.
- Convert texture memory to RGBA byte-sorted buffer data.
- Set where to display the message.
- Draw the buffer pixels obtained in step 3.
The command for converting texture data to a byte-ordered buffer in RGBA is as follows:
buffer=pygame.image.tostring(texture, “RGBA”, True )
OpenGL’s text locator command has the following format:
glRasterPos2d(*(x, y))
Command to bring a buffer converted to RGBA format to display on the display at a given position from the command. glRasterPos2d( ) has the following format:
glDrawPixels( width, height, GL_RGBA, GL_UNSIGNED_BYTE, buffer )
Example code 6 is an example showing the words “Hello, World!!! ” with a yellow 20px Tahoma font at the position (-0.5, 0.0) by the 5 steps mentioned earlier are in a function called draw_text( ).
# -*- coding: UTF-8 -*-
import pygame
from pygame.locals import *
from OpenGL.GL import *
from OpenGL.GLU import *
def draw_text(pos,text,color=(255,255,255,255),
              font_name="Tahoma",size=20):
    font = pygame.font.SysFont (font_name, size)
    text_face = font.render(text, True, color,(0,0,0,255))
    text_buffer = pygame.image.tostring(text_face, "RGBA", True)
    glRasterPos2d(*pos)
    glDrawPixels(text_face.get_width(), text_face.get_height(),
                 GL_RGBA, GL_UNSIGNED_BYTE, text_buffer)
pygame.init()
fpsClock = pygame.time.Clock()
pygame.display.set_mode((800,600), pygame.DOUBLEBUF|pygame.OPENGL)
pygame.display.set_caption("Ex06)
glViewport(0,0,800,600)
glMatrixMode(GL_PROJECTION)
glLoadIdentity()
gluOrtho2D(-1.0,1.0,1.0,-1.0)
running = True
while running:
    fpsClock.tick(30)
    glClearColor(0.0, 0.0, 0.0, 1.0)
    glClear(GL_COLOR_BUFFER_BIT)
    glMatrixMode(GL_MODELVIEW)
    glLoadIdentity()
    draw_text((-0.5, 0.0), "Hello, World!! สวัสดีชาวโลก",(255,255,0,0))
    for event in pygame.event.get():
        if event.type == pygame.QUIT:
            running = False
    pygame.display.flip()
pygame.quit()
Drawing with list
From the previous example, it can be seen that the programmer must send a list of vertex to the graphics card every time each object is drawn. If an object has a large number of vertex or having a large number of objects to be drawn may cause a bottleneck in the transmission of data from the program to the video card. As a result, OpenGL provides a way to draw from the graphics card’s internal memory, with the programmer sending a list of all vertex/normal/color/texture coordinates to the memory card and display results and order drawings when needed.
The storage of the video card’s memory is in the form of a list and cancel this memory reservation after inactivity. So the process of drawing with a list is as follows.
- Request to reserve a memory list from OpenGL.
- Create a new list in the video card memory.
- Set up like a drawing command.
- Order to end the list creation.
The command to reserve a memory list will return a reference number in contact with the video card. And if the request is declined, a negative value will be returned. The format of the command is as follows.
list_ref_number = glGenList( 1 )
The command to end a list creation has the following syntax:
glNewList( list_ref_number, GL_COMPILE )
The command to end a list creation has the following syntax:
glEndList()
To draw an object, use the following draw commands:
glCallList( list_ref_number )
If you want to cancel a list memory from the video card memory, you must use the following command.
glDeleteLists( list_ref_number, 1 )
Example code EX07 is a conversion of the 4.4 sample program to run in a list. It is found that in the execution loop no vertex list is sent to the graphic card, it only tells the graphic card to uses the list that was reserved and created. Makes drawing less time consuming to send data to the graphic card but as a result, starting work takes more time because we need to send a set of instructions to the graphic card.
# -*- coding: UTF-8 -*-
import pygame
import sys
from pygame.locals import *
from OpenGL.GL import *
from OpenGL.GLU import *
vertices = ((-1,  1, -1),
            ( 1,  1, -1),
            ( 1, -1, -1),
            (-1, -1, -1),
            (-1,  1,  1),
            ( 1,  1,  1),
            ( 1, -1,  1),
            (-1, -1,  1))
colors = (  (1.0,0.0,0.0),
            (0.0,1.0,0.0),
            (0.0,0.0,1.0),
            (1.0,1.0,1.0),
            (1.0,0.0,0.0),
            (0.0,1.0,0.0),
            (0.0,0.0,1.0),
            (1.0,1.0,1.0))
cube = (    (0,1,2), #front
            (2,3,0),
            (1,0,4), # top
            (4,5,1),
            (3,2,6), # bottom
            (6,7,3),
            (4,0,3), # Left
            (3,7,4),
            (1,5,6), # right
            (6,2,1),
            (5,4,7), # back
            (7,6,5))
pygame.init()
fpsClock = pygame.time.Clock()
ratio = 8.0/6.0
pygame.display.set_mode((800,600), pygame.DOUBLEBUF|pygame.OPENGL)
pygame.display.set_caption("Ex07")
glViewport(0,0,800,600)
running = True
glMatrixMode( GL_PROJECTION )
glLoadIdentity()
gluPerspective(30.0, ratio, 0.1, 50.0)
glTranslatef(0.0, 0.0, -10.0)
glClearColor(0.0, 0.0, 0.0, 1.0)
cube_id = glGenLists(1)
if cube_id < 0:
    pygame.quit()
    sys.exit()
glNewList( cube_id, GL_COMPILE )
glEnable(GL_DEPTH_TEST)
glBegin(GL_TRIANGLES)
for edge in cube:
    for v in edge:
        glColor3fv(colors[v])
        glVertex3fv(vertices[v])
glEnd()
glEndList()
while running:
    fpsClock.tick(30)
    glClear(GL_COLOR_BUFFER_BIT|GL_DEPTH_BUFFER_BIT)
    glRotatef( 1, 1, 1, 1)
    glCallLists( cube_id )
    for event in pygame.event.get():
        if event.type == pygame.QUIT:
            running = False
    pygame.display.flip()
glDeleteLists( cube_id, 1 )
pygame.quit()
Conclusion
From this article, you will find that Python can be used in a wide range of applications including display 2D and 3D graphics with OpenGL libraries via PyGame and PyOpenGL. In this article, we introduce the basics of programming to open windows, drawing, and interacting with users which is the basis for the next level. And finally, have fun with programming.
If you want to discuss or talk with us, feel free to leave comments below!!
References
(C) 2020-2021, By Jarut Busarathid and Danai Jedsadathitikul
Updated 2021-10-15