This article describes the implementation of the ESP32 microcontroller’s ADC (Analog-to-Digital Converter) and DAC (Digital-to-Analog Convertor) with MicroPython’s Python subclasses ADC and DAC, which fall under the machine class to learn both subclasses along with an example program to use the class as shown in Figure 1 as a basis for further development.
ADC
The ESP32 microcontroller supports ADC voltages in the range of 0 to 1.1VDC and has two ADCs called ADC1 and ADC2. ADC1 consists of the following pins.
- GPIO36 or VP
- GPIO39 or VN
- GPIO32
- GPIO33
- GPIO34
- GPIO35
- GPIO37
- GPIO38
For ADC2 it contains the following pins.
- GPIO4
- GPIO0 Be careful when using it as it is used in special functions of the ESP32.
- GPIO2 Be careful when using it as it is used in special functions of the ESP32.
- GPIO15 Be careful when using it as it is used in special functions of the ESP32.
- GPIO13
- GPIO12
- GPIO14
- GPIO27
- GPIO25
- GPIO26
Micropython’s ADC implementation requires an ADC subclass under the machine class, detailed in Figure 2.

The ADC sector has 12 bits, allowing 0-3.3VDC voltage readings to be digital values 0 to 4095 or 4096 levels by creating an object that references the ADC pin with the following command.
object = machine.ADC( machine.Pin( pin ) )
The command to read the value from the ADC has the following format:
value = object.read( )
If you want to modify the resolution range of the conversion, use the width() command like the following command.
object.width( resolution )
The value for adjusting the resolution is
- WIDTH_9BIT or 0
- WIDTH_10BIT or 1
- WIDTH_11BIT or 2
- WIDTH_12BIT or 3
To change the input voltage or attenuation, modify the value with the atten() method as follows.
object.atten( attenuation )
The value of the attenuation consists of
- ATTN_0DB or 0 to support the voltage up to 800mV
- ATTN_2_5DB or 1 to support approximately 0 to 1.1VDC (1.33x) voltage.
- ATTN_6DB or 2 to support approx. 0 to 2.2VDC (2x) voltage.
- ATTN_11DB or 3 to support approximately 0 to 3.3VDC (3.55x) voltage.
DAC
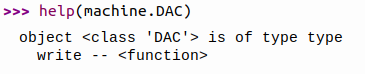
The DAC sector that converts the digital value sent to the ESP32’s voltage or analog value has two 8-bit resolutions, meaning that it can send values from 0 to 255 to convert it to voltage 0 to 3.3. VDC, also known as capable of transmitting 256 levels through DAC1 and DAC2, corresponds to pins GPIO26 and GPIO25. The structure of the DAC class, which is a subclass of the machine, is shown in Figure 3, and the creation of a DAC object is executed as follows.
object = machine.DAC( machine.Pin( pin ))
The command to export digital values to analog values has the following format: where the digital value level is an integer in the range 0 to 255.
object.write( digital_signal )
Example Code
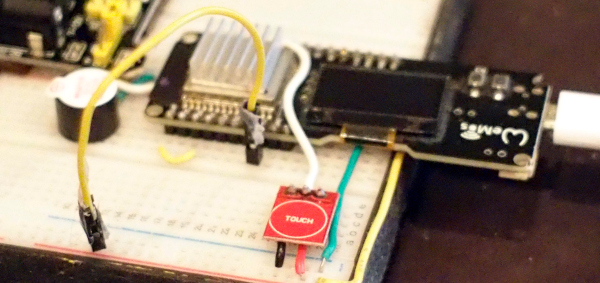
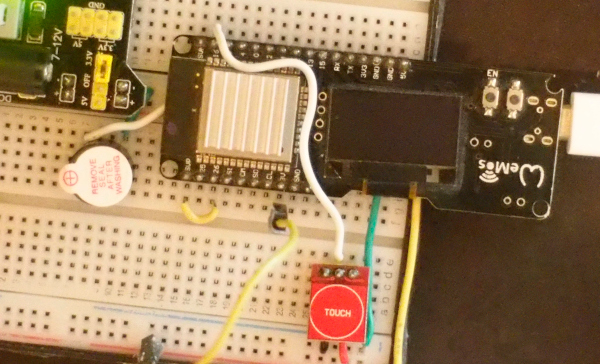
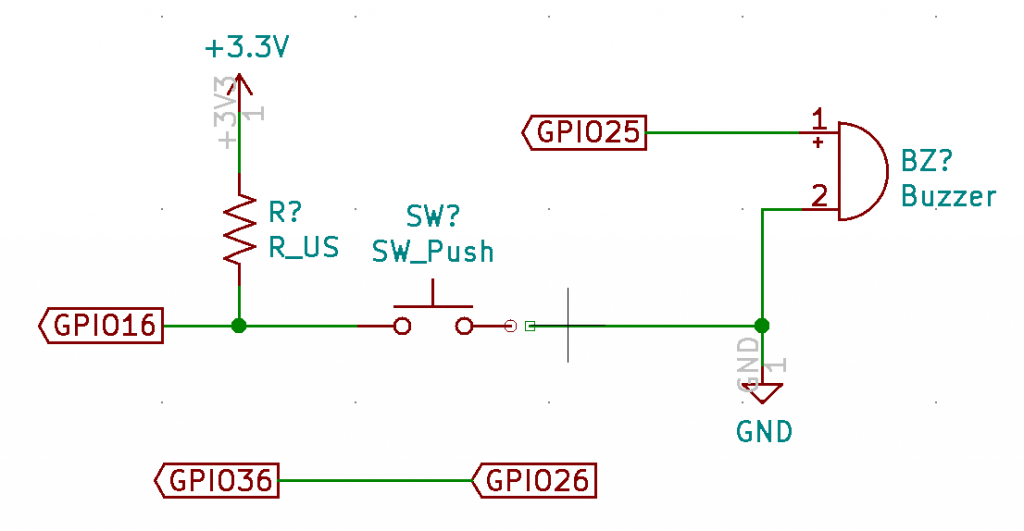
The example program is to send value 200 to DAC1 connected to pin VP of microcontroller, connect pin DAC0 to a speaker, and connect GPIO16 to touch switch as shown in Figure 4 according to the circuit diagram of Figure 5. When the user press switch it will read the value sent to DAC1 via VP and convert it to the value sent to DAC0 making sound out of the speakers. But if the user releases his finger from the switch, it sends a 0 to DAC0 to turn off vocalization.
Code
import time
from machine import ADC, DAC, Pin, TouchPad
adcPin1 = Pin(36) # ต่อกับขา 26 (dacPin2)
dacPin1 = Pin(25) # ต่อกับลำโพง
dacPin2 = Pin(26) # ต่อกับ adcPin1
swPin = Pin(16)

adc1 = ADC( adcPin1 )
adc1.width( ADC.WIDTH_12BIT ) # 12bit
adc1.atten( ADC.ATTN_11DB ) # 3.3V
dac1 = DAC( dacPin1 )
dac2 = DAC( dacPin2 )

# main
while True:
    # wait for TouchPad
    touched = swPin.value()
    if (touched):
        # random DAC
        dac2.write(200)
        # send to ADC
        dValue1 = adc1.read()
        # emit sound
        dac1.write( int(dValue1/4096*256 ) )
        # delay
        #time.sleep_ms(100)
    else:
        # stop emitting sound
        dac1.write( 0 )
A video of the working of the sample program is as follows.
Conclusion
From this article, you will find that the ADC and DAC classes support the operation of the ESP32 microcontroller well and can be used to the full capabilities of the board. However, with a resolution of 8-bit DAC, it may not be enough for audio processing enthusiasts. It requires a higher output resolution, so the reader may need to use an external converter module that works via the I2C or SPI bus to add to the system. Finally, have fun with programming.
References
(C) 2020-2021, By Jarut Busarathid and Danai Jedsadathitikul
Updated 2021-11-03