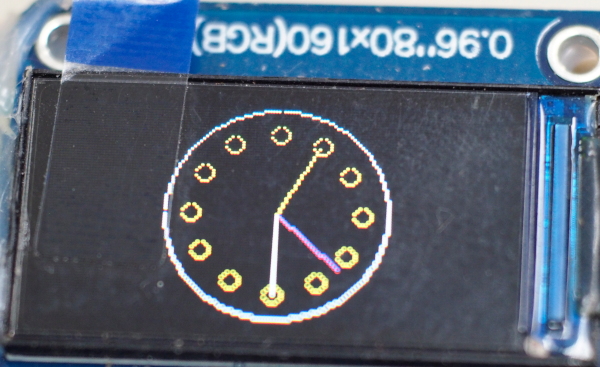
บทความก่อนหน้านี้ได้กล่าวถึงการปรับปรุงปรับปรุงความเร็วในการแสดงผลด้วยการใช้เทคนิคดับเบิลบัฟเฟอร์ (double buffer) จึงนำมาประยุกต์ใช้สำหรับการแสดงผลเป็นนาฬิกาแบบแอนาล็อกดังภาพที่ 1 ซึ่งวิธีการวาดนั้นใช้การคำนวณตรีโกณมิติเพื่อหาค่าพิกัด (x,y) ของปลายเข็มวินาที นาที และชั่วโมง โดยการทำงานของแต่ละวินาทีจะใช้ตัวตั้งเวลาหรือไทเมอร์ (Timer) เพื่อให้การทำงานนั้นใกล้เคียงกับเวลาจริงมากกว่าการวนรอบหรือการหน่วงเวลา
อุปกรณ์
อุปกรณ์การทดลองประกอบด้วย
- บอร์ด esp32
- จอแสดงผล TFT 0.96″
วาดนาฬิกาแอนาล็อก
จอแสดงผล TFT 0.96″ ใช้ไดรเวอร์ ST7735 เป็นตัวขับการทำงาน และในตัวอย่างนี้ใช้บอร์ดที่เป็น REDTAB ที่มีความละเอียด 80×160 จุด ทำให้ต้องสั่งหมุนจอ 90 องศาด้วยการสั่ง rotation(1)
วาดเรือนนาฬิกา
ตัวเรือนนาฬิกาแบ่งการวาดเป็น 2 ส่วน คือ ส่วนของตัวกรอบ และส่วนของเครื่องหมายจุดที่เป็นตัวแทนของตัวเลข 1 ถึง 12 ซึ่งเป็นตัวเลขบนหน้าปัดนาฬิกา
วาดกรอบ
ด้วยไลบรารีที่ใช้งานไม่มีคำสั่งวาดวงกลม จึงได้ใช้ขั้นตอนวิธีการวาดวงกลมแบบจุดกลาง (midpoint circle draw) จากเว็บไซต์ geeksforgeeks ได้เขียนไว้ดังนี้
def midPointCircleDraw(x_centre, y_centre, r):
    x = r
    y = 0

    # Printing the initial point the
    # axes after translation
    print("(", x + x_centre, ", ",
               y + y_centre, ")",
               sep = "", end = "")

    # When radius is zero only a single
    # point be printed
    if (r > 0) :

        print("(", x + x_centre, ", ",
                  -y + y_centre, ")",
                  sep = "", end = "")
        print("(", y + x_centre, ", ",
                   x + y_centre, ")",
                   sep = "", end = "")
        print("(", -y + x_centre, ", ",
                    x + y_centre, ")", sep = "")

    # Initialising the value of P
    P = 1 - r

    while x > y:

        y += 1

        # Mid-point inside or on the perimeter
        if P <= 0:
            P = P + 2 * y + 1

        # Mid-point outside the perimeter
        else:
            x -= 1
            P = P + 2 * y - 2 * x + 1

        # All the perimeter points have
        # already been printed
        if (x < y):
            break

        # Printing the generated point its reflection
        # in the other octants after translation
        print("(", x + x_centre, ", ", y + y_centre,
                            ")", sep = "", end = "")
        print("(", -x + x_centre, ", ", y + y_centre,
                             ")", sep = "", end = "")
        print("(", x + x_centre, ", ", -y + y_centre,
                             ")", sep = "", end = "")
        print("(", -x + x_centre, ", ", -y + y_centre,
                                        ")", sep = "")

        # If the generated point on the line x = y then
        # the perimeter points have already been printed
        if x != y:

            print("(", y + x_centre, ", ", x + y_centre,
                                ")", sep = "", end = "")
            print("(", -y + x_centre, ", ", x + y_centre,
                                 ")", sep = "", end = "")
            print("(", y + x_centre, ", ", -x + y_centre,
                                 ")", sep = "", end = "")
            print("(", -y + x_centre, ", ", -x + y_centre,
                                            ")", sep = "")
จากโค้ดข้างต้นปรับแก้ใหม่ได้ดังนี้
def midPointCircleDraw(x_centre, y_centre, r, c):
    x = r
    y = 0

    # When radius is zero only a single
    # point be printed
    if (r > 0) :
        tft.setPixel(x + x_centre,-y + y_centre, c)
        tft.setPixel(y + x_centre,x + y_centre, c)
        tft.setPixel(-y + x_centre,x + y_centre, c)

    # Initialising the value of P
    P = 1 - r

    while x > y:
        y += 1

        # Mid-point inside or on the perimeter
        if P <= 0:
            P = P + 2 * y + 1

        # Mid-point outside the perimeter
        else:
            x -= 1
            P = P + 2 * y - 2 * x + 1

        # All the perimeter points have
        # already been printed
        if (x < y):
            break

        # Printing the generated point its reflection
        # in the other octants after translation
        tft.setPixel(x + x_centre,y + y_centre, c)
        tft.setPixel(-x + x_centre, y + y_centre, c)
        tft.setPixel( x + x_centre,-y + y_centre, c)
        tft.setPixel( -x + x_centre,-y + y_centre, c)

        # If the generated point on the line x = y then
        # the perimeter points have already been printed
        if x != y:
            tft.setPixel(y + x_centre, x + y_centre, c)
            tft.setPixel(-y + x_centre, x + y_centre, c)
            tft.setPixel(y + x_centre, -x + y_centre, c)
            tft.setPixel(-y + x_centre, -x + y_centre, c)
เมื่อปรับการแสดงผลด้วย pint เป็นคำสั่ง setPixel() และสั่งวาด midPointCircleDraw(80, 40, 39, tft.color(232,232,232)) ได้ผลลัพธ์ดังภาพที่ 2

วาดหมุด
การวาดหมุดชั่วโมงใช้การวาดวงกลมที่ตำแหน่ง 12 นาฬิกาเป็นวงกลมตำแหน่งเริ่มต้นดังภาพที่ 3 ซึ่งเขียนดังนี้
n12x = 80
n12y = 10
midPointCircleDraw(n12x, n12y, 3, tft.color(232, 232, 64))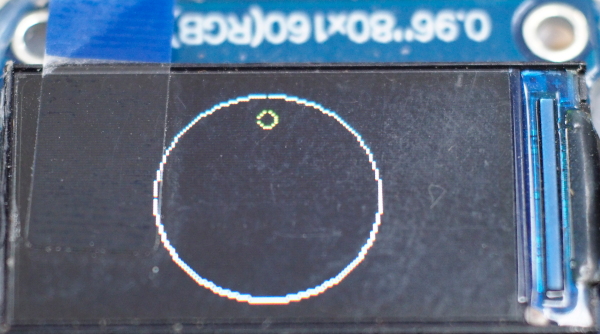
ส่วนตำแหน่งอื่น ๆ ใช้หลักการหมุนวงกลมไปตามองศาของการวางหมุดชั่วโมง นั่นหมายความว่า วงกลมมีองศาเป็น 360 องศา ต้องวาดหมุนจำนวน 12 จุด ดังนั้นแต่ละหมุดจะต้องหมุนองศาเป็นดังนี้
- องศา = 360/12
= 30
นั่นหมายความว่าจะต้องหมุน 30 องศา แล้ววาด 1 หมุด ทำทั้งหมด 12 ครั้ง
การตำนวณค่า (x,y) ใหม่สามารถใช้สมการคำนวณดังที่เคยกล่าวถึงในเรื่องของการหมุนสี่เหลี่ยมดังนี้
screenCenterX = 80
screenCenterY = 40

def rotate(pX,pY,angle):
    rad = math.radians(angle)
    pX -= screenCenterX
    pY -= screenCenterY
    xCos = pX*math.cos(rad)
    ySin = pY*math.sin(rad)
    xSin = pX*math.sin(rad)
    yCos = pY*math.cos(rad)
    newX = xCos - ySin + screenCenterX
    newY = xSin + yCos + screenCenterY
    return (int(newX), int(newY))
เมื่อสั่งวาดด้วยคำสั่งต่อไปนี้จะได้ผลลัพธ์ดังภาพที่ 4
n12x = 80
n12y = 10
for i in range(12):
    newX,newY = rotate( n12x, n12y, 30*i)
    midPointCircleDraw( newX, newY, 3, tft.color(232, 232, 64))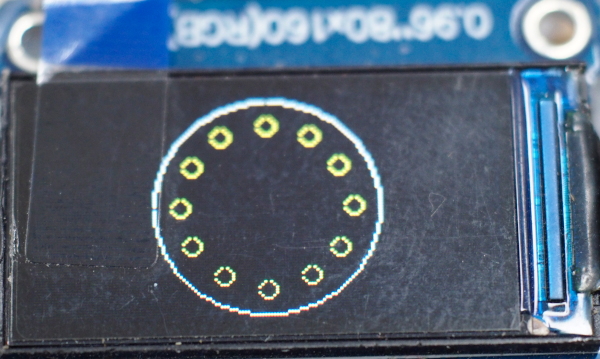
วาดเข็มวินาที
การวาดเข็มวินาทีใช้หลักการเดียวกับการคำนวณตำแหน่งของหมุดของตัวเลขชั่วโมง แต่ด้วย 1 ชั่วโมงมี 60 วินาที หมายความว่าจะต้องมีตำแหน่งของวินาที 60 ตำแหน่งใน 360 องศา ดังนั้น แต่ละตำแหน่งห่างกันตามสมการต่อไปนี้
- องศา = 360 / 60
= 6
ดังนั้น เมื่อรวมการวาดเส้นตรงจากตำแหน่งกึ่งกลางของจอ และปลายเข็มอยู่ที่วินาทีที่ sec สามารถเขียนโค้ดได้ดังนี้
def drawSecond( sec ):
    deg = sec * 6
    n12x = 80
    n12y = 10
    newX,newY = rotate( n12x, n12y, deg)
    print(i, deg, newX, newY)
    tft.line((screenCenterX, screenCenterY), (newX, newY), tft.color(232, 64, 232))
เมื่อเขียนโค้ดให้แสดงเข็มวินาทีดังต่อไปนี้จะได้ตัวอย่างผลลัพธ์ดังภาพที่ 5
for i in range(60):
    tft.fill(tft.BLACK)
    drawClock()
    drawSecond(i)
    tft.swap()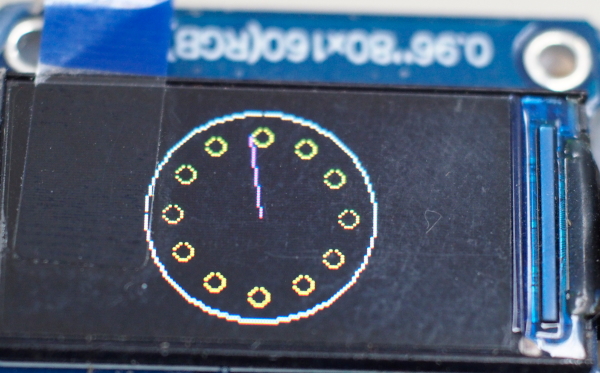
วาดเข็มนาที
เข็มนาทีใช้การคำนวณเหมือนวินาที แต่ขยับทุกครั้งที่เข็มวินาทีวนครบ 1 รอบ ดังนั้น การวาดเข็มนาทีเขียนได้ดังนี้
def drawMinute( minute ):
    deg = minute * 6
    n12x = 80
    n12y = 10
    newX,newY = rotate( n12x, n12y, deg)
    tft.line((screenCenterX, screenCenterY), (newX, newY), tft.color(232, 242, 232))
การกำหนดความสัมพันธ์ระหว่างค่าวินาทีกับนาทีเขียนดังนี้
minute = 10
for nLoop in range(300):
    for sec in range(60):
        tft.fill(tft.BLACK)
        drawClock()
        drawSecond(sec)
        drawMinute(minute)
        tft.swap()
    minute += 1
วาดเข็มชั่วโมง
เข็มชั่วโมงคำนวณตำแหน่งเหมือนการวาดหมุด และมีความสัพธ์กับค่านาที คือ เมื่อนาทีครบ 1 รอบจะเพิ่มค่าชั่วโมงขึ้น 1 และถ้าค่าชั่วโมงมากกว่า12 ให้กลับไป 1 และตัวอย่างผลลัพธ์เป็นดังภาพที่ 1
ตัวอย่างโปรแกรม
ตัวอย่างโปรแกรมทำการแสดงนาฬิกาโดยเริ่มตั้งเวลาไว้ที่ 1:30.00 และใช้การเพิ่มค่าวินาทีจากการใช้การตั้งเวลา 1 วินาที (อ่านบทความ) จึงได้โค้ดผลลัพธ์เป็นดังนี้ และตัวอย่างของการแสดงผลเป็นดังภาพที่ 1
from ST7735 import TFT
import machine as mc
from machine import SPI,Pin, Timer
import time
import math

#################################################################
###### setting ##################################################
#################################################################
mc.freq(240000000)
spi = SPI(2, baudrate=26000000,
          sck=Pin(14), mosi=Pin(12),
          polarity=0, phase=0)
# dc, rst, cs
tft=TFT(spi,15,13,2)
screenCenterX = 80
screenCenterY = 40
second = 0
minute = 30
hour = 1

#################################################################
###### sub modules ##############################################
#################################################################
def midPointCircleDraw(x_centre, y_centre, r, c):
    x = r
    y = 0

    tft.setPixel(x + x_centre,y + y_centre, c)

    # When radius is zero only a single
    # point be printed
    if (r > 0) :
        tft.setPixel(x + x_centre,-y + y_centre, c)
        tft.setPixel(y + x_centre,x + y_centre, c)
        tft.setPixel(-y + x_centre,x + y_centre, c)

    # Initialising the value of P
    P = 1 - r

    while x > y:
        y += 1

        # Mid-point inside or on the perimeter
        if P <= 0:
            P = P + 2 * y + 1

        # Mid-point outside the perimeter
        else:
            x -= 1
            P = P + 2 * y - 2 * x + 1

        # All the perimeter points have
        # already been printed
        if (x < y):
            break

        # Printing the generated point its reflection
        # in the other octants after translation
        tft.setPixel(x + x_centre,y + y_centre, c)
        tft.setPixel(-x + x_centre, y + y_centre, c)
        tft.setPixel( x + x_centre,-y + y_centre, c)
        tft.setPixel( -x + x_centre,-y + y_centre, c)

        # If the generated point on the line x = y then
        # the perimeter points have already been printed
        if x != y:
            tft.setPixel(y + x_centre, x + y_centre, c)
            tft.setPixel(-y + x_centre, x + y_centre, c)
            tft.setPixel(y + x_centre, -x + y_centre, c)
            tft.setPixel(-y + x_centre, -x + y_centre, c)

def rotate(pX,pY,angle):
    rad = math.radians(angle)
    pX -= screenCenterX
    pY -= screenCenterY
    xCos = pX*math.cos(rad)
    ySin = pY*math.sin(rad)
    xSin = pX*math.sin(rad)
    yCos = pY*math.cos(rad)
    newX = xCos - ySin + screenCenterX
    newY = xSin + yCos + screenCenterY
    return (int(newX), int(newY))

def drawClock():
    midPointCircleDraw(80, 40, 39, tft.color(232,232,232))
    n12x = 80
    n12y = 10
    for i in range(12):
        newX,newY = rotate( n12x, n12y, 30*i)
        midPointCircleDraw( newX, newY, 3, tft.color(232, 232, 64))

def drawSecond( sec ):
    deg = sec * 6
    n12x = 80
    n12y = 10
    newX,newY = rotate( n12x, n12y, deg)
    tft.line((screenCenterX, screenCenterY), (newX, newY), tft.color(232, 64, 232))

def drawMinute( minute ):
    deg = minute * 6
    n12x = 80
    n12y = 10
    newX,newY = rotate( n12x, n12y, deg)
    tft.line((screenCenterX, screenCenterY), (newX, newY), tft.color(232, 242, 232))

def drawHour( hour ):
    deg = hour * 30
    n12x = 80
    n12y = 12
    newX,newY = rotate( n12x, n12y, deg)
    tft.line((screenCenterX, screenCenterY), (newX, newY), tft.color(232, 242, 64))

def cbSecond(x):
    global second, minute, hour
    second += 1
    if (second == 60):
        second = 0
        minute += 1
        if (minute == 60):
            minute = 0
            hour += 1
            if (hour == 12):
                hour = 0
    tft.fill(tft.BLACK)
    drawClock()
    drawSecond(second)
    drawMinute(minute)
    drawHour(hour)
    tft.swap()

#################################################################
###### main program #############################################
#################################################################
secTmr = Timer(0)
secTmr.init( period=1000, mode=Timer.PERIODIC, callback=cbSecond)
while True:
    pass
สรุป
จากบทความนี้ จะพบว่า การแสดงผลอาศัยการคำนวณเพื่อใช้ในการวาดวงกลม และตำแหน่งต่าง ๆ ของหมุดชั่วโมง เข็มวินาที เข็มนาที และเข็มชั่วโมง พร้อมทั้งได้ใช้งานตัวตั้งเวลาเป็นตัวเพิ่มค่าววินาที ซึ่งมีความสัมพันธ์กับการแสดงค่านาทีและชั่วโมงที่ขึ้นต่อกัน โดยทีมพวกเราหวังว่า ผู้อ่านจะสามารถนำไปปรับปรุงเพื่อใช้งานต่อไป สุดท้ายขอให้สนุกกับการเขียนโปรแกรมครับ
แหล่งอ้างอิง
- geeksforgeeks : mid-point circle drawing algorithm
(C) 2020-2021, โดย อ.ดนัย เจษฎาฐิติกุล/อ.จารุต บุศราทิจ
ปรับปรุงเมื่อ 2021-11-03, 2022-01-03