This article is a compilation of information related to the ESP8266WiFi class, which performs the WiFi functionality of the ESP8266 microcontroller. This class can be accessed via a WiFi object, which is an object created for accessing the chip’s wireless module and must import a header file named ESP8266WiFi.h

The ESP8266 microcontroller supports the IEEE802.11 b/g/n wireless communication system and has a list of current uses as follows:
- 0.9mA in Standby mode
- 135-215mA when seding data
- 60mA when receiving data
- 1mA in power saving mode
- 0.5uA when WiFi is on
Structure of the WiFi class
The subclasses that fall under the ESP8266WiFi class are listed as follows.
- BufferDataSource
- BufferedStreamDataSource
- ClientContext
- DataSource
- ESP8266WiFiAPClass
- ESP8266WiFiClass
- ESP8266WiFiGenericClass
- ESP8266WiFiMulti
- ESP8266WiFiScanClass
- ESP8266WiFiSTAClass
- ProgmemStream
- SList
- SSLContext
- UdpContext
- WiFiAPlist_t
- WiFiClient
- WiFiClientSecure
- WiFiEventHandlerOpaque
- WiFiEventModeChange
- WiFiEventSoftAPModeProbeRequestReceived
- WiFiEventSoftAPStationConnected
- WiFiEventSoftAPStationDisconnected
- WiFiEventStationModeAuthModeChanged
- WiFiEventStationModeConnected
- WiFiEventStationModeDisconnected
- WiFiEventStationModeGetIP
- WiFiServer
- WiFiUDP
Get started
Reading the MAC address (MAC address), which is a value that each device is different. (except fake code) to use as a reference instead of the name of the device. There are 6 sets of hexadecimal structure as follows:
xx:xx:xx:xx:xx:xx
To write a program to read the mac address of the esp8266 chip, use the macAddress() command as follows:
MACaddr = WiFi.macAddress()
An example program for displaying MAC address values is as follows.
#include <ESP8266WiFi.h>

void setup() {
  Serial.begin(115200);
  Serial.print("\n\nMAC Address:  ");
  Serial.println(WiFi.macAddress());
}

void loop() {

}
If you want to read the MAC Address as an array of characters, create 6 variables uint8_t and run the command in the following format.
uint8_t variable[6];
WiFi.macAddress( variable );
If you want to set the MAC Address for the device, you can do it by
When bringing a microcontroller esp8266 to connect to a wireless network, it must rely on connected devices such as AP (Access Point) and clients in the same network or from the Internet network as shown in Figure 1. The chip itself supports work both in the form of being a client within a wireless network and an AP to serve other clients.
Station mode
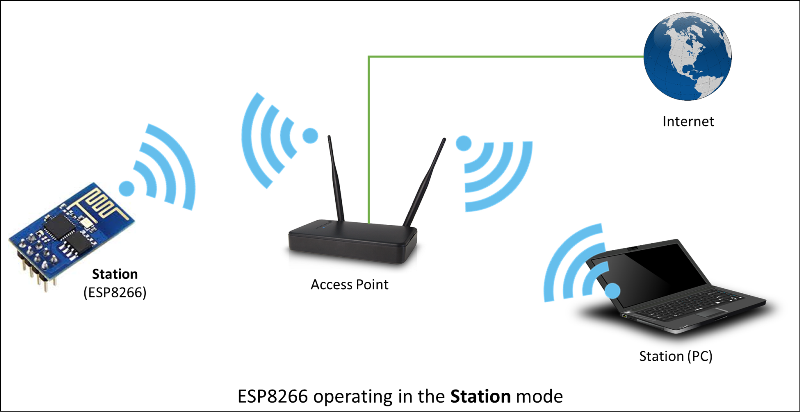
From : https://arduino-esp8266.readthedocs.io/en/latest/_images/esp8266-station.png
Station class
In Figure 1, Station or STA initialization mode is connected to a wireless network with an AP identified by the name of the AP called SSID (Service Set Identifier) and its access key using the begin() command in the following format, where AP_NAME is the name of the AP to connect to and AP_PASSWD is the AP access password.
WiFi.begin( AP_NAME, AP_PASSWD )
Additionally, in some cases, programmers want to connect by specifying a channel, BBSID (MAC Address of the SSID), and directing them to connect immediately or not by using the begin command, but these arguments are set. Therefore, the begin command has the following syntax:
WiFi.begin( AP_NAME, AP_PASSWD, channel, bbsid, conect )To set the working mode to STA, use the mode() command and pass the argument to WIFI_STA as follows:
WiFi.mode( WIFI_STA )
There are all types of WiFi operating modes:
- WIFI_AP for assigning as an Access Point
- WIFI_STA for set mode to work as a client in a network that already has an Access Point.
- WIFI_AP_STA for working in both AP and STA modes
- WIFI_OFF to disable the microcontroller’s WiFi system.
To check the status of a request to access a wireless AP, use the statue() command. This command returns WL_CONNECTED when the connection is successful. The command has the following form of use:
con = WiFi.status()
Status results are:
- 0 or WL_IDLE_STATUS If there is an event to change the operation of the WiFi while reading the status
- 1 or WL_NO_SSID_AVAIL If the name of the given AP is not found
- 3 or WL_CONNECTED If connecting successfully
- 4 or WL_CONNECT_FAILED If unable to connect
- 6 or WL_CONNECT_WRONG_PASSWORD If you set the wrong password
- 7 or WL_DISCONNECTED If the module is not set to STA mode.
Connection Management
Connection management commands include disconnect, reconnect, check connection status, connect automatically, reads the status of the automatic connection, set up automatic reconnection and the command to wait for the connection result. The details of each command are as follows.
Exiting the connection can be done by running the following command. This serves to set AP_NAME and AP_PASSWD values to null.
WiFi.disconnect()
The command to reconnect using the same settings as previously obtained from begin() has the following syntax. And after reconect() , loop wait for connection with status() just like begin() .
WiFi.reconect()
How to check the status of the connection using the command isConnected(), which returns true if the microcontroller is connected to the network, and returns false if it is not connected to the network as the following usage patterns.
status = WiFi.isConnected()
If you want the device to automatically connect to the last AP accessed, you must use the command setAutoConnect with arguments set to true or false to enable or disable the automatic connection as follows:
WiFi.setAutoConnect( auto_connect )
Checking whether the device is configured to connect automatically or not, run the command getAutoConnect() which is a command to read the flag as follows: if true means auto-connect is enabled and false means auto-connect is disabled.
status = WiFi.getAutoConnect()
If you have disconnected by disconnect() and want to reconnect, use reconnect(). If the programmer wants the esp8266 microcontroller to automatically reconnect, it must run this action setup via setAutoReconnect() with the true argument and cancel the automation with the false argument as follows:
WiFi.setAutoReconnect( on_off )
The command to wait until esp8266 is connected to the AP and return the status is waitForConnectResult() .
- 0 or WL_IDLE_STATUS connecting
- 1 or WL_NO_SSID_AVAIL AP not found
- 3 or WL_CONNECTED connected successfully
- 4 or WL_CONNECT_FAILED cannot connect
- 6 or WL_CONNECT_WRONG_PASSWORD wrong password
- 7 or WL_DISCONNECTED module is not in STA mode
- -1 Timeout
Status are
status = WiFi.waitForConnectResult()
Network connection information
In case of successfully accessing the wireless network, the device provides an IP Address to the device to represent the address of the device on a wireless network. The command to read the IP address is
IP = WiFi.localIP()
In addition to using IP Address as a reference in the network, programmers can set a device’s name, also known as hostname (usually accessible by an IP address alias, by setting the name in DNS) with the hostname(). There are 2 forms of usage in the following format: The hostname is usually defined as “ESP-” followed by the last 3 digits of the MAC address. For example, “ESP-123121” means that 12:31:21 is the last 3 digits of the MAC address.
name = WiFi.hostname()
WiFi.hostname( device)
The sub netmask and gateway values can be read with the following command.
subnet = WiFi.subnetMask()
gateway = WiFi.gatewayIP();
Listing data from WiFi to display these values via the serial communication port.
- Mode
- PHY mode
- Channel
- AP id
- Status
- Auto connect
- SSID
- Passphase
- BSSID set
Usage
WiFi.printDiag( Serial )
So, an example program for requesting access to a wireless network service and returning the IP that has been distributed, can be written as follows
#include <ESP8266WiFi.h>

#define AP_NAME "AP"
#define AP_PASSWD "password"

void setup() {
  Serial.begin(115200);
  Serial.println("\n\n");
  WiFi.begin( AP_NAME, AP_PASSWD );
  int countLimit = 200;
  while (WiFi.status() != WL_CONNECTED) {
    delay(250);
    if (countLimit == 0) {
      break;
    }
    countLimit--;
  }
  if (countLimit > 0) {
    Serial.println(WiFi.localIP());
    WiFi.printDiag(Serial);
  }
  WiFi.disconnect();
}

void loop() {
}
The command to read DNS1 and 2, specifying the DNS number 0 or 1. The format of the command is as follows.
return_value = WiFi.dnsIP( DNS )
Reading the SSID name and password (PSK: Pre-shared Key) can be accessed with the following command.
AP = WiFi.SSID()
password = WiFi.psk()
If you want to read the MAC Address of the SSID, also known as the BSSID (Basic Service Set Identifier), you will get a pointer pointing to the location, but the ESP8266 has a command to convert it to a string as well:
BSSID = WiFi.BSSID()
MACAddress = WiFi.BSSIDstr()
Reading the RSSI (Received Signal Strength Indication), which is the strength of a wireless signal, is measured in dBm. It can be used as follows.
signal_strength = WiFi.RSSI()
Some wireless networks require data to be encrypted. Write to read the type of encryption that can be done with the following command. which usually returns ENC_TYPE_NONE
Encryption = WiFi.encryptionType()
The encrypt type values are as follows.
- 2 or ENC_TYPE_TKIP or WPA/SPK
- 4 or ENC_TYPE_CCMP or WPA2/PSK
- 5 or ENC_TYPE_WEP or WEP
- 7 or ENC_TYPE_NONE or Open
- 8 or ENC_TYPE_AUTO or WPA/WPA2/PSK
Configuration
In some cases where the AP disables the DHCP service that distributes IPAddress, DNS1, DNS2, subnetmask, and gateway IP Adress values, programmers can customize these settings with the following config commands:
WiFi.config( IPAddress, gatewayIP, subnetmask, DNS1, DNS2 )
by running config() before begin()
WPS
WPS or WiFi Protected Setup, formerly known as WiFi Simple Config, is a protocol designed for use in wireless home networks, allowing devices to operate without entering the password used with the AP. Currently, the ESP8266 only supports push-button mode (WPS_TYPE_PBC). The setting command is as follows.
setting = WiFi.beginWPSConfig()
Code
#include <ESP8266WiFi.h>

void setup() {
  Serial.begin(115200);
  Serial.println("\n\r---------------------\n\r");
  WiFi.mode(WIFI_STA);
  bool wpsStatus = WiFi.beginWPSConfig();
  if (wpsStatus) {
    Serial.println("WPS success.");
    while (WiFi.status() != WL_CONNECTED) {
      delay(330);
    }
    Serial.print("IP Address : ");
    Serial.println(WiFi.localIP());
  } else {
    Serial.println("WPS failed!!!");
  }
}

void loop() {
}
From the example, we can see that we use beginWPSConfig() instead of begin() to connect to an AP that supports WPS and will find it accessible without a password.
AP scanning
The AP scan must be started with WIFI_STA mode enabled, and then disconnect() is initiated as follows:
WiFi.mode( WIFI_STA );
WiFi.disconnect();
Counting the number of APs that can be scanned is done by running the command scanNetworks() and returns some APs as follows: and called by setting async and hidden to true or false. async specifies the background scan and checks its performance with scanComplete() and hidden allows scanning hidden AP entries.
founded_AP = WiFi.scanNetworks()
founded_AP = WiFi.scanNetworks( async, hidden )
If the async scan is true, the processor does not have to wait for the scan to complete and execute the next command. For this reason, the programmer must check the scan status through the function. scanComplete() in the following format.
result = WiFi.scanComplete()
There are two kinds of results of running the command: if the response is greater than or equal to 0, the number of APs found, and below 0, there is an error, where -1 is scanning and -2 means scanning has not been triggered.
The data of the AP scan is stored in memory (Causes half of the esp8266’s memory loss because it is set aside for WiFi operation) which can be removed with the following command.
WiFi.scanDelete()
Order an Asynchronous scan by specifying a response function so that it doesn’t have to be monitored. scanComplete() can be done manually with 2 steps:
- Create a response function according to this format.
void fn( int networksFound ) {
// do
} - Run the command scanNetworksAsync() in the following format, with hidden true or false to determine whether hidden APs are scanned or not.
WiFi.scanNetworksAsync( fn, hidden )
Checking whether the AP is hidden or not can be checked from isHidden() according to the following usage pattern.
hidden_status = WiFi.isHidden( found_order )
To read the AP’s SSID, BSSID, channel, RRSI, encryptionType, the commands SSID(), channel(), RSSI(), BSSID()/BSSIDstr() and encryptionType() can be used by either entering the AP sequence as an argument or using the keyword or the following commands are stored in the buffer.
WiFi.getNetworkInfo( AP, &ssid, &encryptionType, &RSSI, *&BSSID, &channel, &isHidden)
Scanning the list of accessible APs is written as an example program as follows.
#include <ESP8266WiFi.h>

void showAPs( int networksFound ) {
  Serial.printf("Found %d AP(s)\n", networksFound);
  for (int i = 0; i < networksFound; i++)  {
    Serial.print("AP No.");
    Serial.print(i + 1);
    Serial.print(" : ");
    Serial.print(WiFi.SSID(i));
    if (WiFi.isHidden( i )) {
      Serial.print("*");
    }
    Serial.print(" Ch:");
    Serial.print(WiFi.channel(i));
    Serial.print(" S:");
    Serial.print(WiFi.RSSI(i));
    Serial.print("dBm ENC:");
    switch (WiFi.encryptionType(i)) {
      case ENC_TYPE_TKIP:
        Serial.print("WPA/PSK");
        break;
      case ENC_TYPE_CCMP:
        Serial.print("WPA2/PSK");
        break;
      case ENC_TYPE_WEP:
        Serial.print("WEP");
        break;
      case ENC_TYPE_NONE:
        Serial.print("Open");
        break;
      case ENC_TYPE_AUTO:
        Serial.print("WPA/WPA2/PSK");
        break;
      default:
        Serial.print("Unknown");
    }
    Serial.print(" BSSID:");
    Serial.println(WiFi.BSSIDstr(i));
  }
}

void setup() {
  Serial.begin(115200);
  Serial.println("\n\r\n\r");
  WiFi.mode( WIFI_STA );
  WiFi.disconnect();
  delay(100);
  WiFi.scanNetworksAsync( showAPs, true );
}

void loop() {
}
ESP8266WiFiMulti
In case the developer wants to require the system to connect to another AP when the current AP is not accessible, the ESP8266WiFiMulti class will support this issue. By having the programmer add an AP to the list of APs to be accessed when others can’t. By using it, additional header files must be imported as follows:
#include <ESP8266WiFiMulti.h>
Creating an object of type ESP8266WiFiMulti can create an order as follows:
ESP8266WiFiMulti obj;
Adding an AP entry to an object requires the SSID and PSK of each entry as the addAP() argument:
obj.addAP( SSID, PSK )
The connection method must change from begin() to run() as follows:
con=obj.run()
Code
#include <ESP8266WiFi.h>
#include <ESP8266WiFiMulti.h>

ESP8266WiFiMulti  wifiMulti;

void doConnect() {
  if (wifiMulti.run() != WL_CONNECTED) {
    delay(500);
  }
  else  {
    Serial.printf("SSID : %s\n", WiFi.SSID());

    Serial.print("Hostname :");
    Serial.println(WiFi.hostname());
    Serial.print("\nMAC Address:  ");
    Serial.println(WiFi.macAddress());
    Serial.print("IP Address :");
    Serial.println(WiFi.localIP());
    Serial.print("subnetmask :");
    Serial.println(WiFi.subnetMask());
    Serial.print("Gateway :");
    Serial.println(WiFi.gatewayIP());
    Serial.print("DNS:");
    Serial.print(WiFi.dnsIP(0));
    Serial.print(", ");
    Serial.println(WiFi.dnsIP(1));
    Serial.print("SSID :");
    Serial.print(WiFi.SSID());
    Serial.print(" PSK:");
    Serial.println(WiFi.psk());
    Serial.printf("BBSD: %s\n",WiFi.BSSIDstr().c_str());
    Serial.printf("RSSI: %s dBm\n", WiFi.RSSI());
    Serial.println();
    WiFi.printDiag(Serial);
  }
}

void setup() {
  Serial.begin(115200);
  Serial.println("\n\n");
  wifiMulti.addAP( "SSID1", "PASSWD1" );
  wifiMulti.addAP( "SSID2", "PASSWD2" );
  wifiMulti.addAP( "SSID3", "PASSWD3" );
  wifiMulti.addAP( "SSID4", "PASSWD4" );
  wifiMulti.addAP( "SSID5", "PASSWD5" );
}

void loop() {
  doConnect();
  delay(5000);
}
SoftAP mode
SoftAP mode of operation, as shown in Figure 2, it is found that the ESP8266 acts as an AP to provide services to other stations, which does not focus on accessing the Internet but creates an internal network that works through the Internet protocol. Or create mesh networks for network sensors and support the number of clients that can connect up to 8 nodes, usually 4 by default.
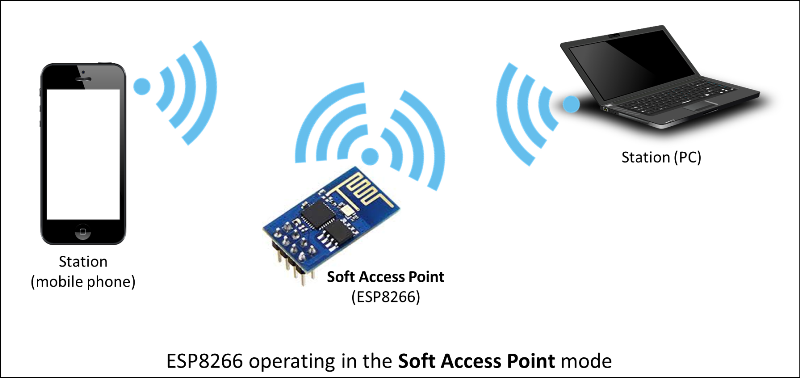
From : https://arduino-esp8266.readthedocs.io/en/latest/_images/esp8266-soft-access-point.png
Managing softAP
Assigning the SSID name to the esp8266 is done by using the softAP() command as follows, returning true or false.
result = WiFi.softAP( name )
Or create it by defining the SSID, PSK, channel, hidden and max_connection details to set a name (up to 32 characters), a password (up to 64 characters, and no less than 8 characters), channel (assignable as numbers 1 through 13, usually using a value of 1), hiding status (if set to true hides the AP), and the maximum number of connected nodes (It is a numeric value 0 through 8) with the softAP() command given the following arguments:
result = WiFi.softAP( SSID, PSK, channel, hidden, max_connection )
Once successfully started as an AP, the ESP8266 assigns itself an IP address of 192.168.4.1, which can be changed with the command softAPConfig().
When the task is done and you want to abort yourself from softAP mode, run the command softAPdisconnect() as follows:
WiFi.softAPdisconnect()
To check the number of clients or nodes connected to a microcontroller set up as a softAP, use the following command:
nodes = WiFi.softAPgetStationNum()
To read the MAC Address, call softAPmacAddress() and create a 6-member uint8_t array variable to store the value of each digit or call a function to return the value:
uint8_t myMACaddr[6];
WiFi.softAPmacAddress( myMACaddr );MAC = WiFi.softAPmacAddress();
IPAddress class
The IPAddress class is a class for handling data structures for IP addresses. For this reason, if an object or variable for an IP address value is created, use this class as a handler.
The command to assign the IP address of the microcontroller in SoftAP mode is executed with the command softAPConfig() as follows: and return the result of true and false
IPAddress IP(xx, xx, xx, xx );
IPAddress GATEWAY( xx, xx, xx, xx );
IPAddress SUBNET( xx, xx, xx, xx );
result = WiFi.softAPConfig( IP, GATEWAY, SUBNET );
To read the softAP IP address, use the softAPIP() command as follows:
IPAddress = WiFi.softAPIP()
Example program to create a softAP with IP Address 192.168.4.54 set Gateway 192.168.4.11 and run in class C with AP name “JarutEx” Password ‘123456789″ Use the 8th channel to hide and allows 3 child nodes to be accessed as follows:
#include <ESP8266WiFi.h>

IPAddress myIP(192, 168, 4, 54);
IPAddress gwIP(192, 168, 4, 11);
IPAddress subnet(255, 255, 255, 0);
uint8_t myMACaddr[6] = {99, 99, 99, 99, 99, 99};

void setup() {
  Serial.begin(115200);
  Serial.println("\n\r\n\r");
  WiFi.softAPmacAddress( myMACaddr );
  Serial.print("MAC Address : ");
  Serial.println(WiFi.softAPmacAddress());
  Serial.printf("%d:%d:%d:%d\n\n",
                myMACaddr[0],
                myMACaddr[1],
                myMACaddr[2],
                myMACaddr[3],
                myMACaddr[4],
                myMACaddr[5]);
  if (WiFi.softAPConfig( myIP, gwIP, subnet )) {
    if (WiFi.softAP("JarutEx", "123456789", 8, true, 3)) {
      Serial.print("IP Address : ");
      Serial.println(WiFi.softAPIP());
      Serial.print(WiFi.softAPgetStationNum());
      Serial.println(" connected.");
      WiFi.softAPdisconnect();
    } else {
      Serial.println("softAP() failed!!");
    }
  } else {
    Serial.println("softAPConfig() failed!");
  }
}

void loop() {
}
Conclusion
From this article, the author hopes that it will be useful to understand the use of the WiFi capabilities of the ESP8266 microcontroller more, which will be found that this chip works in two ways: as a client of a network with already or set yourself up as an AP to create a network for your use. Which the application will be written in the next article.
Finally, have fun with programming.
If you want to talk with us, feel free to leave comments below!!
References
- ESP8266 Arduino Core: ESP8266WiFi Library
- ESP8266 Arduino Core: Station class
- WiKiperia: Wi-Fi Protected Setup
(C) 2021, By Jarut Busarathid and Danai Jedsadathitikul
Updated 2021-11-09