This article discusses how to use image class with TFT-LCD display module of Sipeed M1W dock suit board via lcd class (MaixPy’s lcd class) as shown in Figure 1 provided with MaixPy to study the list of commands provided by image class and an example program using commands about creating a buffer object, clearing the value in the buffer, deleting the buffer, drawing straight lines, circles, squares, character display, saving data from the buffer to memory card (microSD Card), searching for straight lines in buffer (find_lines), finding circles in the buffer, find_circles and find squares (find_rects) in buffers with built-in functionality. It uses the Hough Transform principle to find the position and parameters of the searched object.

image class
The image class is a class to create a memory buffer for storing image data and can be displayed to the lcd module with the command lcd.display( ) a list of commands that should be known and used are as follows.
Buffer commands
Image()
There are two types of commands to create buffers: create an empty buffer or create from the desired image as follows.
buffer = image.Image()
buffer = image.Image( image )
An example of creating an image buffer object is as follows.
a = image.Image()When we output character a with the print(a) statement, we get the following result:
{"w":320, "h":240, "type"="rgb565", "size":153600}From this result, it was found that the generated buffer is 320 points wide, 240 points high, each point is rgb565 data, and this buffer uses 15,3600 bytes of memory. Therefore, we recommend using it when any buffer is not needed or not used for a long time, it should be removed from memory with the following program example.
>>> import gc, image
>>> gc.enable()
>>> gc.collect()
>>> print(gc.mem_free())
513184
>>> img = image.Image()
>>> print(gc.mem_free())
356928
>>> img = None
>>> print(gc.mem_free())
356640
>>> gc.collect()
>>> print(gc.mem_free())
512864
From the above code, you can find that initially, the memory was 513,184 bytes. When creating a buffer variable img, it was set to 356,928, but when the buffer was set to None when checking the amount of memory it was still 356,640, we tried gc.collect() again. Thus, when the buffer variable is set to None, gc.colelct() must be used to allow the system to manage memory again. This slows down the program but in exchange for better memory management.
cut()
The cut() commad is used to cut a portion of a buffer in a given frame. The format of the command is as follows.
buffer = object.cut( x, y, w, h )
An example of dividing an image into two parts is written as follows:
import image
img = image.Image()
upImg = img.cut(0,0,img.width(),img.height()/2)
dwImg = img.cur(0,img.height()/2,img.width(),img.height()/2)
save()
If you want to save the buffer to a file, you can execute it in the following format.
buffer.save( “/sd/file.jpg”)
width()
The width() command returns the width of the buffer.
height()
The height() command returns the height of the buffer.
format()
The format() command returns the format of the data stored in the buffer, as follows:
- sensor.GRAYSCALE
- sensor.RGB565
- sensor.BAYER
- sensor.JPEG
size()
The size() command reports the number of bytes of memory used to store the buffer.
get_pixel()
The get_pixel() command is used to read color values R,G,B from the specified (x,y) position.
(r, g, b) = buffer.get_pixel( x, y )
set_pixel()
If you want to change the pixel value at the position (x,y) to the color value (r,g,b), you can use the command set_pixel() according to usage patterns as follows.
buffer.set_pixel( x, y, (r,g,b) )
Draw commands
draw_string()
Command to display text or draw text at the position (x,y) with the text str by setting the font color and size. It has the following usage patterns:
buffer.draw_string( x, y, str, (r,g,b), size)
draw_line()
The command to draw a straight line in the buffer has the form of drawing from (x1,y1) to (x2,y2) as follows:
buffer.draw_line( x1, y1, x2, y2 )
or
buffer.draw_line( x1, y1, x2, y2, (r,g,b) )or
buffer.draw_line( x1, y1, x2, y2, (r,g,b), line_size )
draw_circle()
The command for drawing a circle where the center is at (x,y) with radius r can be executed as follows: In the 4th form, the fill state can be set to True to fill the circle with color, if false, it will be a circle with only borders.
buffer.draw_circle( x, y, r)
or
buffer.draw_circle(x,y,r,(rr,gg,bb))or
buffer.draw_circle(x,y,r,(rr,gg,bb),line_size)or
buffer.draw_circle(x,y,r,(rr,gg,bb),line_size, color_status)
draw_rectangle()
The command for drawing a rectangle of size w,h where the left corner of the rectangle is at the position (x,y) has the following form of usage:
buffer.draw_rectangle( x, y, w, h )
or
buffer.draw_rectangle( x, y, w, h, (rr, gg, bb) )or
buffer.draw_rectangle( x, y, w, h, (rr, gg, bb), line_size )or
buffer.draw_rectangle( x, y, w, h, (rr, gg, bb) , line_size, color_status)
clear()
The command to clear the values stored in the buffer has the following syntax.
buffer.clear()
draw_cross()
The command for drawing a cross centered at the position (x,y) size n has the following syntax:
buffer.draw_cross( x, y, n, (r,g,b), line_size=1)
Search commands
The commands in this search group use an algorithm called Hough Transform to find straight lines, circles, or squares which the result may be more or less than the real object. Users need to define detailed operating parameters for more accurate results.
find_lines()
The format of the find_lines() command to find lines in a buffer object and return a list of data is as follows:
item = buffer.find_lines()
or
item = buffer.find_lines((x,y,w,h))
The returned list has a number equal to the number of straight lines found. Each line found has the following information:
- x1, x start
- y1, y start
- x2, x end
- y2, y end
- length
- magnitude, similarity, the higher the better
- theta, angle
- rho
find_circles()
If you want to find circular objects in the buffer, you can do this by running the command find_circules() takes the form of the following command.
item = buffer.find_circles( )
or
item = buffer.find_circlrs( (x, y, w, h) )
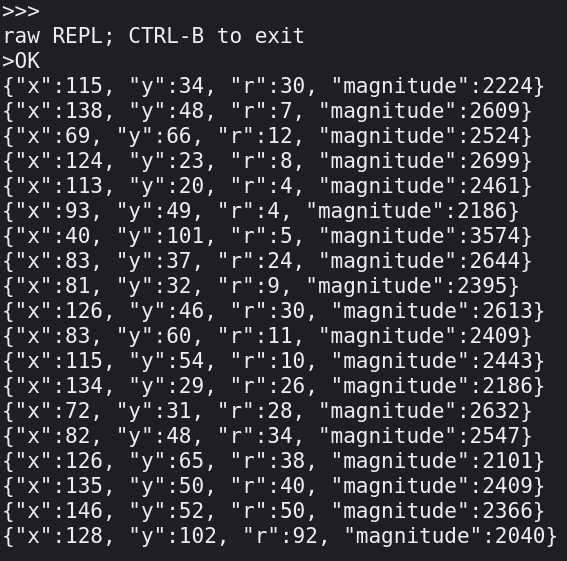
Circle search results are returned in a list format just like a straight line search. But the data items in the list are different: the resulting items consist of the center point (x,y), radius and magnitude as shown in Figure 5.
find_rects()
Finding squares in the buffer with find_rects() has the following syntax:
item = buffer.find_rects()
or
item = buffer.find_rects((x,y,w,h))
The search results are in the form of a list variable of the following items.
- x , start from top-left
- y, start from top-left
- w, width
- h, height
- magnitude , similarity, the higher the better
Example Code
img1
Example 1 is also drawing the screen with draw_string() and displays the frame rate per second, or fps (frame per second) to measure the screen update rate in frames per second, the time class must be imported and run the following command.
- clock() ,read time
- tick() , count
- fps(), frame rate per second
The program code for the text display and render rate is as follows. The sample result is as shown in Figure 2.
# img1 - By: JarutEx - Mon Oct 4 2021

import lcd, image, time

lcd.freq(80000000)
lcd.init(color=(255,0,0))
clock = time.clock()
img = image.Image()

while(True):
    clock.tick()
    img.clear()
    img.draw_string(10,100,"JarutEx",(232,232,18),7)
    img.draw_string(10,20,"fps={}".format(clock.fps()),(252,252,252),2)
    lcd.display(img)

img2
In the example program, img2 draws a straight line into the buffer. After that perform a linear search in the buffer. The results of the search are as shown in Figure 3.
# img2 - By: JarutEx - Mon Oct 4 2021

import lcd, image, time, gc, machine

gc.enable()
gc.collect()

lcd.freq(80000000)
lcd.init(color=(255,0,0))
img = image.Image()

fLines = None
gc.collect()
img.clear()
img.draw_line( 10, 10, 200, 100, coloe=(255,255,255))
fLines = img.find_lines((0,0,img.width(),img.height()))
nLines = len(fLines)
if (nLines > 0):
    img.draw_string(10,10,"lines={}".format(nLines),(8,242,232),2)
    for i in range(nLines):
        print("{}".format(fLines[i]))
lcd.display(img)
time.sleep(2)
fLines = None
img = None
lcd.deinit()
gc.collect()
machine.reset()

img3
Example program img3 increase the complexity of the program by randomizing the number of circles. The position of the center of the circle and the radius of the circle and draw it into the buffer which got an example of drawing as shown in Figure 4. After that, search for circles in buffer, get an example of search results as shown in Figure 5.
# img3 - By: JarutEx - Mon Oct 4 2021

import lcd, image, time, gc, machine
import random

gc.enable()
gc.collect()

lcd.freq(80000000)
lcd.init(color=(255,0,0))
img = image.Image()

fLines = None
gc.collect()
img.clear()
for i in range(1+random.getrandbits(4)):
    img.draw_circle( random.getrandbits(7)+20, random.getrandbits(7)+20,
    random.getrandbits(4)+4, (255,255,255), 1)
fCircles = img.find_circles((0,0,img.width(),img.height()))
nCircles = len(fCircles)
if (nCircles > 0):
    for i in range(nCircles):
        print("{}".format(fCircles[i]))
lcd.display(img)
time.sleep(5)
fCircles = None
img = None
lcd.deinit()
gc.collect()
machine.reset()

img.draw_circle(x,y,r,(rr,gg,bb),2,(rr,gg,bb))

img4
An example of this program is to draw a square into a buffer. By adding a matter of random color, thickness, and set it as a colored square. The sample result of the random square is shown in Figure 6 and the sample result from the square search is shown in Figure 7.
# img4 - By: JarutEx - Mon Oct 4 2021

import lcd, image, time, gc, machine
import random

gc.enable()
gc.collect()

lcd.freq(80000000)
lcd.init(color=(255,0,0))
img = image.Image()

fLines = None
gc.collect()
img.clear()
for i in range(1+random.getrandbits(4)):
    img.draw_rectangle(
        random.getrandbits(8),random.getrandbits(8),
        4+random.getrandbits(6),4+random.getrandbits(6),
        (random.getrandbits(8),random.getrandbits(8),random.getrandbits(8)),
        random.getrandbits(2)+1,
        True)
fRects = img.find_rects((0,0,img.width(),img.height()))
nRects = len(fRects)
if (nRects > 0):
    for i in range(nRects):
        print("{}".format(fRects[i]))
lcd.display(img)
time.sleep(5)
fRects = None
img = None
lcd.deinit()
gc.collect()
machine.reset()


Conclusion
From this article, it will be found that the buffer or image created is an important part of image processing because when reading the image data from the sensor. Those read data are all stored in a buffer and we can draw over the buffer so we can display the superimposed data in the read image buffer or circle in the buffer. This allows us to find things that look like circles or straight lines in the image. Once we have successfully retrieved the data from the buffer, we will be able to select each object to see how similar they are or what is in that section. Finally, Have fun programming.
If you want to talk with us, feel free to leave comments below!!
References
- Wikipedia : Hough transform
- OpenMV : MicroPython documentation
- OpenMV : Class image : image object
(C) 2020-2021, BY Jarut Busarathid and Danai Jedsadathitikul
Updated 2021-12-25