This article uses the MPLAB X IDE development kit (Figure 1) for use with Microchip’s 8-bit microcontrollers in C language through a translation tool called XC8 as a baseline for the next article’s use. The procedure for developing a program with this tool is as follows:
- Create a project file and set the microcontroller chip type to PIC18F458.
- Generate a C language file for the XC8 translation Pack.
- Generate information about microcontroller settings to be pasted into the program code.
- Compile the program.
- Bring the resulting file to upload to the board via PICKit2 tool or later.
Create Project
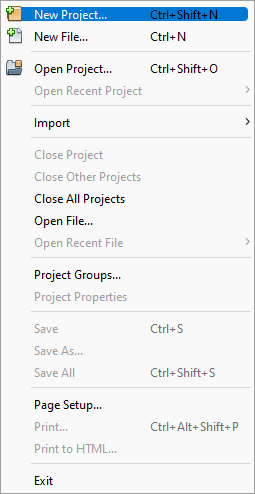
Creating a project creates a group of directories and files to store a list of files associated with that project and creates a Makefile for use in compiling the program. The creation process starts from entering the File menu to select an item as New Project … as shown in Figure 2.
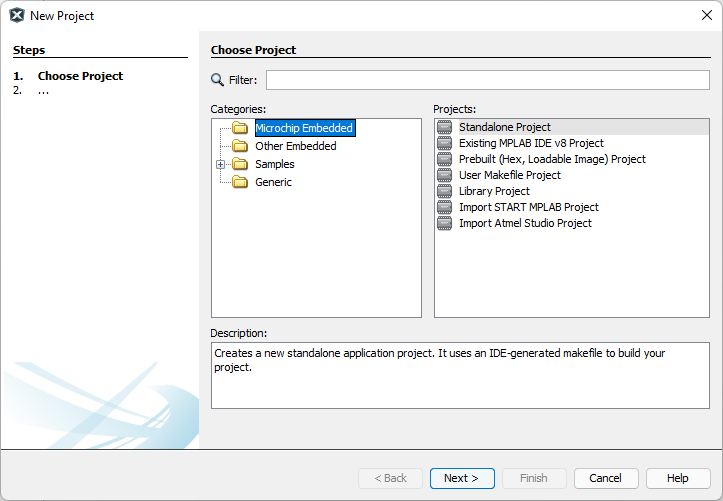
After that, a window as shown in Figure 3 will be displayed to select the type of project. In this case, select Categories as Microchip Embedded and Type of Projects as Standalone Project, then click Next>.
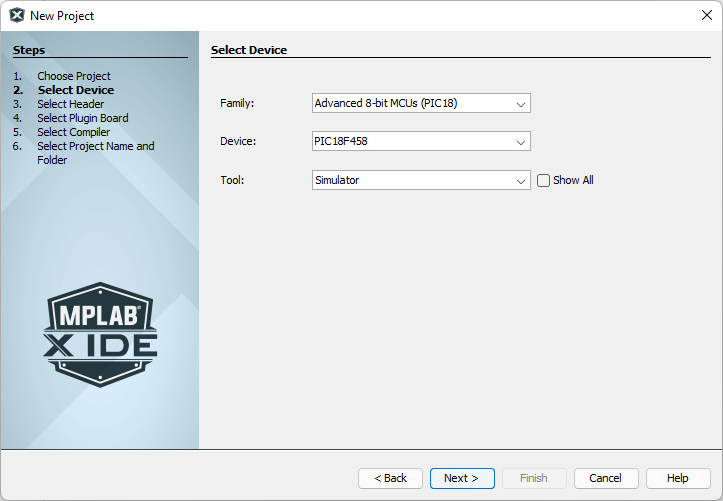
The step in Figure 4 is to select the type of microcontroller being used by setting Family to Advanced 8-bit MCUs (PIC18), setting Device to PIC18F458, and selecting Tool as None or Simulator. After that, click on Next> button.
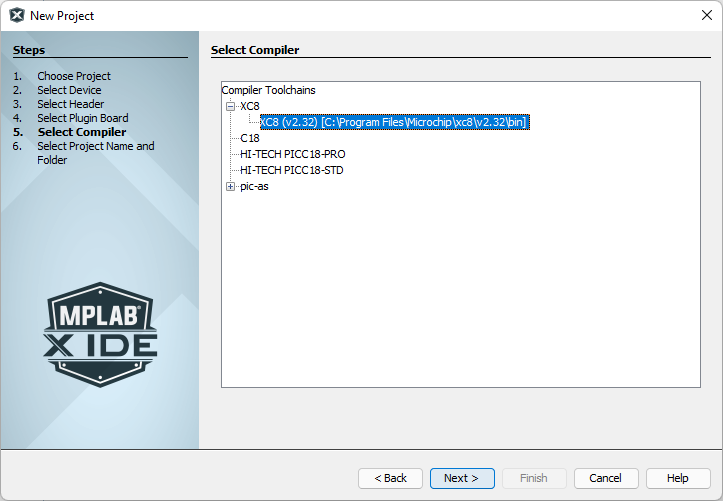
After defining the type of microcontroller that is used, it determines the type of interpreter being used. By selecting XC8 as shown in Figure 5, then click on the Next> button to go to the next step.
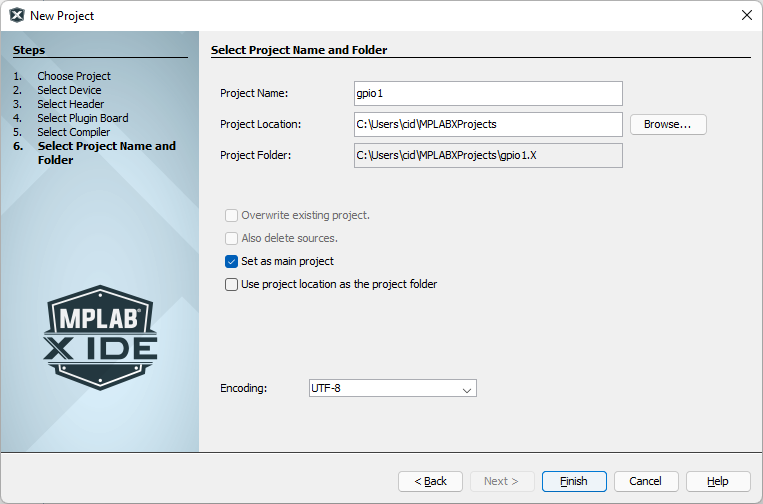
The final step of creating a project is to define the name of the project (hereinafter set as gpio1), project storage location, and details about setting up this project as the main project (In case of multiple projects) to be a project that is called when compiling a program. And we choose Encoding to UTF-8 to view the data in the file as characters encoded in UTF-8, allowing us to write instructions in the Thai language. And there is no problem when opening it in a machine that is in other languages, as shown in Figure 6.
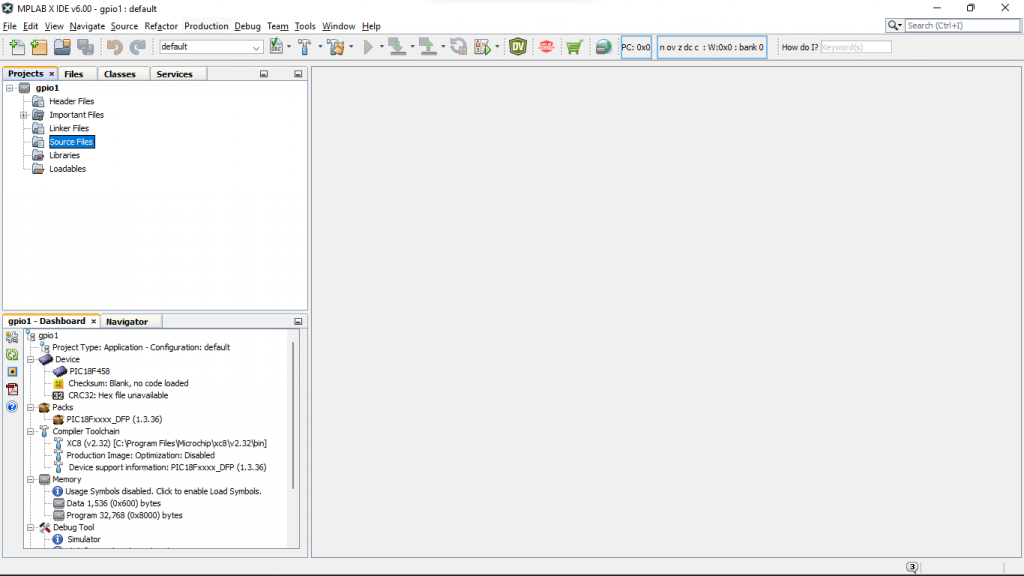
Finally, click on the Finish button and wait for the program to create the directory and associated files. When ready to use, it will be as shown in Figure 7.
Adding C language files
What MPLAB X IDE creates for us is a Makefile that is stored in the Important Files directory, which is an alphabetical file that contains details about compiling the program, as in the following example.
#
#  There exist several targets which are by default empty and which can be
#  used for execution of your targets. These targets are usually executed
#  before and after some main targets. They are:
#
#     .build-pre:              called before 'build' target
#     .build-post:             called after 'build' target
#     .clean-pre:              called before 'clean' target
#     .clean-post:             called after 'clean' target
#     .clobber-pre:            called before 'clobber' target
#     .clobber-post:           called after 'clobber' target
#     .all-pre:                called before 'all' target
#     .all-post:               called after 'all' target
#     .help-pre:               called before 'help' target
#     .help-post:              called after 'help' target
#
#  Targets beginning with '.' are not intended to be called on their own.
#
#  Main targets can be executed directly, and they are:
#
#     build                    build a specific configuration
#     clean                    remove built files from a configuration
#     clobber                  remove all built files
#     all                      build all configurations
#     help                     print help mesage
#
#  Targets .build-impl, .clean-impl, .clobber-impl, .all-impl, and
#  .help-impl are implemented in nbproject/makefile-impl.mk.
#
#  Available make variables:
#
#     CND_BASEDIR                base directory for relative paths
#     CND_DISTDIR                default top distribution directory (build artifacts)
#     CND_BUILDDIR               default top build directory (object files, ...)
#     CONF                       name of current configuration
#     CND_ARTIFACT_DIR_${CONF}   directory of build artifact (current configuration)
#     CND_ARTIFACT_NAME_${CONF}  name of build artifact (current configuration)
#     CND_ARTIFACT_PATH_${CONF}  path to build artifact (current configuration)
#     CND_PACKAGE_DIR_${CONF}    directory of package (current configuration)
#     CND_PACKAGE_NAME_${CONF}   name of package (current configuration)
#     CND_PACKAGE_PATH_${CONF}   path to package (current configuration)
#
# NOCDDL


# Environment
MKDIR=mkdir
CP=cp
CCADMIN=CCadmin
RANLIB=ranlib


# build
build: .build-post

.build-pre:
# Add your pre 'build' code here...

.build-post: .build-impl
# Add your post 'build' code here...


# clean
clean: .clean-post

.clean-pre:
# Add your pre 'clean' code here...
# WARNING: the IDE does not call this target since it takes a long time to
# simply run make. Instead, the IDE removes the configuration directories
# under build and dist directly without calling make.
# This target is left here so people can do a clean when running a clean
# outside the IDE.

.clean-post: .clean-impl
# Add your post 'clean' code here...


# clobber
clobber: .clobber-post

.clobber-pre:
# Add your pre 'clobber' code here...

.clobber-post: .clobber-impl
# Add your post 'clobber' code here...


# all
all: .all-post

.all-pre:
# Add your pre 'all' code here...

.all-post: .all-impl
# Add your post 'all' code here...


# help
help: .help-post

.help-pre:
# Add your pre 'help' code here...

.help-post: .help-impl
# Add your post 'help' code here...


# include project implementation makefile
include nbproject/Makefile-impl.mk

# include project make variables
include nbproject/Makefile-variables.mk
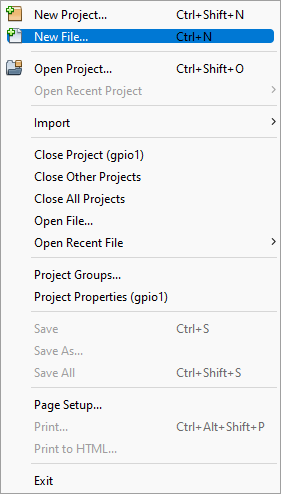
All you have to do is create a programming file (In this case, choose C language), go to the File menu and select New File… as shown in Figure 7.
After selecting the item New File… will show a window as shown in Figure 8 for the user to choose the type of file. Here, select the XC8 Compiler option in Microchip Embedded and the file type is main.c.
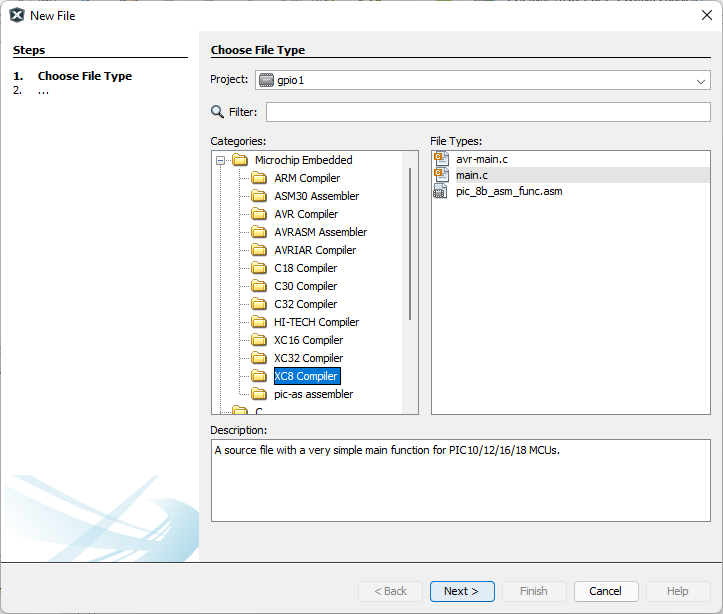
After clicking the Next> button of Figure 8, it will go into the process of specifying the file name as shown in Figure 9. We have named the file as main.c. After that, click on the Finish button to finish creating the file.

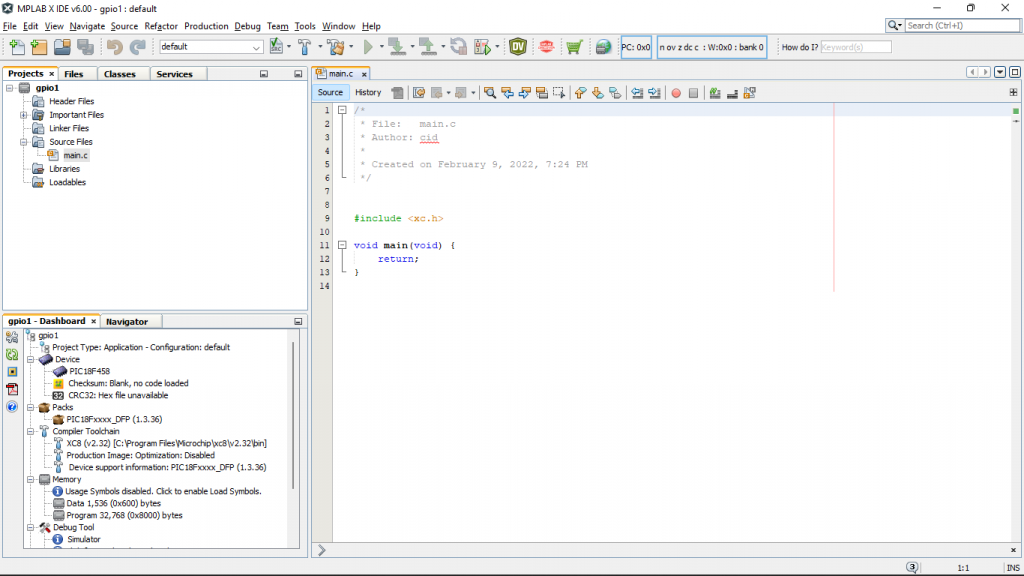
After creating the file, the system will create a file main.c stored in the Source Files section as shown in Figure 10. The structure of the program that has been created is as follows.
/*
 * File:   main.c
 * Author: cid
 *
 * Created on February 10, 2022, 10:22 AM
 */


#include <xc.h>

void main(void) {
    return;
}
To test that the system is installed and working, click the hammer icon as shown in Figure 11 to run the compile test. After that, look at the results of the Output window to see if there is an error or not. If the XC8 installation is normal, the result will be reported as shown in Figure 11.
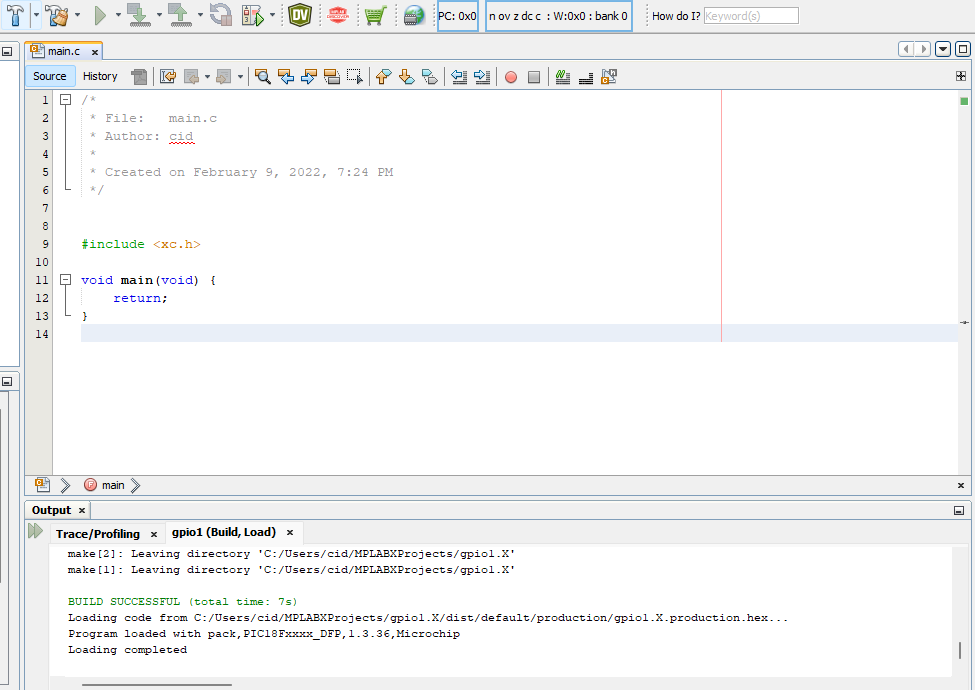
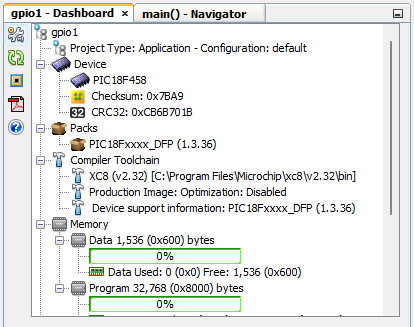
In Figure 12, it’s part of the Dashboard window used to see details about the project that it is a type of microcontroller device. What tools do you use to compile the program? Details about memory usage, etc.
Configuration
Because PIC18F458 is a type of microcontroller which has many types of working units built-in This allows programmers to initialize the units they use (details are discussed in the previous article), and the advantage of MPLAB X IDE is that it provides tools to assist programmers in displaying configuration lists. You can use it as a template by going to the Window menu as shown in Figure 13.

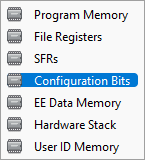
In the Target Memory Views sub-item of the Window menu, there is an item to choose from, as shown in Figure 14. Here, select Configuration Bits
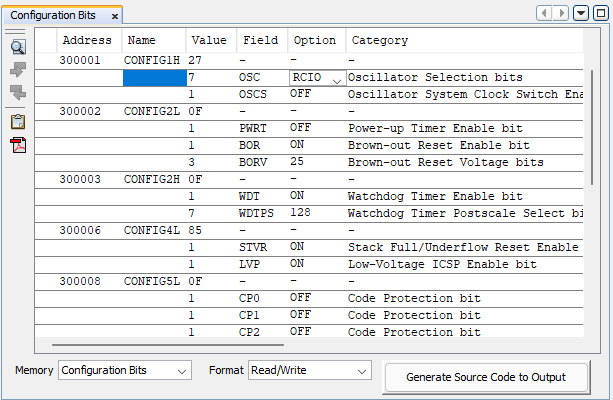
After selecting an item Configuration Bits, the Configuration Bits window will appear as shown in Figure 15, report memory locations, the name of the config, the values given, and a description for us to set. Once the settings are complete, click on the Generate Source Code to Output button.
After clicking the Generate Source Code to Output button, you will find that the Output section has a tab named Config Bits Source as shown in Figure 16.
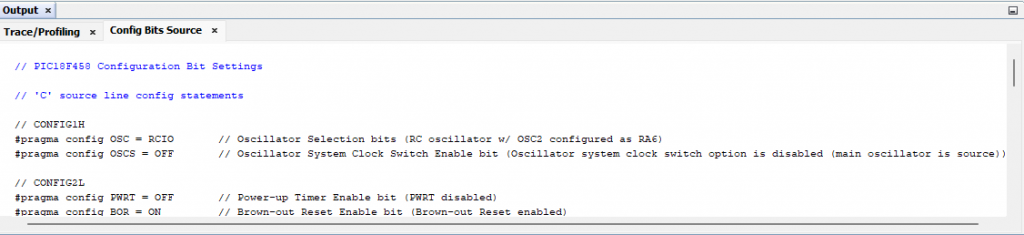
From the code generated by the system as shown in Figure 16, copy it and put it in the main.c file. The result of the file is as follows.
// PIC18F458 Configuration Bit Settings
// 'C' source line config statements
// CONFIG1H
#pragma config OSC = RCIO       // Oscillator Selection bits (RC oscillator w/ OSC2 configured as RA6)
#pragma config OSCS = OFF       // Oscillator System Clock Switch Enable bit (Oscillator system clock switch option is disabled (main oscillator is source))

// CONFIG2L
#pragma config PWRT = OFF       // Power-up Timer Enable bit (PWRT disabled)
#pragma config BOR = ON         // Brown-out Reset Enable bit (Brown-out Reset enabled)
#pragma config BORV = 25        // Brown-out Reset Voltage bits (VBOR set to 2.5V)

// CONFIG2H
#pragma config WDT = ON         // Watchdog Timer Enable bit (WDT enabled)
#pragma config WDTPS = 128      // Watchdog Timer Postscale Select bits (1:128)

// CONFIG4L
#pragma config STVR = ON        // Stack Full/Underflow Reset Enable bit (Stack Full/Underflow will cause Reset)
#pragma config LVP = ON         // Low-Voltage ICSP Enable bit (Low-Voltage ICSP enabled)

// CONFIG5L
#pragma config CP0 = OFF        // Code Protection bit (Block 0 (000200-001FFFh) not code protected)
#pragma config CP1 = OFF        // Code Protection bit (Block 1 (002000-003FFFh) not code protected)
#pragma config CP2 = OFF        // Code Protection bit (Block 2 (004000-005FFFh) not code protected)
#pragma config CP3 = OFF        // Code Protection bit (Block 3 (006000-007FFFh) not code protected)

// CONFIG5H
#pragma config CPB = OFF        // Boot Block Code Protection bit (Boot Block (000000-0001FFh) not code protected)
#pragma config CPD = OFF        // Data EEPROM Code Protection bit (Data EEPROM not code protected)

// CONFIG6L
#pragma config WRT0 = OFF       // Write Protection bit (Block 0 (000200-001FFFh) not write protected)
#pragma config WRT1 = OFF       // Write Protection bit (Block 1 (002000-003FFFh) not write protected)
#pragma config WRT2 = OFF       // Write Protection bit (Block 2 (004000-005FFFh) not write protected)
#pragma config WRT3 = OFF       // Write Protection bit (Block 3 (006000-007FFFh) not write protected)

// CONFIG6H
#pragma config WRTC = OFF       // Configuration Register Write Protection bit (Configuration registers (300000-3000FFh) not write protected)
#pragma config WRTB = OFF       // Boot Block Write Protection bit (Boot Block (000000-0001FFh) not write protected)
#pragma config WRTD = OFF       // Data EEPROM Write Protection bit (Data EEPROM not write protected)

// CONFIG7L
#pragma config EBTR0 = OFF      // Table Read Protection bit (Block 0 (000200-001FFFh) not protected from Table Reads executed in other blocks)
#pragma config EBTR1 = OFF      // Table Read Protection bit (Block 1 (002000-003FFFh) not protected from Table Reads executed in other blocks)
#pragma config EBTR2 = OFF      // Table Read Protection bit (Block 2 (004000-005FFFh) not protected from Table Reads executed in other blocks)
#pragma config EBTR3 = OFF      // Table Read Protection bit (Block 3 (006000-007FFFh) not protected from Table Reads executed in other blocks)

// CONFIG7H
#pragma config EBTRB = OFF      // Boot Block Table Read Protection bit (Boot Block (000000-0001FFh) not protected from Table Reads executed in other blocks)

// #pragma config statements should precede project file includes.
// Use project enums instead of #define for ON and OFF.

#include <xc.h>

void main(void) {
    return;
}
Compile and upload
Compiling the program is done by clicking on the hammer icon to translate the program which will result in the following output window.
make -f nbproject/Makefile-default.mk SUBPROJECTS= .build-conf
make[1]: Entering directory '/home/cid/MPLABXProjects/gpio1.X'
make  -f nbproject/Makefile-default.mk dist/default/production/gpio1.X.production.hex
make[2]: Entering directory '/home/cid/MPLABXProjects/gpio1.X'
"/opt/microchip/xc8/v2.36/bin/xc8-cc"  -mcpu=18F458 -c   -mdfp="/opt/microchip/mplabx/v6.00/packs/Microchip/PIC18Fxxxx_DFP/1.3.36/xc8"  -fno-short-double -fno-short-float -memi=wordwrite -O0 -fasmfile -maddrqual=ignore -xassembler-with-cpp -mwarn=-3 -Wa,-a -DXPRJ_default=default  -msummary=-psect,-class,+mem,-hex,-file  -ginhx32 -Wl,--data-init -mno-keep-startup -mno-download -mdefault-config-bits   -std=c99 -gdwarf-3 -mstack=compiled:auto:auto:auto     -o build/default/production/main.p1 main.c
"/opt/microchip/xc8/v2.36/bin/xc8-cc"  -mcpu=18F458 -Wl,-Map=dist/default/production/gpio1.X.production.map  -DXPRJ_default=default  -Wl,--defsym=__MPLAB_BUILD=1   -mdfp="/opt/microchip/mplabx/v6.00/packs/Microchip/PIC18Fxxxx_DFP/1.3.36/xc8"  -fno-short-double -fno-short-float -memi=wordwrite -O0 -fasmfile -maddrqual=ignore -xassembler-with-cpp -mwarn=-3 -Wa,-a -msummary=-psect,-class,+mem,-hex,-file  -ginhx32 -Wl,--data-init -mno-keep-startup -mno-download -mdefault-config-bits -std=c99 -gdwarf-3 -mstack=compiled:auto:auto:auto      -Wl,--memorysummary,dist/default/production/memoryfile.xml -o dist/default/production/gpio1.X.production.elf  build/default/production/main.p1

Memory Summary:
    Program space        used    16h (    22) of  8000h bytes   (  0.1%)
    Data space           used     0h (     0) of   600h bytes   (  0.0%)
    Configuration bits   used     7h (     7) of     7h words   (100.0%)
    EEPROM space         used     0h (     0) of   100h bytes   (  0.0%)
    ID Location space    used     8h (     8) of     8h bytes   (100.0%)

make[2]: Leaving directory '/home/cid/MPLABXProjects/gpio1.X'
make[1]: Leaving directory '/home/cid/MPLABXProjects/gpio1.X'

BUILD SUCCESSFUL (total time: 4s)
Loading code from /home/cid/MPLABXProjects/gpio1.X/dist/default/production/gpio1.X.production.hex...
Program loaded with pack,PIC18Fxxxx_DFP,1.3.36,Microchip
Loading completed
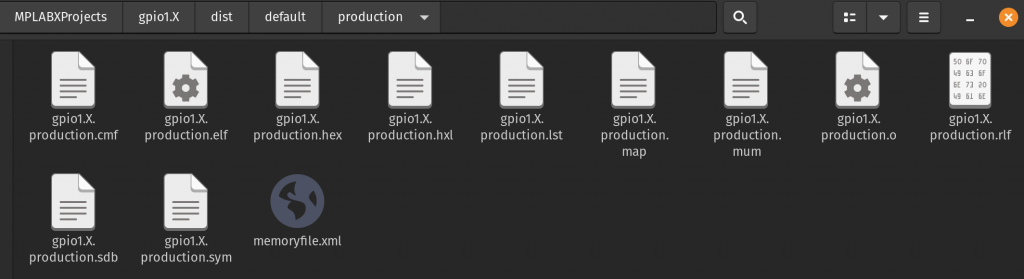
and when looking into the directory where the project is stored, there is a directory named dist/default/production for storing compiled files and programmed into the chip as shown in Figure 17
Conclusion
From this article, readers will be able to create project files and source files in C language with microcontroller settings. After this, we will get to know the registers involved in using GPIO to operate the display. Or read the values in the next article, which are LED, Switch, 7-Segment, ADC, PWM, RTC and LCD which are based on the Computer Architecture lab. Finally, have fun with programming.
(C) 2022, By Anuchart Boonmark, Jarut Busarathid and Danai Jedsadathitikul
Updated 2022-03-19