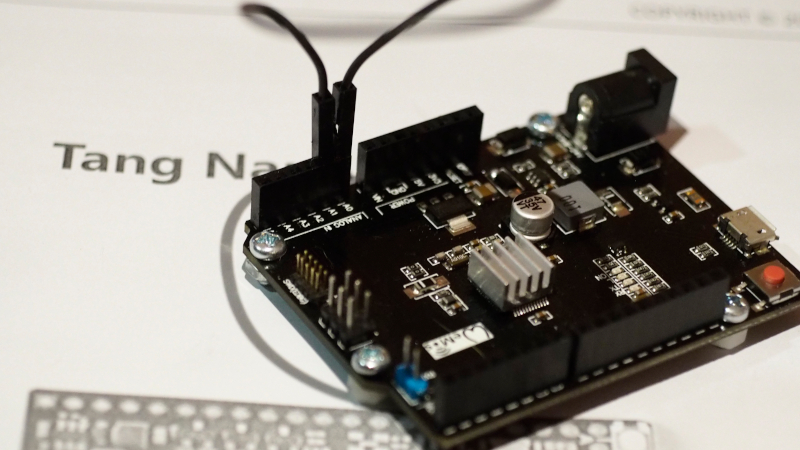
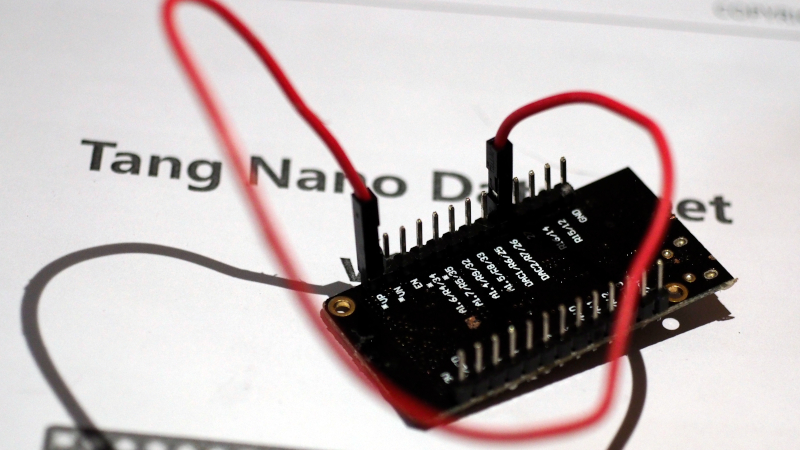
This article introduces the ESP32 and SAM-D21 microcontroller board to learn how to use ADC (Analog to Digital Converter) and DAC (Digital to Analog Converter) instruction by connecting the DAC pin to ADC as shown in Figures 1 (Connect A0 to A1 of Board SAM-D21 ) and 2 (Connect Pin GPIO26 to GPIO36 of ESP32) to send data to DAC and have ADC read it back. Then send the results out to the serial port for display with the Serial Plotter, which is an example program to send 3 types of data, which is a zigzag graph, triangular graph and waveform graph from the sinusoidal function
Read MoreCategory: Cortex-M0
[EN] Cortex-M0+: SAMD21
This article introduces a microcontroller board based on Microchip’s ATSAMD21G18 chip based on 32-bit ARM architecture, Cortex-M0+ family in the form of a board based on the Arduino Uno family as shown in Figure 1.
Read More[TH] Queue data structure with array and Singly Linked List.
บทความนี้เป็นการอธิบายเกี่ยวกับโครงสร้างข้อมูลแบบคิว (Queue) ซึ่งได้เคยเขียนถึงไปในบทความ Queue Data Structure ที่เป็นภาษาไพธอนและถูกนำไปใช้บ่อยกับตัวอย่างของ MicroPython แต่บทความนี้เป็นภาษา C ที่เขียนผ่าน Arduino IDE เพื่อใช้งานกับบอร์ดไมโครคอนโทรลเลอร์ LGT8F328P, SAM-D21, ESP8266, ESP32 และ ESP32-S2 ดังภาพที่ 1 โดยยกตัวอย่างการนำโครงสร้างแถวลำดับ และลิงค์ลิสต์เดี่ยวมาเป็นโครงสร้างข้อมูลแบบคิว และคงเป็นบทความสุดท้ายบน JarutEx แล้วครับ
Read More[TH] Stack data structure with Singly Linked List.
บทความนี้เป็นการอธิบายเกี่ยวกับโครงสร้างข้อมูลแบบสแต็ก (Stack) เพื่อเขียนโปรแกรมด้วยภาษา C บนแพล็ตฟอร์มต่าง ๆ โดยใช้โครงสร้างข้อมูลแบบลิงค์ลิสต์เดี่ยวเป็นที่เก็บข้อมูลของสแต็กพร้อมตัวอย่างการแถวลำดับเป็นที่เก็บข้อมูล และทดสอบการทำงานกับบอร์ดไมโครคอนโทรลเลอร์ LGT8F328P, SAM-D21, ESP8266, ESP32 และ ESP32-S2 ดังภาพที่ 1 และ 2 ส่วนกรณีที่ต้องการไปใช้กับแพล็ตฟอร์มอื่น ๆ ยังคงสามารถดัดแปลงโค้ดเพื่อนำไปใช้ได้เช่นเดียวกัน
Read More[TH] Arduino: ใช้ SoftwareSerial กับ STM32F030F4
จากบทความแนะนำการใช้บอร์ด STM32F030F4P6 ที่ใช้การสื่อสารพอร์ตอนุกรมด้วยการใช้ไลบรารีเพิ่มเติมซึ่งทำให้ปริมาณหน่วยความจำไม่มากพอสำหรับใช้งาน ทางเราเลยลองเปลี่ยนมาใช้ SoftwareSerial ของเฟรมเวิร์ก Arduino และใช้ขา PA10 และ PA9 ต่อเข้ากับ RX และ TX ของโมดูลแปลง USB-RS232 ดังภาพที่ 1 และทดลองใช้งานตามการตั้งค่าของ Arduino IDE ดังภาพที่ 2 พร้อมทั้งสั่ง Toggle หลอด LED ที่เชื่อมต่อกับขา PA4 พบว่า เมื่อคอมไพล์โปรแกรมตัวอย่างแล้วมีการใช้ ใช้หน่วยความจำ ROM และ RAM เป็น 80% และ 21% ตามลำดับดังการรายงานจาก Arduino IDE ดังต่อไปนี้
Sketch uses 13188 bytes (80%) of program storage space. Maximum is 16384 bytes.
Global variables use 876 bytes (21%) of dynamic memory, leaving 3220 bytes for local variables. Maximum is 4096 bytes.
Read More
[TH] Generate temperature and humidity graphs with data from Singly Linked List.
จากบทความโครงสร้างข้อมูล Singly Linked List, การใช้โมดูลเซ็นเซอร์ DHT11 กับไมโครคอนโทรลเลอร์ STM32F103 และการใช้โมดูลแสดงผล TFT ที่ใช้ตัวควบคุม st7735s จึงเกิดเป็นแนวคิดของบทความนี้ คือ นำตัวอย่างการใช้โครงสร้างข้อมูลแบบลิงค์ลิสต์เดี่ยวที่เก็บค่าอุณหภูมิและความชื้นมาหาค่ามากสุด น้อยสุด ค่าเฉลี่ย พร้อมทั้งข้อมูลในลิสต์มาแสดงในรูปแบบของกราฟดังภาพที่ 1
Read More[TH] Singly Linked List
บทความนี้เป็นการเขียนโปรแกรมภาษา C/C++ กับบอร์ด Arduino Nano, Arduino Uno, LGT8F328P หรือบอร์ดอื่น ๆ และแพล็ตฟอร์มอื่น ๆ ที่ใช้ภาษา C ได้ โดยในบทความนี้กล่าวถึงวิธีการใช้โครงสร้าง struct สำหรับเก็บข้อมูลและตัวชี้ที่ใช้สำหรับชี้ไปยังตำแหน่งของหน่วยความจำ และวิธีการบริหารหน่วยความจำได้แก่ การจองหน่วยความจำ การเข้าถึงหน่วยความจำ และการยกเลิกการใช้หน่วยความจำเพื่อสร้างวิธีการจัดเก้บข้อมูลแบบลิงค์ลิวต์เดียว (Singly Linked List) พร้อมทั้งตัวอย่างโปรแกรมที่ใช้สำหรับเก็บรายการค่าอุณหภูมิและความชื้นจากโมดูล DHT11 ดังภาพที่ 1
Read More[EN] u8g2 Library
From the article on using the ESP8266 with an OLED graphical display written in Python, you’ll find that it’s fast and easy but when used with other microcontrollers that cannot use Micropython or CircuitPython, what must be done? One of the many options is the u8glib or u8g2 (Universal 8 bit Graphics Library) libraries, designed to work with monochromatic 8-bit graphics over either I2C or SPI communication. In this article, we are using I2C OLED as shown in Figure 1.
Read More[TH] Arduino ADC/DAC
บทความนี้แนะนำบอร์ดไมโครคอนโทรลเลอร์ ESP32 และ SAM-D21 มาใช้งานเพื่อเรียนรู้การใช้คำสั่งเกี่ยวกับ ADC (Analog to Digital Converter) และ DAC (Digital to Analog Converter) ด้วยการเชื่อมต่อขา DAC เข้ากับ ADC ดังตัวอย่างภาพที่ 1 (เชื่อม A0 เข้า A1 ของบอร์ด SAM-D21) และ 2 (เชื่อมต่อขา GPIO26 เข้ากับ GPIO36 ของ ESP32) เพื่อส่งข้อมูลที่ไป DAC และให้ ADC อ่านค่ากลับเข้ามา และส่งผลลัพธ์ออกไปที่พอร์ตอนุกรมสำหรับแสดงผลด้วย Serial Plotter ซึ่งตัวอย่างโปรแกรมสั่งส่งข้อมูล 3 แบบ คือ กราฟแบบฟันปลา กราฟแบบสามเหลี่ยม และกราฟรูปคลื่นจากฟังก์ชันไซน์
Read More