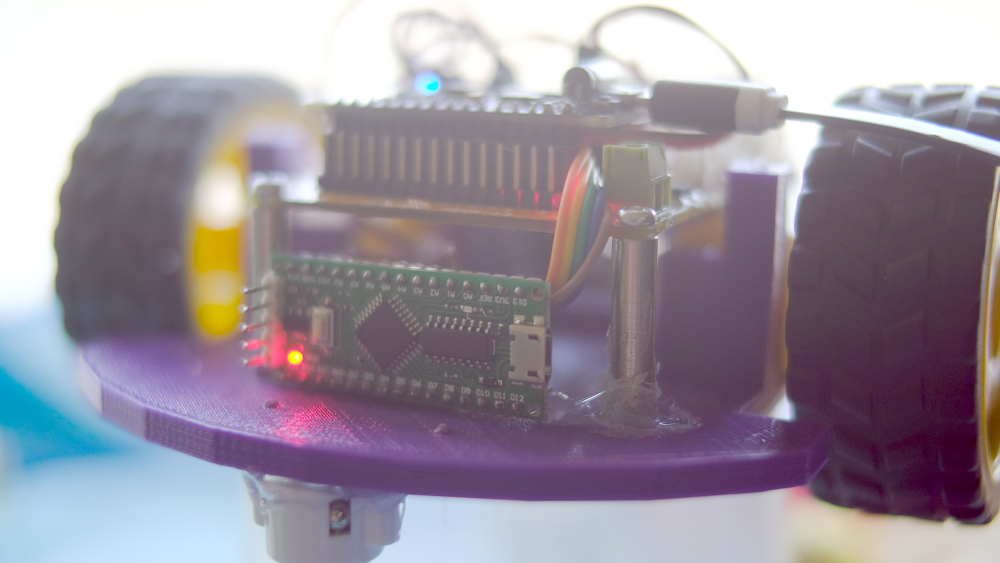
Based on the previous article that uses a single esp8266 for controlling the Agent, the number of pins that the esp8266 microcontroller (as written in the MicroPython article about machine.Pin) is limited. Many of the pins are used at boot up causing unintended errors such as the wheel spinning when the system starts and stops when the system finishes booting, etc. Therefore, in this article, a microcontroller board LGT8F328P is added as shown in Figure 1, or the reader may change to other Arduino family microcontrollers, such as Arduino Nano or Arduino Uno, etc. by giving that LGT8F328P is part of the Actuator that acts as a movement in the environment. It can be commanded to go forward, backward, turn left, turn right and stop, reducing the workload of the esp8266 and making it more responsive to WiFi communication.
Read MoreTag: robot car
[EN] Arduino: Control the movement of the robot car through the browser with the esp8266.
From the article Controlling a Servo 2-Wheel Robot in the ESP8266+RoboServo and the DC electric motor in VisionRobo Car: Drive Motor, we have taken the 2nd built-in robot car from the Raspberry Pi to the ESP8266 to operate via WiFi using the guidelines from the ESP-01s+Relay article. Let’s rewrite Arduino’s C/C++ with the WebServer class from the ESP8266 article to MicroPython. Thus, by the end of this article, the robot can be operated in the first example by connecting a phone or communication device. Go to 192.168.4.1 and order it to go forward, backward, turn left, turn right, or stop.
Read More[TH] Arduino: ควบคุมการเคลื่อนที่หุ่นยนต์รถผ่านบราวเซอร์ด้วย esp8266 Part 2
จากบทความก่อนหน้าที่ใช้ esp8266 เพียงตัวเดียวสำหรับการควบคุม Agent ซึ่งจำนวนขาที่ไมโครคอนโทรลเลอร์ esp8266 (ตามที่เขียนไว้ในบทความเกี่ยวกับ machine.Pin ของ MicroPython) มีให้นั้นมีจำกัด และหลายขาถูกใช้งานขณะเริ่มระบบทำให้เกิดความผิดพลาดที่ไม่ได้ตั้งใจ เช่น ล้อหมุนเมื่อระบบเริ่มทำงาน และหยุดเมื่อระบบทำการบูตเสร็จ เป็นต้น ดังนั้น ในบทความนี้จึงเพิ่มบอร์ดไมโครคอนโทรลเลอร์ LGT8F328P เข้ามา ดังภาพที่ 1 หรือผู้อ่านอาจจะเปลี่ยนเป็นไมโครคอนโทรลเลอร์ตระกูล Arduino อื่น ๆ แทนได้ เช่น Arduino Nano หรือ Arduino Uno เป็นต้น โดยให้ LGT8F328P นั้นเป็นส่วนของ Actuator ที่ทำหน้าที่เคลื่อนที่ไปในสิ่งแวดล้อม คือ สามารถสั่งให้เดินหน้า ถอยหลัง เลี้ยวซ้าย เลี้ยวขวา และหยุดได้ ทำให้ลดภาระการทำงานของ esp8266 ลง และให้ทำงานตอบสนองการสื่อสาร WiFi ได้มากขึ้น
Read More[TH] Arduino: ควบคุมการเคลื่อนที่หุ่นยนต์รถผ่านบราวเซอร์ด้วย esp8266
จากบทความการควบคุมหุ่นยนต์รถ 2 ล้อแบบ Servo ใน ESP8266+RoboServo และมอเตอร์ไฟฟ้ากระแสตรงใน VisionRobo Car: Drive Motor ทางเราได้นำหุ่นยนต์รถในตัวที่ 2 เปลี่ยนจาก Raspberry Pi เป็น ESP8266 เพื่อสั่งงานผ่าน WiFi โดยใช้แนวทางจาก บทความ ESP-01s+Relay มาเขียนใหม่ด้วยภาษา C/C++ ของ Arduino ด้วยคลาส WebServer จากที่ในบทความของ ESP8266 เป็น MicroPython ดังนั้น เมื่อทำตามบทความนี้จนเสร็จจะสามารถสั่งงานหุ่นบนต์ในภาพตัวอย่างที่ 1 ได้ด้วยการเชื่อมต่อโทรศัพท์หรืออุปกรณ์สื่อสารไปที่ 192.168.4.1 และสั่งให้เดินหน้า ถอยหลัง เลี้ยวซ้าย เลี้ยวขวา หรือหยุดได้
Read More[TH] Bare Metal Cortex-M Ep.6
หลังจากได้ใช้คำสั่ง HAL สำหรับสั่งงาน Cortex-M0/M3/M4 ไปกันพอสมควร ครั้งนี้มาประยุกต์เพื่อขับเคลื่อนหุ่นยนต์รถ 2 ล้อให้เดินหน้า ถอยหลัง หันซ้าย หันขวา และหยุดกันบ้าง ดังนั้น ในบทความนี้กล่าวถึงการประยุกต์ใช้ GPIO เพื่อส่งสัญญาณ 0 หรือ 1 ไปยังพอร์ตที่ต่อกับภาคขับมอเตอร์ดังภาพที่ 1 เพื่อให้ตัวหุ่นนั้นเคลื่อนที่
Read More[EN] ESP8266 RoboCar+Ultrasonic Sensor
This article is an example of the implementation of the servo motor driven robot car mentioned in the previous article. Motion is used to define the motion rules under the factor of distance read from a distance sensor such as an ultrasonic sensor.
Read More[EN] ESP8266+RoboServo
This article is an example of programming in Python to operate a DC electric motor called a servo motor, and when a servo motor is used to drive the wheels on the left and right, it can easily work as a wheeled robot. Also, an example program of this article is to commands the movement of a wheel-driven robot to move forward, backward, turn left, turn right and stop.
Read More[TH] ESP8266 RoboCar+Ultrasonic Sensor
บทความนี้เป็นตัวอย่างการนำหุ่นยนต์รถที่ขับเคลื่อนด้วยมอเตอร์แบบเซอร์โวดังที่กล่าวไปในบทความก่อนหน้านี้มาใช้งาน โดยในบทความนี้ใช้การเคลื่อนที่ด้วยการกำหนดกฎการเคลื่อนที่ภายใต้การตัดสินใจเรื่องระยะทางที่อ่านได้จากเซ็นเซอร์วัดระยะทางอย่าง Ultrasonic Sensor
Read More[TH] ESP8266+RoboServo
บทความนี้เป็นตัวอย่างการเขียนโปรแกรมภาษาไพธอนเพื่อสั่งงานมอเตอร์ไฟฟ้ากระแสตรงที่เรียกว่าเซอร์โวมอเตอร์ (Servo Motor) และเมื่อนำเซอร์โวมอเตอร์มาขับเคลื่อนล้อทางด้านซ้ายและขวาทำให้สามารถทำงานเป็นหุ่นยนต์เคลื่อนที่ด้วยล้ออย่างง่าย ๆ ได้ นอกจากนี้ ตัวอย่างโปรแกรมของบทความนี้ เป็นการสั่งงานการเคลื่อนที่หุ่นยนต์ขับเคลื่อนด้วยล้อเพื่อสั่งเดินหน้า ถอยหลัง เลี้ยวซ้าย เลี้ยวขวา และหยุด
Read More