This article is a tutorial on how to use esp and esp32 classes, which are dedicated classes for esp8266 and esp32 microcontrollers to access specific features and the internal abilities of the two chips.

esp
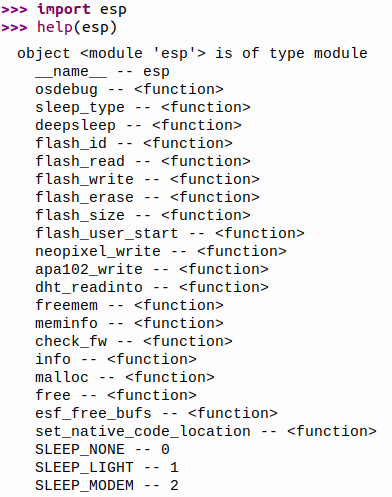
It is a class designed specifically for use with esp8266 and esp32, which consists of functions and constants as shown in Figure 1.
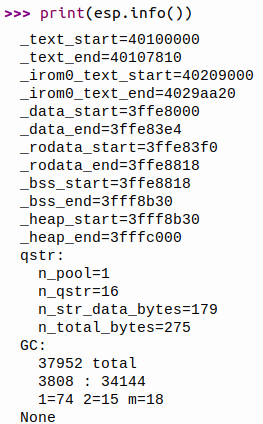
The info() function provides information about the program’s start/end position, start/end of rom0, start/end of storage memory, start/end of read-only data, start/end of stack memory, start and end of heap memory (or working RAM) and information about qstr/GC as shown in Figure 2.
There are three types of sleep modes that can be set to save energy: SLEEP_NONE, SLEEP_LIGHT and SLEEP_MODEM, or 0, 1 and 2, which means
- It is the setting to cancel the sleep.
- Save power by shutting down processor and WiFi.
- Turn off WiFi
By the pattern of checking the sleep mode and setting the sleep mode as follows.
mode = esp.sleep_type()
esp.sleep_type( mode )
When using an esp8266 (for ESP32, machine.deepsleep() is required) and wanting to enter sleep mode to save power for a specified period of time, GPIO 16 must be connected to the reset pin to be used as a reset signal when the time is reached or press the reset button to resume the format of the command is as follows.
esp.deepsleep( microsec )
The command to read the flash memory id has the following form of usage:
esp.flash_id()
The command for querying the amount of flash memory has the following usage patterns.
esp.flash_size()
Sometimes programmers want to write data to available flash memory to be used as temporary storage for developed programs. The initial address of the writable, erasable, readable flash memory can be specified with the following commands.
addr = esp.flash_user_start()
esp.flash_erase(del_addr)
esp.flash_write(addr, bytes)
data = esp.flash_read(addr, read_bytes )
What we like the most is a set of instructions for requesting heap memory reservations and canceling reserved memory make it as convenient as writing in C/C++ by the above commands as follows. There are 2 cases where the return value is returned from the reserving: If the return value is 0, it means the reserving was unsuccessful and in the case of a numeric value greater than 0, which is the default value of the requested memory address.
ref = esp.malloc( reserve_bytes )
esp.free( ref )
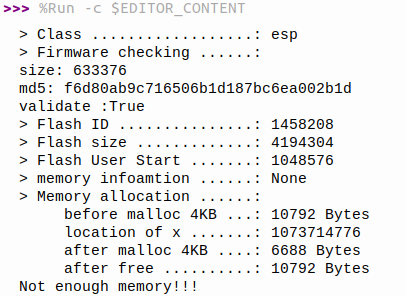
Here are some examples of other commands of the esp class: and get a sample result as shown in Figure 3.
# demoExp.py
# 2021-007-15 by JarutEx (https://www.jarutex.com)
import esp
print("> Class ..................: {}".format(esp.__name__))
print("> Firmware checking ......:");
print("validate :{}".format(esp.check_fw()))
print("> Flash ID ...............: {}".format(esp.flash_id()))
print("> Flash size .............: {}".format(esp.flash_size()))
print("> Flash User Start .......: {}".format(esp.flash_user_start()))
print("> memory infoamtion ......: {}".format(esp.meminfo()))
print("> Memory allocation ......:")
print("     before malloc 4KB ...: {} Bytes".format(esp.freemem()))
x = esp.malloc(4096)
print("     location of x .......: {}".format(x))
print("     after malloc 4KB ....: {} Bytes".format(esp.freemem()))
esp.free(x)
print("     after free ..........: {} Bytes".format(esp.freemem()))
x = esp.malloc( esp.freemem() + 1 )
if (x == 0):
    print("Not enough memory!!!")
There is also a function to operate the DHT Smart Pixel (APA102) and neopixel dedicated modules. The form of use is as follows.
esp.dht_readinto( pin, buf )
esp.apa102_write( clockPin, dataPin, pixels, numBytes )
esp.neopixel_write( pin, pixels, numBytes, is800KHz )
To enable and disable the display of debug messages of the program via UART uses the following commands:
esp.osdebug( UART )
esp.osdebug( None )
esp32
The esp32 class is a supplemental class for use with ESP32 specifically by the list of functions, subclasses and constants are shown in Figure 4.
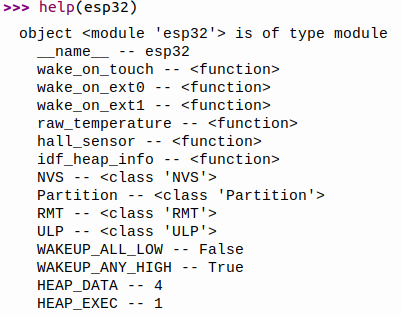
From Figure 4, it can be seen that the thermal readings of the internal heat sensor in ESP32 and the magnetic values (Hall Effect) can be performed through the following commands.
f = esp32.raw_temperature()
c = (esp32.raw_temperature() -32.0)/1.8
magnetic = esp32.hall_sensor()
Accessing heap memory data with the command idf_heap_info( ) has the following form of usage: The property values (capacities) are esp32.HEAP_DATA for accessing storage memory and esp32.HEAP_EXEC for accessing the instruction set memory that can be processed by the processor.
data = esp32.idf_heap_info( property )
An example of a display of idf_heap_info( ) is as follows, and the result is as shown in Figure 5. The result is 4 tuples of data, namely the number of bytes of the heap, remaining bytes, the largest block size that can be reserved and the minimum amount that can be restored at the end of the usage period.
import esp32
print("=== HEAP DATA INFO ===")
print(esp32.idf_heap_info( esp32.HEAP_DATA ))
print("=== HEAP EXEC INFO ===")
print(esp32.idf_heap_info( esp32.HEAP_EXEC ))
From Figure 5, we can see that there are 5 chunks in the data heap, each with dimensions 7280, 16648, 94608, 15072, and 113840. The program heap has three, which are 15072, 113840, and 23656, etc.
In addition, the functions in the wake_up group, or set the wake from sleep, have 3 touch commands (configure the wake to True or False to turn the touch wake on and off), EXT0 and EXT1. as the following format. There are two types of level values: esp32.WAKEUP_ALL_LOW and esp32.WAKEUP_ANY_HIGH. The pins can be specified as None or tuple/list data.
esp32.wake_on_touch( wake )
esp32.wake_on_ext0( pin, level )
exp32.wake_on_ext1( list_of_pin, level )
Partition
It is a class for accessing flash memory partitions and includes a set of instructions for enabling OTA (over-the-air) updates a list of partition classes to manage flash memory partitions as shown in Figure 7.
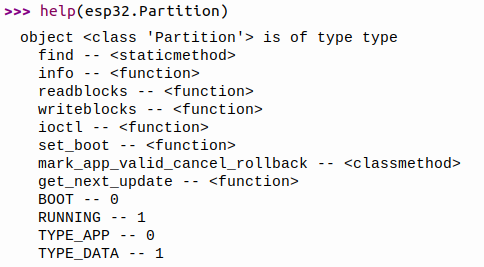
Creating an object to access a partition has the following format, where the id value is Partition.BOOT or Partition.RUNNING or a string that is the name of the partition to be accessed.
object = esp32.Partition( id )
The list of Micropython partitions from the partitions.csv file is as follows: nvs is a partition of the Micropython file system, and there are two types of partitions: esp32.TYPE_APP and esp32.TYPE_DATA.
# Notes: the offset of the partition table itself is set in
# $ESPIDF/components/partition_table/Kconfig.projbuild and the
# offset of the factory/ota_0 partition is set in makeimg.py
# Name,   Type, SubType, Offset,  Size, Flags
nvs,      data, nvs,     0x9000,  0x6000,
phy_init, data, phy,     0xf000,  0x1000,
factory,  app,  factory, 0x10000, 0x200000,
vfs,      data, fat,     0x220000, 0x180000,
The readout of the partition requesting access has the form of the command:
object.info()
The result is a tuple of 6 elements, each representing type, subtype, addr, size, label and encrypted, respectively. An example of reading a vfs partition returns the following values:
(1, 129, 2228224, 1572864, 'vfs', False)Searching for partitions by type, subtype and partition name (label), if the subtype is set to 255 or the partition name is None, it means any type or any name.
esp32.Partition.find( type=TYPE_APP, subtype=255, label=None )
If you want to change the status of the partition to be bootable to make it the next startup partition, you can do so with the following commands:
object.set_boot()
Here are the commands for reading and writing a block of data (buf) in a block (block_num) at a required offset within the partition to be accessed.
object.readblocks( block_num, buf )
object.readblocks( block_num, buf, offset )
object.writeblocks( block_num, buf )
object.writeblocks( block_num, buf, offset )
If you want to control the operation of partitions, you must use ioctl( ). These implementations extend the capabilities of the os class to be used exclusively with the esp32 microcontroller as follows.
object.ioctl( cmd, arg )
From the ioctl( ) command format, there is a cmd requirement which, when combined with writing data to the block, allows us to do OTA.
- 1 is the command to initialize the partition (do not specify arg).
- 2 is the command to shutdown the partition (without setting arg).
- 3 is the command to sync (Sync) partitions (do not set arg).
- 4 reads the number of partition blocks. (do not set arg)
- 5 read the number of bytes per block, the default value is 512 bytes (do not define arg).
- 6 remove arg number block
And the command to find the next partition to be executed is as follows: If there is no such partition then OSError: [Errorno 2] ENOENT
running .get_next_update()
An example of a class implementation program esp32.Partition is as follows
#############################################################
# demoPartition.py
# (C) 2021, JarutEx
# https://www.jarutex.com
#############################################################
import esp32
def showPartitionInfo( x ):
part = esp32.Partition(x)
info = part.info()
print("Partition information")
printPartitionInfo(info)
print(" Number of blocks {}".format(part.ioctl(4,...)))
print(" block size ..: {} byte(s)".format(part.ioctl(5,...)))
def printPartitionInfo( info ):
print(" Name ........: {}".format(info[4]))
print(" Type ........: {}".format(info[0]))
print(" SubType .....: {}".format(info[1]))
print(" Address .....: {}".format(info[2]))
print(" Size .......: {} Bytes".format(info[3]))
print(" Encrypted ...: {}".format(info[5]))
def showPartitions():
partApp = esp32.Partition.find(type=esp32.Partition.TYPE_APP)
partData = esp32.Partition.find(type=esp32.Partition.TYPE_DATA)
print("APP Partition ({})".format(len(partApp)))
for i in range(len(partApp)):
print(" {}.{}".format(i+1,partApp[i]))
printPartitionInfo(partApp[i].info())
print(" Number of blocks {}".format(partApp[i].ioctl(4,...)))
print(" block size ..: {} byte(s)".format(partApp[i].ioctl(5,...)))
print("DATA Partition ({})".format(len(partData)))
for i in range(len(partData)):
print(" {}.{}".format(i+1,partData[i]))
printPartitionInfo(partData[i].info())
print(" Number of blocks {}".format(partData[i].ioctl(4,...)))
print(" block size ..: {} byte(s)".format(partData[i].ioctl(5,...)))
showPartitions()
showPartitionInfo( "nvs" )
running = esp32.Partition(esp32.Partition.RUNNING)
print("esp32.Partition.RUNNING")
printPartitionInfo(running.info())
try:
nextRunning = running.get_next_update()
except:
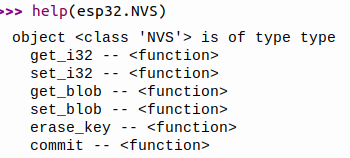
print("No next update!")NVS
NVS (Non-Volatile Storage) is the memory used by ESP32. The storage structure is partition style and partitions are identified by namespaces. Each partition contains a group of data items containing keys and values of keys, which are integer binary blobs or strings. Currently, only 32-bit integers and binary blobs are supported.
The list of NVS classes is shown in Figure 6.
Creating an object to access the NVS namespace has the following format:
object = esp32.NVS( namespace )
The command for assigning a 32-bit integer to a key has the following format:
object.set_i32( key, number )
To read a numeric value from a key, use the following command:
data = object.get_i32( key )
The case for binary blob can be created with the following command format.
object.set_blob( key )
To read the binary blob, use the following command:
data = object.get_blob( key )
If the key is not active, delete it with the following command.
object.erase( key )
However, set_i32( ) and set_blob( ) generate data in memory. If you want to save to NVS, you must command commit() as follows:
object.commit( )
RMT
The list of RMT classes for use with sensors connected to remote control via an IR (infra-red) sensor is shown in Figure 8.
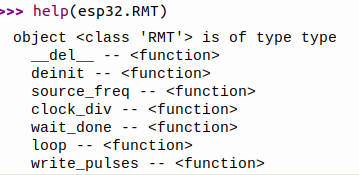
As of the writing of this article, the RMT class supports 80MHz clock frequency (so the frequency cannot be set with source_freq) and can set an 8-bit integer clock divider (0-255) to allow suitable for the device being communicated with the command for creating an RMT object has the following format: 8 channels are available (0-7), idle_level is True means high voltage, False is low voltage, tx_carrirer is a three-member tuple that is a positive integer: carrier frequency, duty percent (values in the range 0 to 100), and pressure rating of 1 (high) or 0 (low).
object = esp32.RMT( channel, pin=machine.Pin( pin ), clock_div=divider, idle_level=False, tx_carrier=None )
object = esp32.RMT( channel, pin=machine.Pin( pin ), clock_div=divider, tx_carrier=(38000, 50, 1) )
When deactivating, it must be canceled as follows:
object.deinit()
The reading of the clock divider has the following command format.
clock_value = object.clock_div()
If you want to output a pulse, you can use the following command to send a signal, where duration is an integer value in 100ns and data is the initial transmission voltage which can be outputed in 3 ways:
- Sends a list or tuple of duration in 100ns that sends 0 and 1 sequentially for the duration that assigns the initial pressure level to the data.
- The value of duration is an integer and data is a list or tuple of pressure.
- Both duration and data are lists or tuples with the same number of members to specify the duration value of each data.
object.write_pulses( duration, data=True )
An example of the command in the first form is as follows.
write_pulses((1, 20, 2, 40), 0)
It means sending data 0 for 1x100ns, 0 for 20x100ns, 0 for 2x100ns and 1 for 40x100ns with default voltage set to Low or 0.
To check the status of the pulse transmission, use the following command. If the result is True, the tunnel is empty; if false, it is doing write_pulses.
state=object.wait_done(timeout=0)
The command to defines the loop have the following format: the value enable_loop set to True means that the data is sent as called by write_pulse again, and if false means that when the pulse is sent in this cycle, no data is resent. However, this loop can be repeated no more than 126 times.
object.loop( enable_loop )
ULP
Using ULP (Ultra-Low-Power co-processor), the ESP32’s built-in energy-saving microcontroller can be accessed and executed by sending binary instructions and running it through the ULP class as shown in Figure 9.
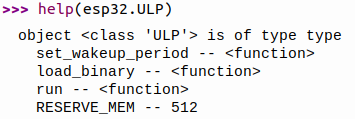
The command used to set ULP operations to run every specified period has the following usage patterns:
exp32.ULP.set_wakeup_period( period_index, period_microsec )
Loading a set of instructions for ULP to run at the set time is done with the following command.
esp32.ULP.load_binary( addr, program )
Ordering a program that has been loaded to keep running has the following command format:
esp32.ULP.run( start_addr )
Conclusion
From this article, esp classes can be used with ESP8266 and ESP32, except that the ESP32 deep sleep command must be called through machine.deepsleep( ) and ESP32 class that is only available for ESP32. NVS/Partition/RMT and ULP are available, so this microcontroller’s bargain price is very attractive. But without these additional capabilities, the ESP8266 is capable of more than enough applications. And the price is much cheaper. Finally, have fun with programming.
If you want to talk with us, feel free to leave comments below!!
References
(C) 2020-2021, By Jarut Busarathid and Danai Jedsadathitikul
Updated 2021-10-26