This article discusses the use of PWM or Pulse Width Modulation modules under the machine class of MicroPython for esp8266 and esp32, along with an example of using PWM to dim the brightness of an LED and the generation of audio frequencies with PWM, which can be applied in the future.

PWM
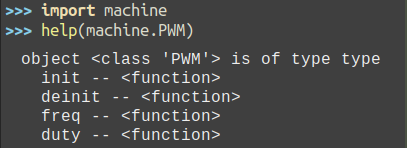
MicroPython’s PWM implementation requires a PWM class called machine class, as shown in Figure 1. It has four commands: init(), deinit(), freq() and duty().
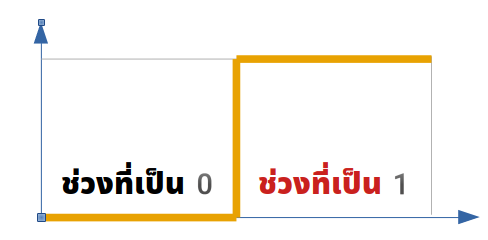
The principle of PWM is to determine the rate of status values 1 and 0 of a single wave, as shown in Figure 2. If the waveform is only 1, the duty ratio must be 100% or 1023. If the duty value needs to be 0% or a value of 0 which causes the waveform to have a digital flag of 0.
With this principle, microcontroller users without a DAC (Digital to Analog Convertor) or digital-to-analog converter can set the voltage level of the PWM pin by configuring the duty value. Normally the voltage is 3.3v, if you want it to be half, set the duty value to 512 or 50%, and if you want the voltage to be 1.0V, you need to set the duty value to 310. Therefore, the duty equation is as follows:
duty = 1023*(voltage/3.3)
When written as a function in Python, it can be written as follows. The sample result is as shown in Figure 3.
def findDutyValue( volt ):
    return int(volt/3.3*1023.0)
print(findDutyValue(0.0))
print(findDutyValue(1.0))
print(findDutyValue(1.65))
print(findDutyValue(2.0))
print(findDutyValue(3.3))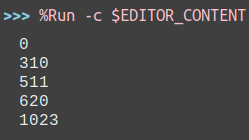
esp8266‘s pins
The PWM pins of the esp8266 microcontroller are:
- 0
- 2
- 4
- 5
- 12
- 13
- 14
- 15
The limitation of the esp8266’s PWM usage is that it supports operating frequencies in the 1Hz to 1kHz range and duty values must be in the 10-bit range, or 0 to 1023.
esp32‘s pin
The PWM pins of the esp32 family of microcontrollers can be used with any pin enabled. The duty is set to 0 to 1023 and the settable frequency is from 1Hz to 40MHz, which is higher than the esp8266 where the default preset frequency is 5kHz and duty is 50% or 512.
Additionally, the esp32 supports the generation of 16 PWM channels, with 8 of them being of different frequencies, but the other 8 have to be of the same frequency.
Usage
Creating a PWM object has the following form of creation:
obj = machine.PWM( machine.Pin( pin ) )
Pulse frequency configuration can be done with the following format:
obj.freq( freq_val )
The duty or interval value of digital voltage level 1 must be in the range 0 to 1023 as follows:
obj.duty( duty_val )
And when finished using the program, the programmer should cancel the operation by using the deinit() command as follows:
obj.deinit()
For creating objects by configuring pins that are connected, the frequency and duty values in a single command can be done according to the following patterns.
obj = machine.PWM( machine.Pin( pin ), freq=freq_val, duty=duty_val )
Example Code
There are 3 examples of programs mentioned in this example: dimmer LED bulbs and produce the following sound frequencies
Dim the LED
An example of this is to dim the LED lamp installed on the esp8266 board (located at GPIO2) so that the lamp’s light fades from dark to bright and from bright to dark. The sample code is as follows.
#fade LED
from machine import Pin,PWM
import time

led = PWM(Pin(2))
led.freq(50)
led.duty(1023)
for i in range(0,1023):
    #print(i)
    led.duty(1023-i)
    time.sleep_ms(1)
for i in range(0,1024):
    #print(i)
    led.duty(i)
    time.sleep_ms(1)
led.deinit()
led = Pin(2)
led.value(0)
Create sound frequencies
Example program for generating audio frequencies by connecting the ground of the speaker to pin GPIO13 and connecting Vcc to the + of the speaker.
import time
from machine import Pin,PWM
spk = PWM(Pin(13))
spk.duty(0)
for i in range(100,1000,200):
    spk.freq(i)
    time.sleep_ms(20)
spk.duty(1023)
spk.deinit()
spk = Pin(13)
spk.value(1)
When the working part is written as a beep() function, it can be written as follows:
def beep(f,d=512):
    spk = PWM(Pin(13),freq=f, duty=d)
    spk.init()
    time.sleep_ms(50)
    spk.deinit()
Conclusion
From this article, you will find that to use PWM with esp8266 microcontroller, you must select the correct pin and the frequency band must be in the range of 1Hz to 1kHz, while esp32 supports all pins at a maximum of 16 channels and the frequency range is from 1Hz to 40MHz. This can be applied to several cases such as control the electric motor speed, servo motor rotation control, sound frequency generation, LED brightness control or commanding the brightness level of the TFT by sending a pulse to the BL pin of the TFT module, etc. Finally, have fun programming.
If you want to talk with us, feel free to leave comments below!!
References
- MicroPython : esp8266 : Tutorial : Pulse Width Modulation
- MicroPython : esp32 : Tutorial : Pulse Width Modulation
(C) 2020-2021, By Jarut Busarathid and Danai Jedsadathitikul
Updated 2021-12-14