This article is based on the article programming a client/server for a weather station over a wireless network or WiFi to modify from reading data from sensors to joystick shield (Arduino Joystick Shield) so that it has become a wireless game controller using MicroPython and an ESP32 microcontroller as shown in Figure 1. It is possible to control the movement of objects in the display via a ST7735 TFT screen connected to another ESP32. It will be found that the Python implementation of MicroPython is applicable in this example. And with an easy-to-write language and code that can be modified without recompiling and uploading, it’s easy to write prototype code for further development at a higher speed.
Equipment
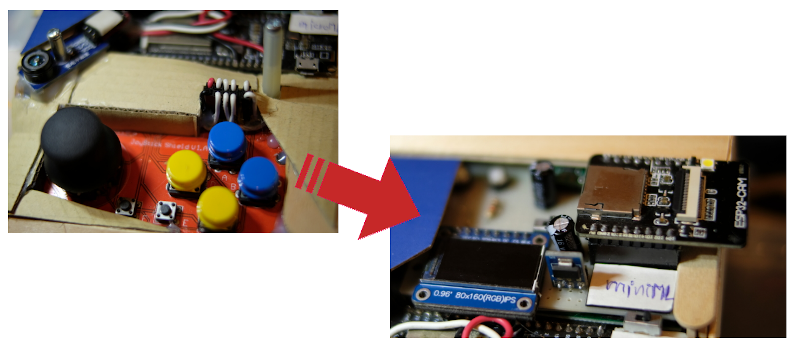
Display
- ST7735 GREENTAB80x160
- ESP32CAM
- Connection between display and ESP32 with spi 2nd channel
- SCK connect to GPIO14 of ESP32
- MOSI connect to GPIO12 of ESP32
- DC connect to GPIO15 of ESP32
- RST connect to GPIO13 of ESP32
- CS connect to GPIO2 of ESP32
Controller
- Joystick module
- Buzzer
- ESP32
- Connection
- Buzzer connect to GPIO25 of ESP32 to export analog signal
- Lever X connect to GPIO36 of ESP32 to read analog signal
- Lever Y connect to GPIO39 of ESP32 to read analog signal
- Switch A connect to GPIO32 to import digital signal
- Switch B connect to GPIO33 of ESP32 to import digital signal
- Switch C connect to GPIO35 to import data
- Switch D connect to GPIO34 to import digital signal
- Switch E connect to GPIO27 to import digital signal
- Switch F connect to GPIO26 to import data
Example Code
Example program for controlling the red square box on the miniML board by moving the joystick lever attached to the microML board by sending data over the Internet. The transmitted data has a size of 16 bits or 2 bytes, which is caused by encoding bits of data from receiving data from the joystick, as shown in Figure 2 and as detailed below.
- Bit 11 to 15 are idle.
- Keep the status of the left down lever.
- If 1 means it was pressed
- If 0 means not pressed
- Bit 9 stores the state of the right down lever.
- If 1 means it was pressed
- If 0 means not pressed
- Bit 8 is idle.
- Bit 7 stores the state of the lever upward.
- If 1 means it was pressed
- If 0 means not pressed
- Bit 6 stores the state of the lever downward.
- If 1 means it was pressed
- If 0 means not pressed
- Bit 5 stores the state of the swA key pressed.
- If 1 means it was pressed
- If 0 means not pressed
- Bit 4 stores the state of the swB key pressed.
- If 1 means it was pressed
- If 0 means not pressed
- Bit 3 stores the state of the swC key pressed.
- If 1 means it was pressed
- If 0 means not pressed
- Bit 2 stores the state of the swD key pressed.
- If 1 means it was pressed
- If 0 means not pressed
- Bit 1 stores the state of the swE key pressed
- If 1 means it was pressed
- If 0 means not pressed
- Bit 0 stores the state of the swF key pressed.
- If 1 means it was pressed
- If 0 means not pressed

Display part
The function of the display is to act as the AP of the Internet network. It is set as follows.
- ssid is dCoreMiniML
- passwd is _miniML_dCore_
- IP Address is 192.168.4.1
- communication port is 1592
When acting as an AP and waiting for a connection. Upon successful connection from the joystick part, it waits for 2 bytes of data from the controller side to modify the pos value which holds the coordinates of the red box under the following conditions
- Decrease x or pos[0] if the lever is moved to the left.
- Increase the value of x or pos[0] when the lever is moved to the right.
- Decrease y or pos[1] if the lever is moved upwards.
- Increase the y or pos[1] value when the user lowers the lever.
Code
#############################################################
#GameDisplay.py
# For server
# (C) 2021, JarutEx
#############################################################
from machine import Pin,SPI,SDCard,ADC
import dht
import machine
import gc
import time
import os
import sys
import machine as mc
import network as nw
import ubinascii as ua
import socket
from st7735x import TFT
#############################################################
# system
gc.enable()
gc.collect()
machine.freq(240000000)

ssid = 'dCoreMiniML'
passwd = '_miniML_dCore_'
serverIP = '192.168.4.1'
serverPort = 1592

class coreDisplay:
    def __init__(self):
        self.spi = None
        self.dev = None
        self.use()
        self.unused()

    def use(self):
        self.spi = SPI(2, baudrate=33000000,
          sck=Pin(14), mosi=Pin(12),
          polarity=0, phase=0)
        # dc, rst, cs
        self.dev=TFT(self.spi,15,13,2)

    def unused(self):
        self.spi.deinit() # ปิด


tft = coreDisplay()
tft.use()

########################################
## start TFT

tft.dev.fill(tft.dev.BLACK)
tft.dev.text("(C)2020-21",(10,24),tft.dev.YELLOW)
tft.dev.text("JarutEx",(92,244),tft.dev.WHITE)
tft.dev.text("JarutEx",(93,24),tft.dev.WHITE)
tft.dev.swap()

###########################################################
# Main program
APif = nw.WLAN(nw.AP_IF)
# Set WiFi access point name (formally known as ESSID) and WiFi channel
APif.config(essid=ssid,
            password=passwd,
            authmode=nw.AUTH_WPA2_PSK,
            channel=1, hidden=True)
APif.active(True)
print(APif.ifconfig())

# main loop
s = socket.socket(socket.AF_INET, socket.SOCK_STREAM) # TCP
s.bind(('',serverPort))
s.listen(1)
conn, addr = s.accept()

pos = [78,38]
tft.dev.fill(tft.dev.BLACK)
tft.dev.fillrect(pos,(4,4),tft.dev.RED)
tft.dev.swap()

try:
    while True:
        request = (int).from_bytes(conn.recv(2),'big')
        print(request)
        if (request & 0x0400): # left 1024
            pos[0] -= 1
        if (request & 0x0200): # right 512
            pos[0] += 1
        if (request & 0x0080): # up 128
            pos[1] -= 1
        if (request & 0x0040): # down 64
            pos[1] += 1
        tft.dev.fill(tft.dev.BLACK)
        tft.dev.fillrect(pos,(4,4),tft.dev.RED)
        tft.dev.swap()
except KeyboardInterrupt:
    pass
conn.close()
s.close()
APif.active(False)
Control part
The control program consists of two parts of the program code: the keypad library that connects to the Joystick Shield, and the main program interface that connects to the display AP and transmits data from the joystick to the controller. display
Library keypad
########################################################################################
# keypad.py
# to create wireless Game Pad Controller
# By JarutEx
# 2021-09-02 update JoyStick
# 2021-08-20 create Keypad class to support JoyStick and A,B,C,D,E,F buttons except buttons on joystick
#
########################################################################################
from machine import Pin, ADC

########################################################################################
class Keypad:
    def __init__(self):
        self.swA = Pin(32, Pin.IN)
        self.swB = Pin(33, Pin.IN)
        self.swC = Pin(35, Pin.IN)
        self.swD = Pin(34, Pin.IN)
        self.swF = Pin(26, Pin.IN) # select
        self.swE = Pin(27, Pin.IN) # start
        self.jst = (ADC(Pin(36)), ADC(Pin(39))) # X,Y
        self.jst[0].width( ADC.WIDTH_12BIT ) # 12bit
        self.jst[0].atten( ADC.ATTN_11DB ) # 3.3V
        self.jst[1].width( ADC.WIDTH_12BIT ) # 12bit
        self.jst[1].atten( ADC.ATTN_11DB ) # 3.3V
        self.bits = 0x000 # 10-bits
        self.x = self.jst[0].read()
        self.y = 4095-self.jst[1].read()
        self.a = self.swA.value()
        self.b = self.swB.value()
        self.c = self.swC.value()
        self.d = self.swD.value()
        self.e = self.swE.value()
        self.f = self.swF.value()
    def read(self):
        self.x = self.jst[0].read()
        self.y = 4095-self.jst[1].read()
        self.a = self.swA.value()
        self.b = self.swB.value()
        self.c = self.swC.value()
        self.d = self.swD.value()
        self.e = self.swE.value()
        self.f = self.swF.value()
    def show(self):
        self.read()
        print("{} ({},{}) SWs: A{} B{} C{} D{} E{} F{}".format(
            hex(self.status()),
            self.x,self.y,
            self.a,self.b,self.c,self.d,self.e,self.f))
    def status(self):
        self.bits = 0x000 # 10-bits
        if (self.x < 1500): # left
            self.bits = self.bits | 0x400
        elif (self.x > 2500): # right
            self.bits = self.bits | 0x200
        if (self.y < 1500): # up
            self.bits = self.bits | 0x080
        elif (self.y > 2500): # down
            self.bits = self.bits | 0x040
        if (self.a == 0):
            self.bits = self.bits | 0x020
        if (self.b == 0):
            self.bits = self.bits | 0x010
        if (self.c == 0):
            self.bits = self.bits | 0x008
        if (self.d == 0):
            self.bits = self.bits | 0x004
        if (self.e == 0):
            self.bits = self.bits | 0x002
        if (self.f == 0):
            self.bits = self.bits | 0x001
        return self.bits
Main
The main program connects to the dCoreMiniML and emits a sound to the speaker 1 time when the connection is successful. After that, the timer sends data from joystick to service or display every 30 milliseconds as follows:
###################################################################
### GamePad
# (C) 2021, JarutEx
###################################################################
from machine import Pin, ADC, Timer, SPI
from keypad import Keypad
import time
import gc
import network as nw
import socket
import machine

###################################################################
### system setting
###################################################################
gc.enable()
gc.collect()
machine.freq(240000000)
keypad = Keypad()
tmSwitch = Timer(0) # control input from switch
ssid = 'dCoreMiniML'
passwd = '_miniML_dCore_'
serverIP = '192.168.4.1'
serverPort = 1592
# WiFi
print("Start WiFi")
sta = nw.WLAN( nw.STA_IF )
sta.active(False)
sta.active(True)
# connection
sta.connect(ssid, passwd)
while not sta.isconnected():
    time.sleep_ms(200)
print(sta.ifconfig())
serverInfo = socket.getaddrinfo( serverIP, serverPort, 0, socket.SOCK_STREAM )[0]
print("Server info : {}".format(serverInfo))

###################################################################
### Speaker
###################################################################
pinSpk = Pin(25,Pin.OUT)

def beep():
    pinSpk.value(0) # on
    time.sleep_ms(100)
    pinSpk.value(1) # off

def spkOff():
    pinSpk.value(1) # off

spkOff()
beep()

###################################################################
## doInput()
###################################################################
def doInput(x):
    #keypad.show()
    keypad.read()
    status = keypad.status()
    data = bytearray([(status & 0xff00) >> 8,status&0x00ff])
    print(status, data)
    s.write(bytearray(data))

###################################################################
### Main program
###################################################################
# start program
s = socket.socket( socket.AF_INET, socket.SOCK_STREAM )
s.connect((serverIP,serverPort))
tmSwitch.init(period=30, mode=Timer.PERIODIC, callback=doInput)
# main loop
try:
    while True:
        time.sleep_ms(10)
except KeyboardInterrupt:
    pass
# end program
tmSwitch.deinit()
sta.disconnect()
sta.active(False)
s.close()
Conclusion
From this article, you will find that we can apply a wider variety of ESP32 microcontroller systems when replacing sensors or displays and incorporating them into communications. For example, the previous example uses one ESP32 as a Web Server and the other as a sensor, allowing the Server to read data from the censored board when browsing the web. While in this article, we use the display attached to the server board and change it from sensor to joystick. After that, the client-side is responsible for sending data to the server instead which will see that if a programmer understands the working principles and methods of coding, they can modify their coding to serve a variety of purposes. So practice a lot, experiment a lot, and have fun programming.
If you want to talk with us, feel free to leave comments below!!!
(C) 2021, By Jarut Busarathid and Danai Jedsadathitikul
Updated 2022-01-01