This article describes the use of the Serial class in the Arduino framework to use as a command for reporting results from the microcontroller board to the Arduino IDE, making it easy to verify operation and learn the basics of C++.
Class Serial
The Arduino Serial class uses the serial communication port of the microcontroller board to communicate with external devices. By the way, the serial communication port has buffers for storing data for input and output. The usage of commands or methods is as follows.
Start communicating
The begin command of the Serial class is used to determine the communication or transmitting/receiving speed between external devices and the microcontroller board. The communication speed values are 300, 1200, 2400, 4800, 9600, 19200, 38400, 57600 and 115200 bps.
The unit of communication speed is called bps (bits per second), which is the ratio of n bits of data transmitted in one second. For this reason, 9600bps means 9600 bits are sent or received per second. If 9600bps is used on the transmitting side while 19200bps is used on the receiving side, the speed of 19200bps will be a problem ie. when transmitting data for 1 second, the receiver side sees that the transmitted data is 19200 data, while the sender only sends 9600 data. Therefore, in communication, the communication speed of both the microcontroller board and the external device must have the same speed.
Serial.begin( communication_speed );The default parameter of begin() is SERIAL_8N1, which means that serial communication has 8 bits of data, non-parity bits, and has one-stop bit, which is set to correspond to external devices connected to the microcontroller board.
Serial Monitor
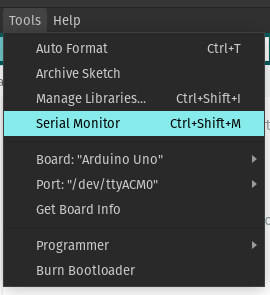
Setting the terminal communication speed in the Arduino IDE can be done by going to the Tools menu and selecting the Serial Monitor item or pressing a hotkey.
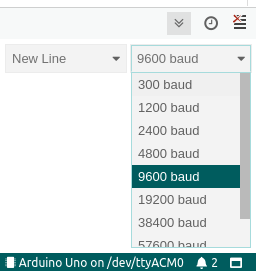
When the Serial Monitor is selected as the terminal to communicate through the serial communication port, you will see the program window at the bottom of the Arduino IDE program as follows.

Users can adjust the communication rate with the Arduino board by selecting the communication rate as shown below.
Close communication
The command for deactivating a serial communication port has the following form:
Serial.end();Communication port monitoring
Sometimes the microcontroller board may not have a serial communication port, so if we writing a program to communicate through the port will cause an error. The big problem of programming on a microcontroller system is that it cannot see the error of the operation because there is no operating system to report any errors. For this reason, when the programmer wants to use the communication via the serial port, you must always check the port first to avoid any errors in the operation. If the program listens to a serial connection, in programming with the Arduino IDE, this function can work because the program development must connect the communication cable to the computer. But when the board is used, it can’t work. This is caused by the program looping waiting for communication but no connection was found, so it’s looping around endlessly.
The commands for checking the port or serial port communication have the following format:
if (Serial) {
    // What to do when there is a serial communication port
}

หรือ

if (!Serial) {
    // What to do when there is no serial port
}

หรือ

while (Serial) {
    // What to do when there is a serial communication port
}

หรือ

while (!Serial) {
    // What to do when there is no serial port
}
Exporting data
The command for exporting data has the following format:
Serial.write(val);
Serial.write(str);
Serial.write(buf, len);
The difference between the three commands is that the first sends a byte of data with val, the second sends a string, and the third sends data from an array variable of len bytes.
If you want to export data as a string where the data imported to the command is converted to a string to be export to the serial port. The command can be used in the following format.
Serial.print( data );
Serial.println( data );
Serial.print( data, base );
Serial.println( data, base );
Serial.print( decimal, number of digits after the decimal point );
Serial.println( decimal, number of digits after the decimal point );
The print and println commands are used to send data to the serial port at the speed specified by the begin() command. The print command terminates when the date is exported, but println sends a newline code after the data is sent out through the serial communication port.
where base is the type of base number of the data to be displayed which has values of DEC, OCT or HEX for base 10, 8 and 16.
In the case of displaying decimal numbers, the number of digits after the decimal point can be set, for example:
Serial.println( 1.1234, 0 );
Serial.println( 1.1234, 1 );
Serial.println( 1.1234, 2 );
Serial.println( 1.1234, 3 );
Reading the data
data = Serial.read();The read() command is used to take data from the serial port buffer from buffer.
Serial.readBytes( variable, number_of_data );This command reads a specified number of n sets of data and stores them in a variable. This applies to streaming cases.
Serial.readBytesUntil( character, array, number_of_data );Reads data from a stream of n bytes or until a character is found and stores it in an array variable.
variable = Serial.readString();For reading data to store in a string variable. The read data ends with the code ‘\0’.
For reading a string or until a given character is found (terminator), the following format can be used, The terminator is removed from the buffer without appearing in the string.
Serial.readStringUntil( terminator) ;Set Time-out
Serial.setTimeout( millis );Set the communication wait of the serial communication port. Typically set to 1000 milliseconds, this interval affects find(), findUntil(), parseInt(), parseFloat(), readBytes(), readBytesUntil(), readString() and readStringUntil() commands.
Verifying data stored in communication port buffers
If you want to know how much data is stored in the serial port buffer, you can use the following command.
number_of_data = Serial.available();The available() command checks the serial port buffer and reports the number of bytes of data stored
In case of checking the amount of data stored in the buffer prepared to be removed from the serial communication port, the following commands must be used.
number_of_data = Serial.availableForWrite();Searching for data in buffers
Searching for data in a serial communication port buffer is used as follows.
result = Serial.find( target );The result of the operation is True when the target is found in the buffer and False when the target is not found in the buffer.
Stream search
In case you want to search target from a stream serial port until the terminal is found, here is the form of usage:
result = Serial.findUntil( target, terminal );True when a target is found and False when a time-out occurs.
Command to eject data from buffers.
Command to remove all data from the buffer without waiting for input with the following format:
Serial.flush();Data conversion from serial communication port
The commands to convert data read from buffers and convert data types to integers and decimals have the following format:
data = Serial.parseInt();
data = Serial.parseFloat();
Read next data
If you want to read the next byte of the buffer without removing the data. It has the following usage patterns:
next_data = Serial.peek();Conclusion
In this article, you will find that the Arduino library Serial class supports importing and exporting data from a variety of serial ports. In the article on Arduino for learning C++, we will use a group of commands to display results , and import data between the Serial Monitor of the Arduino IDE and the microcontroller board.
Finally, we hope that this article will be more or less useful. And have fun with programming.
Reference
https://www.arduino.cc/reference/en/language/functions/communication/serial/
(C) 2020-2021, By Jarut Busarathid and Danai Jedsadathitikul
Updated 2021-09-24