This article describes the methods of Wire.h, a class for communicating with devices over an I2C bus that uses two signal wires called SDA and SCL to transmit data between them. We have quite a number of articles about this type of communication and used as the main bus to develop devices by yourself and run through the bus, for example, articles on using esp8266 to connect to Arduino Uno or using esp8266 with stm32f030f4p6, etc.
Pin form I2C
In this section, let’s talk about the pins that serve the SCL and SDA that the microcontroller hardware supports. This makes communication work faster than using simulation software.
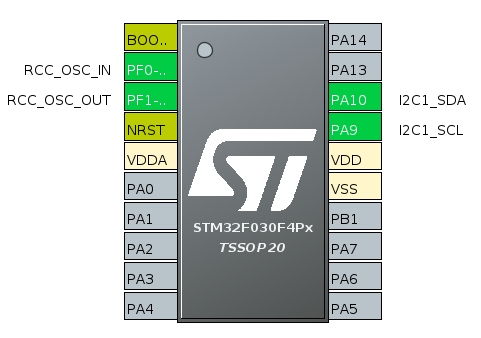
STM32F030F4P6
The pin for performing SCL and SDA is shown in Figure 1, it is found that there is only one set of I2C, using PA10 as SDA pin and PA9 as SCL.
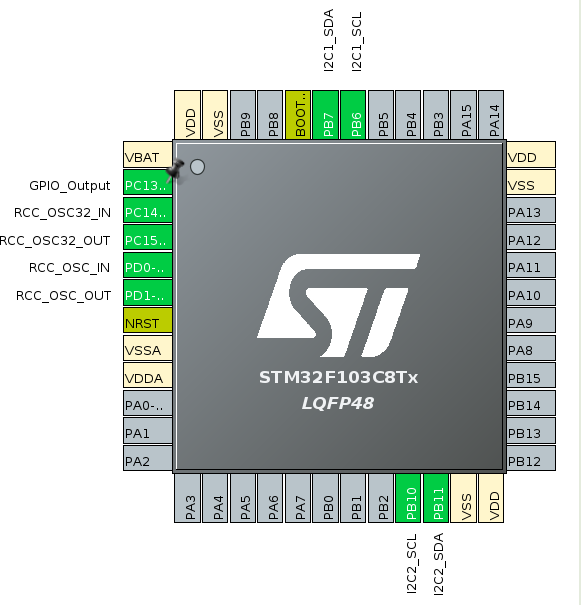
STM32F103C8
For STM32F103C8, which is Cortex-M3, it supports 2 sets of I2C which are I2C1 and I2C2 as shown in Figure 2. The pin SCL of each set is PB6 and PB10 and pin SDA is PB7 and PB11.
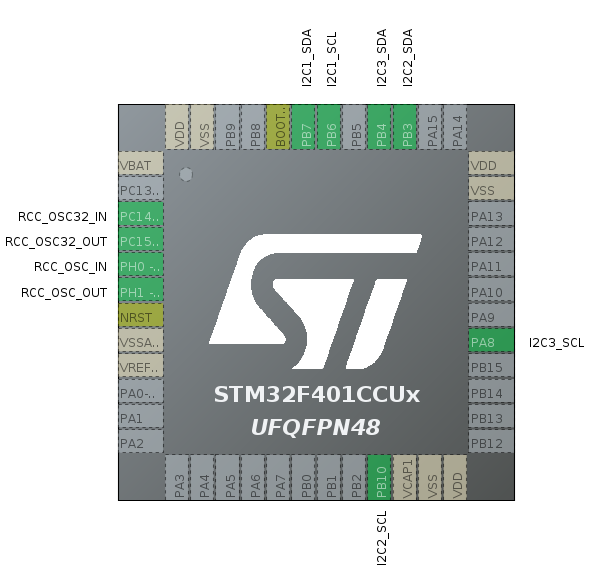
STM32F401CC
For the STM32F401CC, 3 sets of I2C are supported by selecting the second set, SPI3 can be used because of the shared pins. And enabling the third set of I2C will affect the use of USART1. The pin SCL of each set is PB6, PB10 and PA8. For SDA, use the following pins: PB7, PB3 and PB4 as shown in Figure 3.
ESP8266
For the ESP8266, there are no hardware-supported pins but can use all available pins as a software worker.
ESP32
ชิพ ESP32 รองรับฮาร์ดแวร์ I2C จำนวน 2 ชุดดังนี้ ซึ่งขาในชุดที่ 2 นั้นใช้ร่วมกับการทำ DAC
The ESP32 chip supports two sets of I2C hardware as follows, the pin in the second set is used for making a DAC.
- I2C id=0
- SCL is GPIO18
- SDA is GPIO19
- I2C id=1
- SCL is pin 25
- SDA is pin 26
Usage
To use Arduino‘s I2C bus, it must be called through Wire.h. The method to use is as follows.
The command to start the bus is as follows.
Wire.begin()The command to request access to a device at a given address is as follows.
Wire.beginTransmission( device_address )To revoke access to the device requesting access, the following format is available: where the method returns 0 if the access is aborted.
Wire.endTransmission()If you want to send data to the device via the bus can be done in 3 ways: send data bytes, send a string and send a chunk with the amount of data:
Wire.write( byte )
Wire.write( string )
Wire.write( data, byte )
When requesting bus information, the system will store the data in the buffer. The command that checks the amount of data in the buffer has the following format:
buffer = Wire.available()To remove a byte of data from the buffer, use the following command:
byteData = Wire.read()The request command to read data from the device to be stored in the buffer must specify the address of the device and the number of bytes to be read:
Wire.requestFrom( address, bytes )To adjust the communication speed of the I2C bus, use the following command:
Wire.SetClock( frequency )Commands for defining a function to respond when receiving data from an external device.
Wire.onReceive( function )Defines a function that responds to requests.
Wire.onRequest( function )Example
Example of device inspection
An example of checking if an I2C_DEVICE device exists can be written as follows:
      Wire.beginTransmission( I2C_DEVICE );
      if (Wire.endTransmission() == 0) {
        // device founded
      } else {
        // device not founded
      }
Example of writing data to the device.
The process of writing data to the device is to connect and send byte sequences of data and close the connection as the following code.
  Wire.beginTransmission( I2C_DEVICE ); // (1)
  Wire.write( byte1 );             // (2)
  Wire.endTransmission();     // (3)
Example of reading data from device
Reading data from a device consists of three main steps: requesting access to the device’s address, readings, and stored in the buffer and accessing the buffer to remove data:
step 1
  Wire.beginTransmission( I2C_DEVICE );
  Wire.write( address );
  Wire.endTransmission();
step 2
  Wire.requestFrom( I2C_DEVICE, bytes );
step 3
  while (Wire.available( ) ) {
     data = Wire.read( );
  }
Conclusion
From this article, you will find that programming principles to operate an I2C device through the Wire class requires an understanding of the protocol or device communication format since the help command only sends bytes to the device and read only a certain amount of data from the device. We hope it will be a guide for those who are interested in programming to communicate with devices on the I2C bus or create their own devices that communicate with devices on the bus.
If you want to talk with us, feel free to leave comments below!!
References
(C) 2020-2021, By Jarut Busarathid and Danai Jedsadathitikul
Updated 2021-11-04