This article is about programming C/C++ with Arduino Nano, Arduino Uno, LGT8F328P or other boards with C-capable platforms. A pointer is used to point to a memory address and memory management methods, including memory reservation memory access and deactivating the use of memory to create a method for storing data in a Single Linked List along with an example program used to store a list of temperature and humidity values from the DHT11 module as shown in Figure 1.

Link List Data Structure
A linked list is the first type of data structure that works with dynamic memory, meaning it asks for memory to be used without pre-booking like an array and unreserved can control the amount of memory. That way, using a data structure like this results in memory savings in the event that the initial data is not large and can eliminate unwanted parts. Unlike an array that a program can run, it must have enough memory space to hold that array. Making the case that the microcontroller has less RAM may cause not enough memory to do other things, etc.
The list type is popularly referred to as a node because the structure of a node consists of two main parts:
- Payload for storing the data of that node.
- The pointer part is used to point to other loads or to store NULL to indicate it does not point anywhere or no further information.
From the pointer section, if there is a pointer used to point to another node it is called a single linked list. If two pointers are pointing to the previous and next node it is called a doubly link list and if there is more, it is called a Multiple Linked List as shown in Figure 3.

As a result, a linked list construct is the basis for the dynamic application of a queue, stack, graph, or tree. In this article, we will write a program for a single linked list data structure.
Pointer variable
Pointer variables, or pointer variables, are variables equal to the number of bits of a memory reference. Because the value stored in this variable is used to refer to data at the location stored in this variable. This makes it possible to use this type of variable to access different parts of the memory. In older operating systems, programmers had direct access to memory, allowing malicious access to data, thus modern operating systems protect against non-own memory access. However, when we allow a program to run at an administrative level, it also allows the program to access memory outside of its own space as well. As a result, many operating systems add a special set of instructions that programs that need access to run through the functions provided to keep the system secure.
Creating a pointer variable must specify the type of data to be stored internally, because moving the position of memory by ++, –, +=, -= affects the size of the data. If char is shifted by 1 byte, short is shifted by 2 bytes, long is shifted by 4 bytes, and int is shifted by increments equal to the size of the operating chip’s architecture, etc. Therefore, the declaration has the following format:
type * name;
For example, declaring pointer variables ptrByte, ptr2Bytes, and prt4Bytes as pointer variables of 1, 2, and 4 bytes could be coded as follows:
char * ptrByte;
short * ptr2Bytes;
long * ptr4Bytes;
Because variables are stored in a memory location, data access must be preceded by a * so that the C/C++ interpreter understands that the programmer wants to refer to the data. In the following example, the first statement sets the pointer variable ptrA to 60, and the second command adds the value 5 and stores it in variable b.
*ptrA = 60;
b = (*ptrA)+5;
Building a structure
Structured data, or struct in C/C++, is the creation of a new type of data. The members within this new data structure are sorted according to the variable declaration within the given statement. This makes it more flexible to program or group related data within the same chunk. It was the starting point of development towards creating relationships among different chunks of data until creating a relational data structure (relation database) that views each structure as a table and design the relationship of the attributes of each table (…. and in order not to get too out of topic, we would like to cut this off).
The structured data declaration is as follows.
struct name {
type1 name1;
type2 name2;
…
typen namen;};
From the form of the declaration of the structure when written to declare a data structure for a single link list that collects decimal temperature and humidity data can be written as follows.
struct sNode{
  float t;
  float h;
  sNode * next;
};
Because the declaration tells the translator that there is a new type of data structure created by the programmer. It contains only the nature of the data and the given name. Therefore, the implementation requires that the type of structure be declared as a variable to take the blueprint of the declared structure to reserve data in memory for use as variables as the following example.
struct sNode{
  float t;
  float h;
  sNode * next;
};

sNode node;

void printNode( sNode n ) {
  Serial.print("[");
  Serial.print(n.t);
  Serial.print(",");
  Serial.print(n.h);
  Serial.print("][");
  Serial.print((int)(n.next));
  Serial.println("]");
}

void setup() {
  Serial.begin(9600);
  node.t = 29.5;
  node.h = 60.0;
  node.next = NULL;
  printNode(node);
}

void loop() {

}
The program will report the results as follows.
[29.50,60.00][0]
Memory reservation
As an example in the previous section, declaring a data structure type sNode and creating a variable from the custom struct is a variable declaration just like any common usage. The sequence of data is given in the following code.
struct sNode{
float t;
float h;
sNode * next;
};
sNode node[100];
void printNode( sNode n ) {
Serial.print("[");
Serial.print(n.t);
Serial.print(",");
Serial.print(n.h);
Serial.print("][");
Serial.print((int)(n.next));
Serial.println("]");
}
void setup() {
Serial.begin(9600);
node[0].t = 29.5;
node[0].h = 60.0;
node[0].next = NULL;
printNode(node[0]);
}
void loop() {
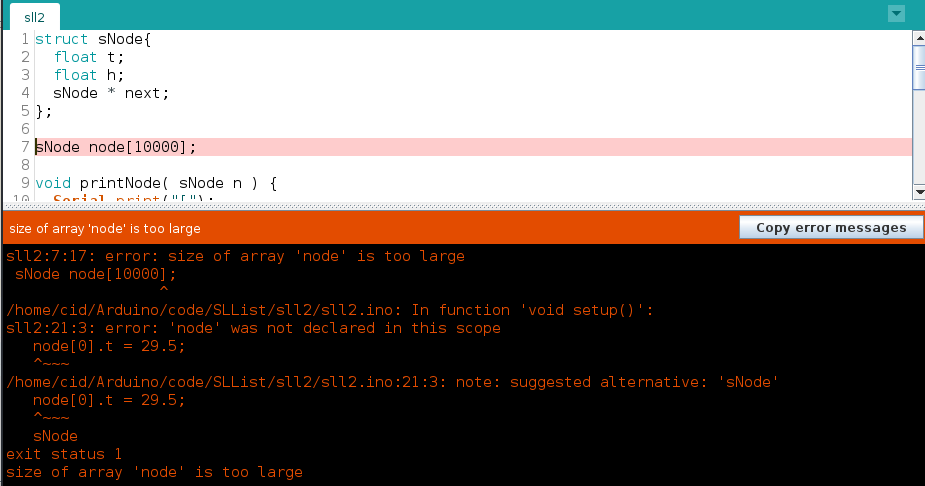
}From the example, it looks smooth. And if raised to 1000, it can still compile and upload normally. But when adjusting to 10000, there will be a problem with the microcontroller as shown in Figure 3, which is caused by the structure itself using approximately 4+4+4 = 12 bytes of space per data set. When 10,000 sets need 120,000 bytes of memory, which may will be more than the microcontroller installed, it will make the program unable to work. Therefore, if you want the program to work, you need to adjust the number of members that are appropriate for the microcontroller every time to upload it to the chip. And when writing another program that consumes more memory, it may result in the number of members of the array structure having to be adjusted and recompiled every time.
As a result, using a link list solves the above problem by creating a pointer variable. And if there is enough memory left to store 1 set, then gradually add more nodes. If used again, gradually add it. If not enough, decide which nodes to remove. This is for flexibility within the program and able to manage data but at the cost of programming complexity and more time spent on this management work.
Memory reservations in C (C++ can also be used) have the following format:
pointer = (type *)malloc( size )
The example
sNode * node;
node = (sNode*)malloc( sizeof( sNode ));
Accessibility
When memory is reserved instead of using regular arrays, the way to access memory differs which is that a -> must be used instead of a . that means the memory reservation in the previous example when adding data to h, t and next is rewritten as follows.
struct sNode{
  float t;
  float h;
  sNode * next;
};

sNode *node;

void printNode( sNode *n ) {
  Serial.print("[");
  Serial.print(n->t);
  Serial.print(",");
  Serial.print(n->h);
  Serial.print("][");
  Serial.print((int)(n->next));
  Serial.println("]");
}

void setup() {
  Serial.begin(9600);
  node = (sNode*)malloc(sizeof(sNode));
  node->t = 29.5;
  node->h = 60.0;
  node->next = NULL;
  printNode(node);
}

void loop() {

}
An example program for trying to reserve memory until there is no space to reserve can be written as follows.
struct sNode{
  float t;
  float h;
  sNode * next;
};

sNode *node;

void printNode( sNode *n ) {
  Serial.print("[");
  Serial.print(n->t);
  Serial.print(",");
  Serial.print(n->h);
  Serial.print("][");
  Serial.print((int)(n->next));
  Serial.println("]");
}

void setup() {
  Serial.begin(9600);
  long count = 0;
  do {
    node = (sNode*)malloc(sizeof(sNode));
    if (node) {
      count++;
      Serial.print(".");
    }
  } while (node != NULL);
  Serial.println();
  Serial.print("Number of node(s) = ");
  Serial.println(count);
}

void loop() {

}
An example of the result is shown in Figure 4, where only 137 memory reservations can be made. This is because the booking differs from the pre-execution of the program as defined in the array. After all, a booking with malloc() is a reservation while the program is started, variables or memory-related operations take over the memory. And each booking request must find an area with consecutive free spaces equal to the size of the data structure defined. Therefore, some spaces are empty, but not enough for the size of the data structure, they are not chosen, which is why using malloc() for reservations may yield less data than array reservations. But at the cost of scalability, it is an alternative for program development.

Memory termination
Canceling reserved memory can be executed with the following commands which, when canceled, means the system does not hold or reference the information in that section. When a memory reservation request occurs, that portion of memory is considered free.
free( pointer )
Singly link list
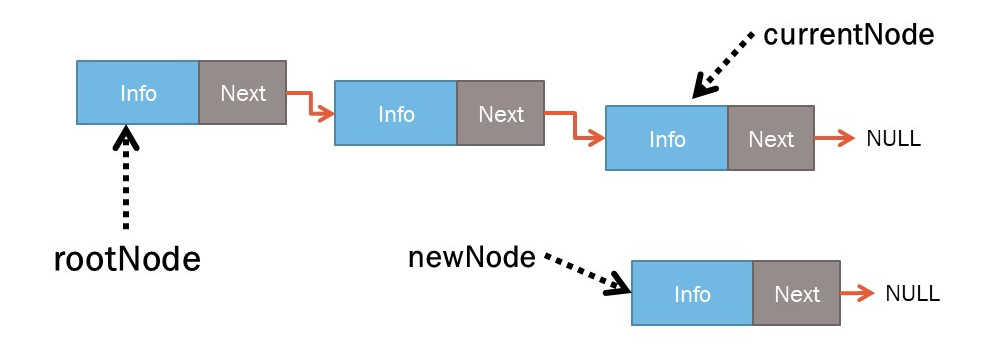
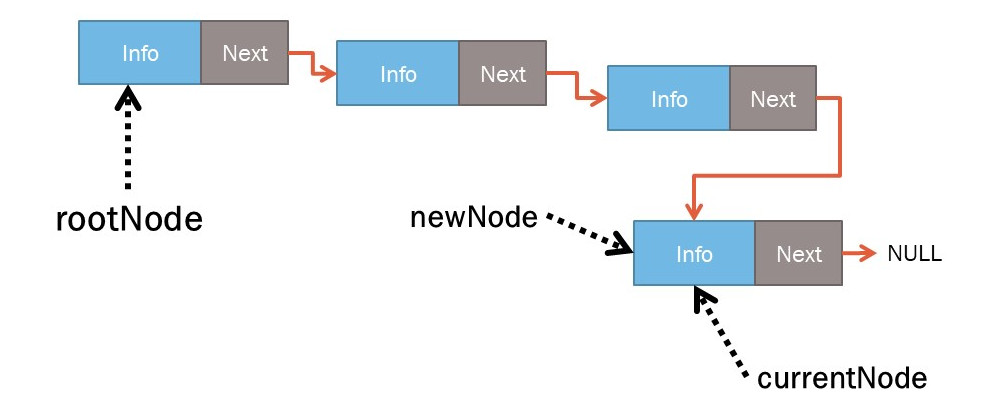
Single link list relies on the single link list data structure mentioned above and there are 3 more variables for the use which are
- rootNode is a pointer variable of type based on the data structure of the created node. It was used to point to the first node of the link list.
- currentNode is a pointer variable like rootNode, but for pointing to the last node.
- newNode เป็นตัวแปรตัวชี้ที่ใช้สำหรับชี้ไปยังโหนดที่ is a pointer variable used to point to the newly created node.
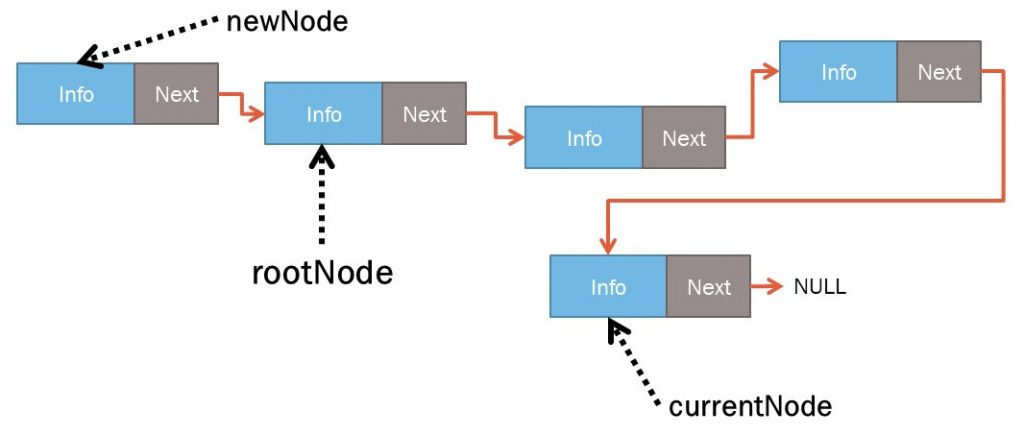
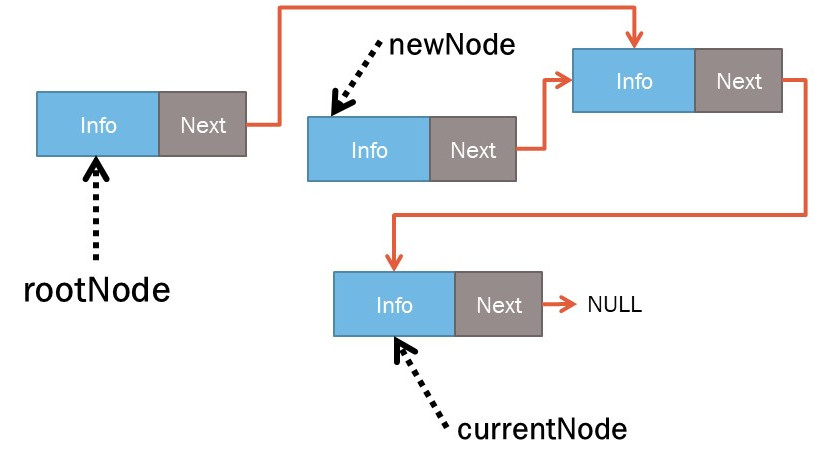
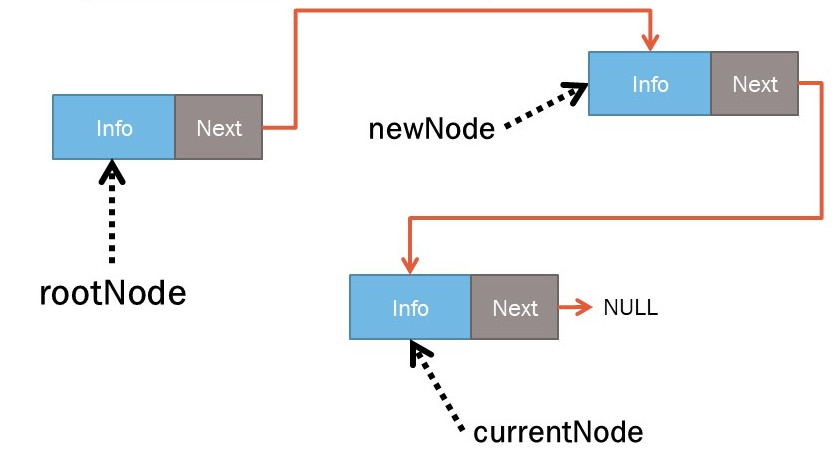
Figure 5 is an example of a link list with 3 nodes, where the rootNode points to the first node and the currentNode points to the last node. You can also see that the next pointer value of each node will point to the next node except the last node with Next NULL to use as a reference to know that there is no next and this position is the last node.
And to create a new node, the variable newNode will point to the new node and set the default value of Next to NULL.Figure 5 Singly link list structure
Adding node
The workflow for a single link list is as follows.
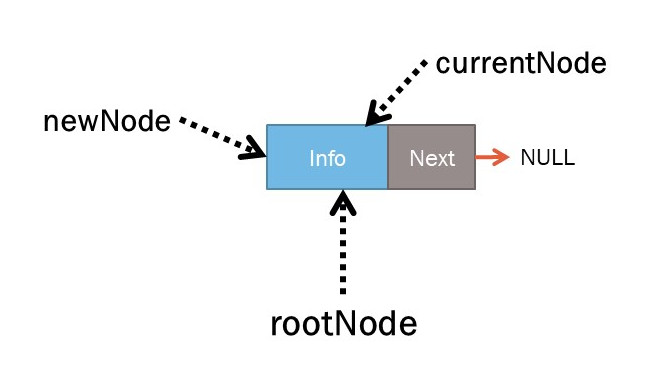
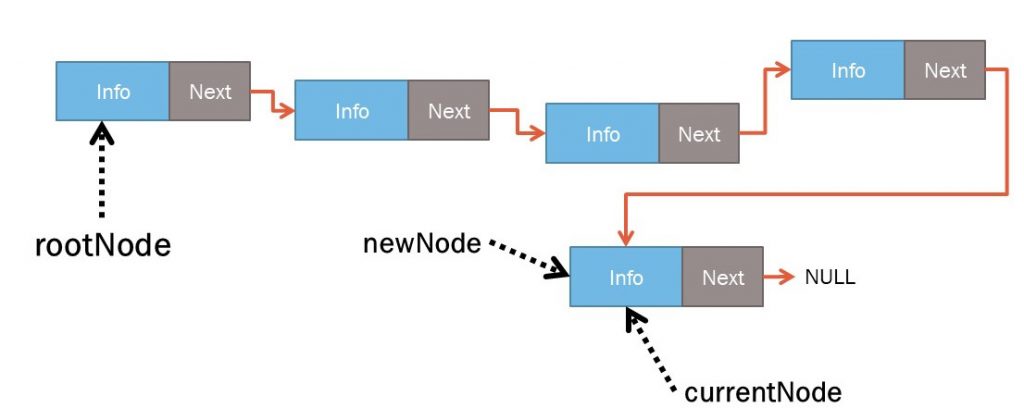
- Create a memory with newNode as the pointer (Figure 5).
- Insert into a link list with rootNode pointing to first node and currentNode pointing to last node.
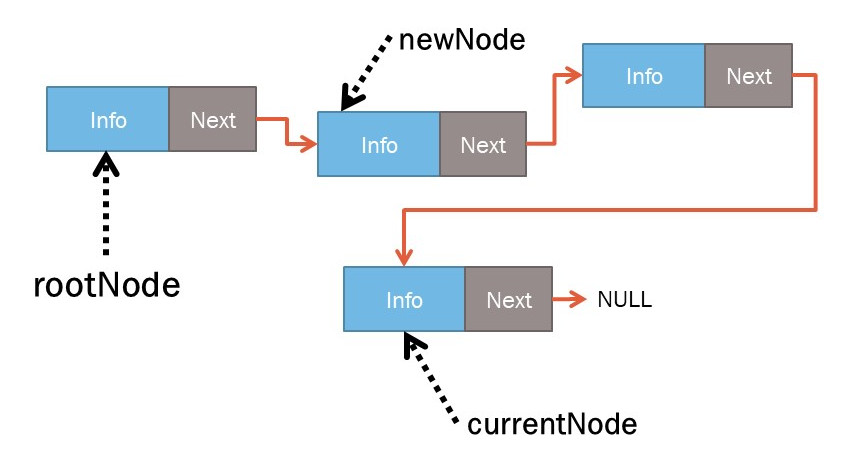
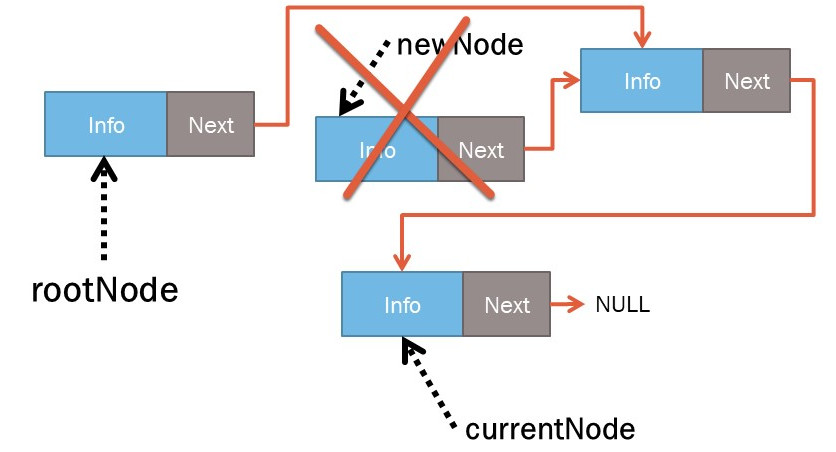
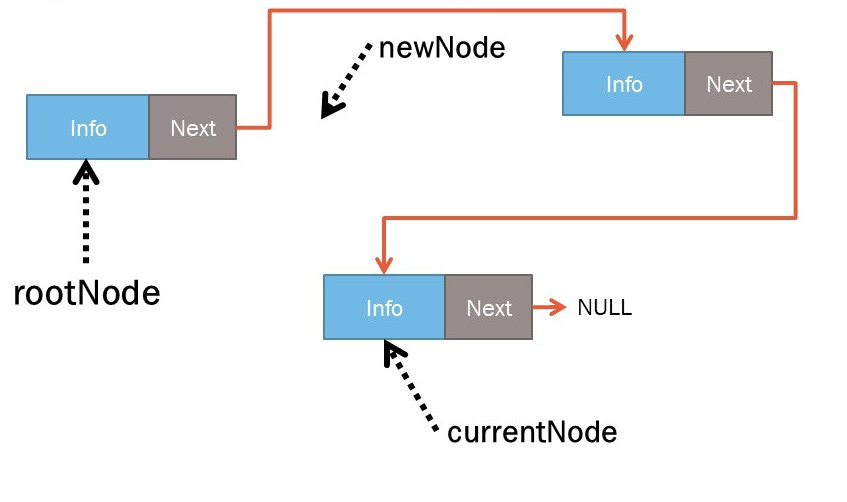
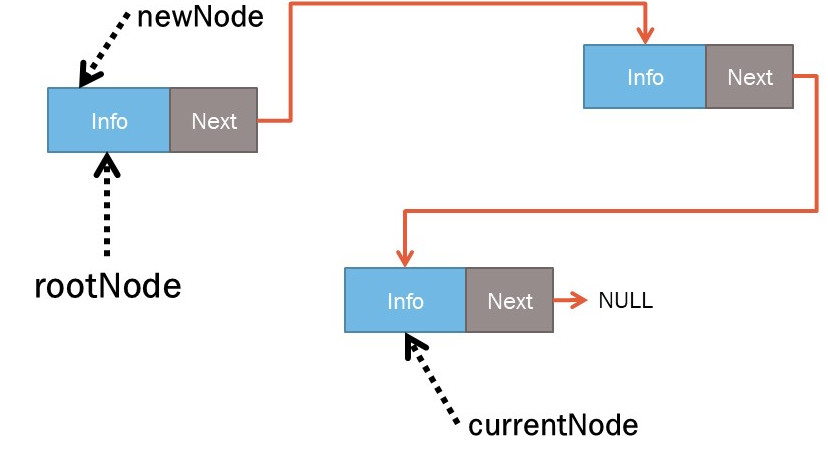
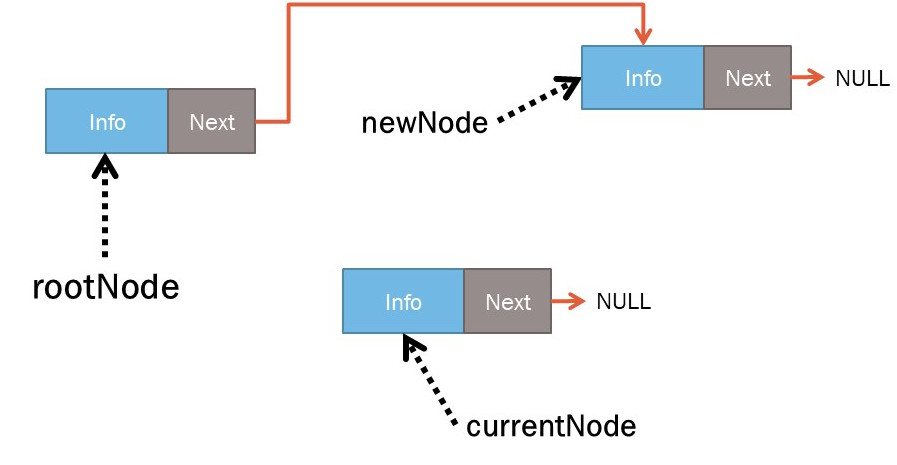
- If newNode is the first node of the link list, let rootNode and currentNode point to newNode as shown in Figure 6.
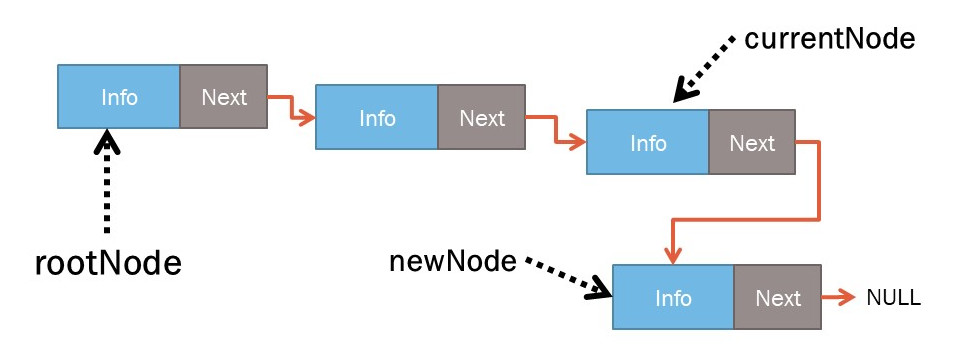
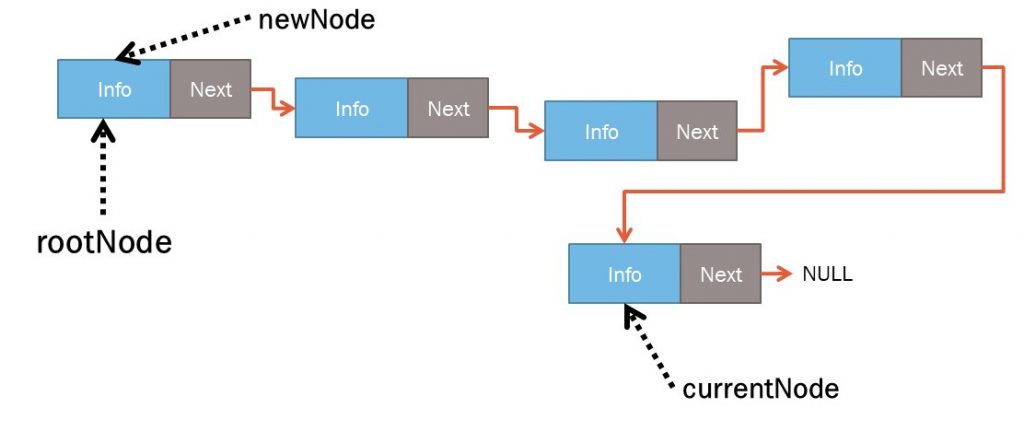
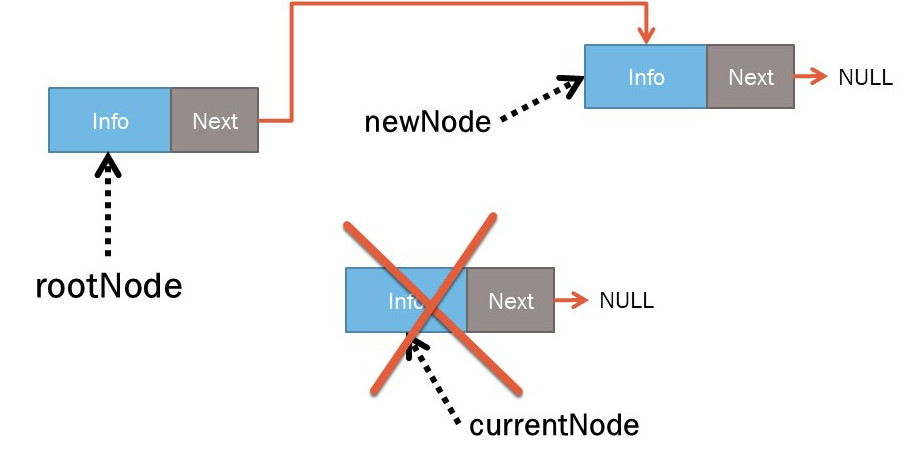
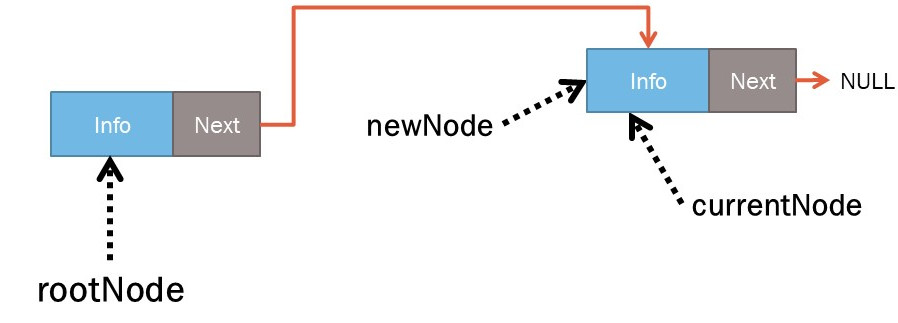
- If already exists as shown in Figure 7, let currentNode->next point to newNode and then point currentNode to newNode as shown in Figure 8.
Code
struct sNode {
float t;
float h;
sNode * next;
};
sNode *rootNode;
sNode *currentNode;
sNode *newNode;
void printNode( sNode *n ) {
Serial.print("[");
Serial.print(n->t);
Serial.print(",");
Serial.print(n->h);
Serial.print("][");
Serial.print((int)(n->next));
Serial.println("]");
}
void setup() {
rootNode = NULL;
Serial.begin(9600);
long count = 0;
do {
newNode = (sNode*)malloc(sizeof(sNode));
if (newNode) {
newNode->t = 0.0;
newNode->h = 0.0;
newNode->next = NULL;
if (rootNode == NULL) {
rootNode = newNode;
currentNode = newNode;
} else {
currentNode->next = newNode;
currentNode = newNode;
}
count++;
Serial.print(".");
}
} while (newNode != NULL);
Serial.println();
Serial.print("Number of node(s) = ");
Serial.println(count);
currentNode = rootNode;
while (currentNode) {
Serial.print("This = ");
Serial.print((int)currentNode);
Serial.print("Next = ");
Serial.println((int)currentNode->next);
currentNode = currentNode->next;
}
}
void loop() {
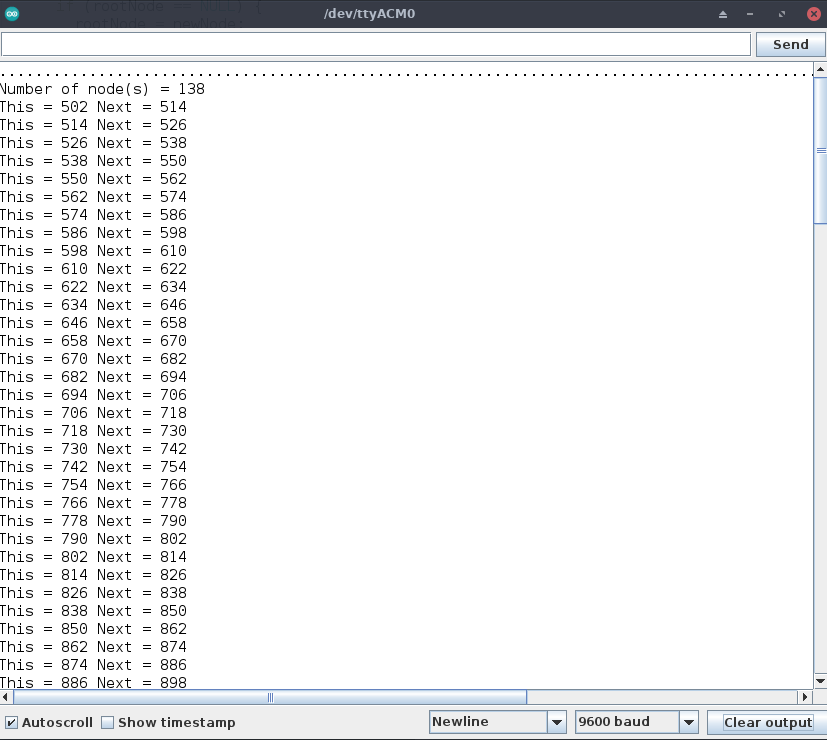
}An example of the result of the work is shown in Figures 9 and 10. It is found that the maximum number of nodes is 138, and when looking at each node, the first node has the value Next of 514 and it is the same value as This of the next data. That means Next points to the next data and so on until the last node is This of 2134, Next of 2146, which points to the last node. and the last node with This value of 2146 will have the value Next of 0 or NULL because more memory cannot be reserved for reasons as in the previous example.

Deleting node
There are three types of node deletion algorithms cited in the example: delete the first node pointed by the rootNode, delete the last node pointed by currentNode, and delete any nodes (for example, delete the second node) that have the algorithm as follows.
Deleting the first node
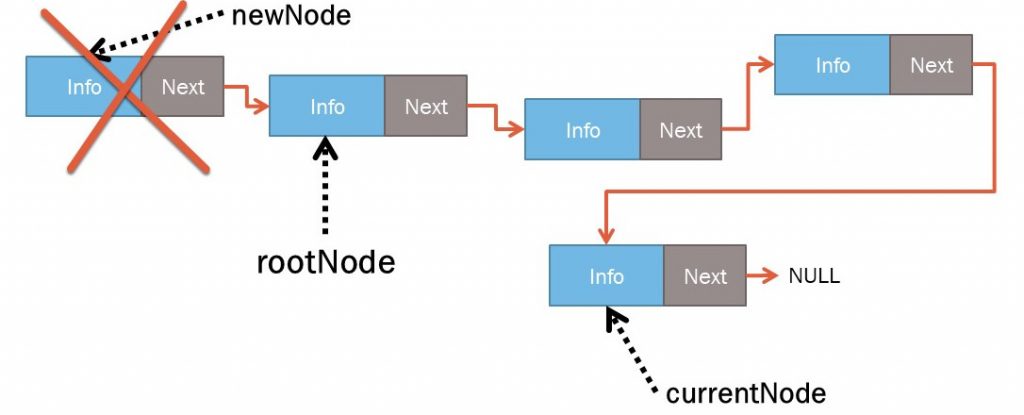
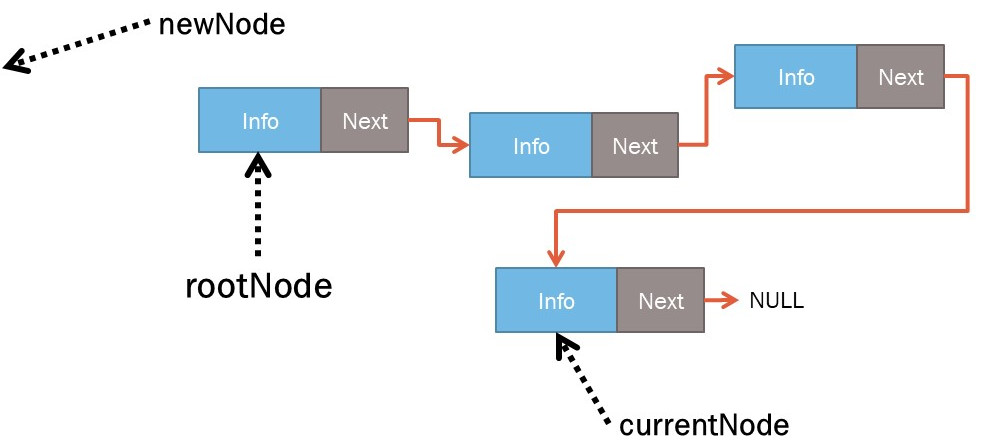
The procedure for deleting the first node as shown in Figure 11 is as follows.
- newNode = rootNode point to the first node as shown in Figure 12.
- rootNode = newNode->Next point to the first node as shown in Figure 13.
- free(newNode) to cancel the memory reservation as shown in Figure 14, and the result when the newNode has been removed as in Figure 15
Deleting the second node
การลบโหนดที่ 2 จากตัวอย่างในภาพที่ 15 มีขั้นตอนดังนี้
- newNode = rootN so that the newNode points to the node next to the rootNode, which is the second node as shown in Figure 16.
- rootNode->Next = newNode->Next เพื่อให้ rootNode->Next so that rootNode->Next Points to the node next to the second node as shown in Figure 17.
- free(newNode) to delete the node that newNode is pointing to, as shown in Figure 18, and get an example of the result in Figure 19.
Deleting last node
From Figure 19, to delete the last node, the steps are as follows.
- newNode = rootNode so that newNode points to the first node as shown in Figure 20.
- Proceed with the command newNode = newNode->Next until the Next value of newNode equals currentNode so that newNode points to the node before the last node as shown in Figure 21.
- newNode->Next = NULL to indicate that this node is the last node as shown in Figure 22.
- free(currentNode) to delete the last node before as shown in Figure 23.
- currentNode = newNode Let’s point out the new last node as shown in Figure 24.
Deleting node example
An example program of adding 5 nodes and then deleting the first node, the 2nd node (after removing the first node) and the last node is as follows, and the result of the operation is as shown in Figure 25.
struct sNode {
  float t;
  float h;
  sNode * next;
};

sNode *rootNode;
sNode *currentNode;
sNode *newNode;

void printNode( sNode *n ) {
  Serial.print("[");
  Serial.print(n->t);
  Serial.print(",");
  Serial.print(n->h);
  Serial.print("][");
  Serial.print((int)(n->next));
  Serial.println("]");
}

void printList( sNode *r) {
  sNode * currentNode = r;
  while (currentNode) {
    Serial.print("This = ");
    Serial.print((int)currentNode);
    Serial.print(" next = ");
    Serial.println((int)currentNode->next);
    currentNode = currentNode->next;
  }
}

void setup() {
  rootNode = NULL;
  Serial.begin(9600);
  int count = 0;

  // Add 5 nodes
  for (count = 0; count < 5; count++) {
    newNode = (sNode*)malloc(sizeof(sNode));
    if (newNode) {
      newNode->t = 0.0;
      newNode->h = 0.0;
      newNode->next = NULL;
      if (rootNode == NULL) {
        rootNode = newNode;
        currentNode = newNode;
      } else {
        currentNode->next = newNode;
        currentNode = newNode;
      }
      Serial.print(".");
    } else {
      Serial.print("Not enough memory!");
      while (1) {

      }
    }
  }
  // show all nodes
  Serial.println();
  Serial.println("The 5 nodes:");
  printList( rootNode );

  // Delete the 1st node
  newNode = rootNode;
  rootNode = newNode->next;
  free(newNode);
  Serial.println("After deleted the 1st node.");
  printList( rootNode );

  // Delete the 2nd node
  newNode = rootNode->next;
  rootNode->next = newNode->next;
  free(newNode);
  Serial.println("After deleted the 2st node.");
  printList( rootNode );

  // Delete the last node
  newNode = rootNode;
  while (newNode->next != currentNode) {
    newNode = newNode->next;
  }
  newNode->next = NULL;
  free(currentNode);
  Serial.println("After deleted the last node.");
  currentNode = newNode;
  printList( rootNode );
}

void loop() {

}
Example of storing temperature and humidity data in a linked list structure.
The code to test the connection to DHT11 connecting pin S or I/O pin between microcontroller and sensor module to D2 is as follows.
#include <DHT.h>

DHT dht = DHT(D2, DHT11);

void setup() {
  Serial.begin(9600);
  dht.begin();
}

void loop() {
  float h = dht.readHumidity();
  float tc = dht.readTemperature();
  float tf = dht.readTemperature(true);

  if (isnan(h) || isnan(tc) || isnan(tf)) {
    Serial.println("DHTsensor Failed");
    return;
  }

  float hic = dht.computeHeatIndex(tc, h, false);
  float hif = dht.computeHeatIndex(tf, h);

  Serial.println("--------------------------------");
  Serial.print("Temperature ...:");
  Serial.print(tc);
  Serial.print("C/");
  Serial.print(tf);
  Serial.println("F");
  Serial.print("Heat index ....:");
  Serial.print(hic);
  Serial.print("C/");
  Serial.print(hif);
  Serial.println("F");
  Serial.print("Humidity ......:");
  Serial.print(h);
  Serial.println("%");

  delay(1000);
}
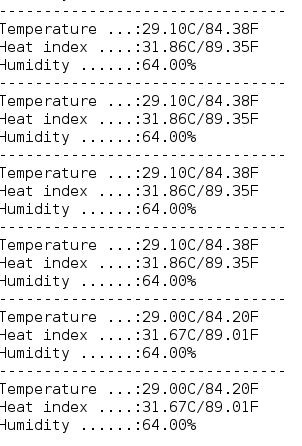
An example of the output shown in the Serial Monitor is shown in Figure 26.
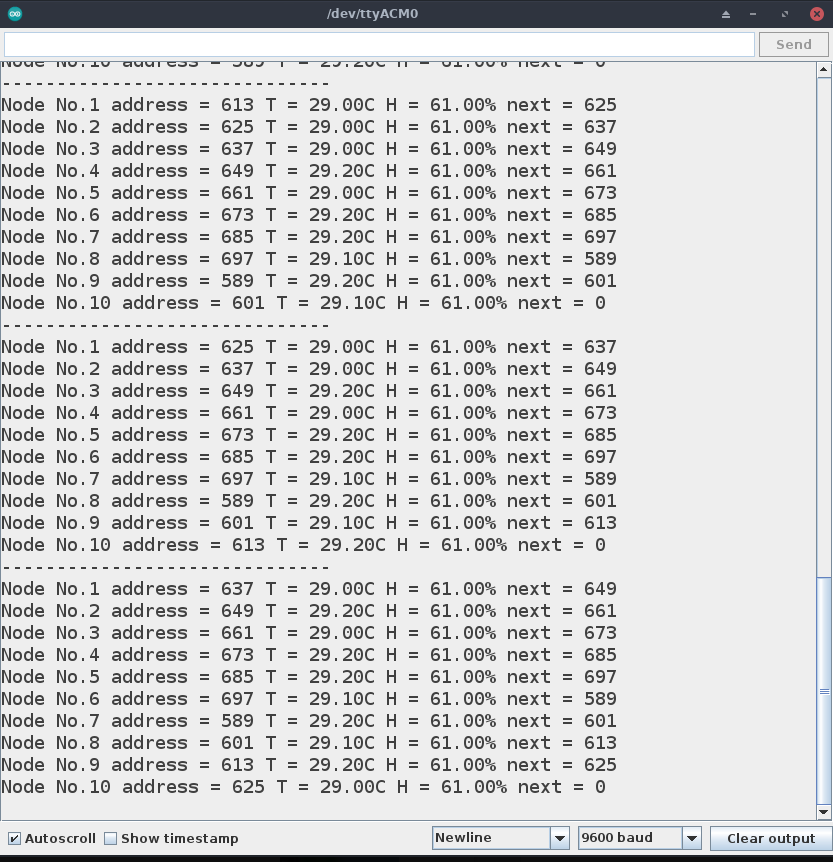
As an example, readings from DHT11 apply to a single link list. It defines no more than 10 nodes, and if more than 10, the mode removes the first node and add a new node instead. Write the code like this: the working example is as shown in Figure 26. It will be found that when 10 nodes have been completed, every run will remove the first node and add new data at the end of the link list.
#include <DHT.h>
DHT dht = DHT(D2, DHT11);

struct sNode {
  float t;
  float h;
  sNode * next;
};

sNode *rootNode;
sNode *currentNode;
sNode *newNode;
int countNode;

void printNode( sNode *n ) {
  Serial.print("[");
  Serial.print(n->t);
  Serial.print(",");
  Serial.print(n->h);
  Serial.print("][");
  Serial.print((int)(n->next));
  Serial.println("]");
}

void printList( sNode *r) {
  int counter = 0;
  sNode * currentNode = r;
  while (currentNode) {
    counter++;
    Serial.print("Node No.");
    Serial.print(counter);
    Serial.print(" address = ");
    Serial.print((int)currentNode);
    Serial.print(" T = ");
    Serial.print(currentNode->t);
    Serial.print("C H = ");
    Serial.print(currentNode->h);
    Serial.print("% next = ");
    Serial.println((int)currentNode->next);
    currentNode = currentNode->next;
  }
}

void addNode() {
  if (countNode == 10) {
    delete1stNode();
    countNode--;
  }
  newNode = (sNode*)malloc(sizeof(sNode));
  if (newNode) {
    newNode->t = dht.readTemperature();
    newNode->h = dht.readHumidity();
    newNode->next = NULL;
    if (rootNode == NULL) {
      rootNode = newNode;
      currentNode = newNode;
    } else {
      currentNode->next = newNode;
      currentNode = newNode;
    }
    countNode++;
  } else {
    Serial.print("Not enough memory!");
    while (1) {
    }
  }
}

void delete1stNode() {
  newNode = rootNode;
  rootNode = newNode->next;
  free(newNode);
}

void setup() {
  countNode = 0;
  rootNode = NULL;
  Serial.begin(9600);
  dht.begin();
}

void loop() {
  addNode();
  Serial.println("------------------------------");
  printList(rootNode);
  delay(2000);
}
In the case of using SAM-D21 that connects the IO pin of DHT11 to pin D13, you can write the code as follows.
#include <Arduino.h>
#include <DHT.h>
DHT dht = DHT(13, DHT11); // D13

struct sNode {
  float t;
  float h;
  sNode * next;
};

sNode *rootNode;
sNode *currentNode;
sNode *newNode;
int countNode;

void printNode( sNode *n ) {
  SerialUSB.print("[");
  SerialUSB.print(n->t);
  SerialUSB.print(",");
  SerialUSB.print(n->h);
  SerialUSB.print("][");
  SerialUSB.print((int)(n->next));
  SerialUSB.println("]");
}

void printList( sNode *r) {
  int counter = 0;
  sNode * currentNode = r;
  while (currentNode) {
    counter++;
    SerialUSB.print("Node No.");
    SerialUSB.print(counter);
    SerialUSB.print(" address = ");
    SerialUSB.print((int)currentNode);
    SerialUSB.print(" T = ");
    SerialUSB.print(currentNode->t);
    SerialUSB.print("C H = ");
    SerialUSB.print(currentNode->h);
    SerialUSB.print("% next = ");
    SerialUSB.println((int)currentNode->next);
    currentNode = currentNode->next;
  }
}

void addNode() {
  if (countNode == 10) {
    delete1stNode();
    countNode--;
  }
  newNode = (sNode*)malloc(sizeof(sNode));
  if (newNode) {
    newNode->t = dht.readTemperature();
    newNode->h = dht.readHumidity();
    newNode->next = NULL;
    if (rootNode == NULL) {
      rootNode = newNode;
      currentNode = newNode;
    } else {
      currentNode->next = newNode;
      currentNode = newNode;
    }
    countNode++;
  } else {
    SerialUSB.print("Not enough memory!");
    while (1) {
    }
  }
}

void delete1stNode() {
  newNode = rootNode;
  rootNode = newNode->next;
  free(newNode);
}

void setup() {
  countNode = 0;
  rootNode = NULL;
  SerialUSB.begin(9600);
  dht.begin();
}

void loop() {
  addNode();
  SerialUSB.println("------------------------------");
  printList(rootNode);
  delay(2000);
}
Conclusion
From this article, we hope readers understand the reason for having a linked list data structure as well as understand the thinking process and how to write programs. It also applies the concept of data structure to real programs that will hopefully be useful in the future. However, if there is a story after being used, it can be exchanged and learned together. Finally, have fun with programming.
(C) 2020-2022, By Jarut Busarathid and Danai Jedsadathitikul
Updated 2022-02-14