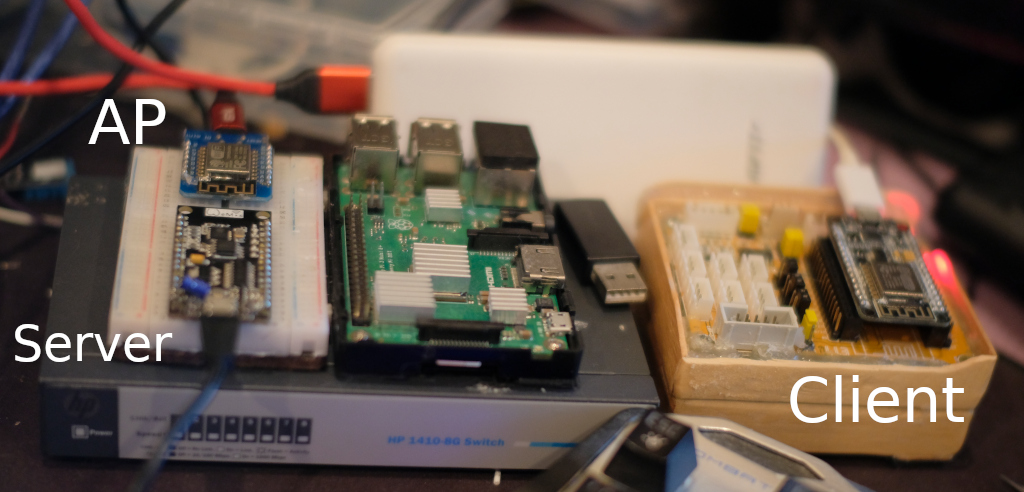
After studying the ESP8266WiFi to control the microcontroller connected to a wireless network in an STA and SoftAP form, then learned how to use the WiFiClient to use the esp8266 as a client node. This time, it’s about WiFiServer to make esp8266 act as a service node or Server. The example in this article is to create an internal network system by using 3 esp8266 to act as SoftAP, Server and Client as shown in Figure 1.

WiFiServer
The WiFiServer class is a class for making the microcontroller work as a service machine. By creating a service machine object, the service port number must be specified in the creation process as the following usage patterns
WiFiServer obj( port )
When the object to reference the machine library is complete. The next step is to create a client object that is provisioned for the service as follows.
WiFiClient client = obj.available()
If the client object is not 0, the provider we created is available. The programmer has to check whether any clients are connecting to the service machine or not. (using the command WiFiClient.begin( service machine, port ) from the previous article) with the following command.
result = client.connected()
To read request data from a client, use the command run command readStringUntil() in the following format.
String variable = client.readStringUntil( end )
Send the response to the client using print() or println() as follows:
client.print( return_data )
client.println( return_data )
To ensure data transmission or reception, flush() empties the buffer by completing the import or eject before other tasks are performed.
client.flush()
Finally, when there is no connection or communication with the client, disconnect the client with stop() command as follows:
client.stop()
Example Code
The experimental device of the sample program in this article, we use 3 esp8266 as shown in Figure 1, which is a model WeMos D1 mini (clone) as SoftAP to distribute IP Address to Server and Client, after using NodeMCU V3 (right side). is the Client and the NodeMCU on the left is the Server.
SoftAP
// Node 1 : SoftAP
#include <ESP8266WiFi.h>

IPAddress myIP(192, 168, 4, 1);
IPAddress gwIP(192, 168, 4, 10);
IPAddress subnet(255, 255, 255, 0);

#define SSID "JarutEx"
#define PSK "123456789"

void setup() {
  Serial.begin(115200);
  Serial.println("\n\r\n\r");
  Serial.print("MAC Address : ");
  Serial.println(WiFi.softAPmacAddress());
  if (WiFi.softAPConfig( myIP, gwIP, subnet )) {
    if (WiFi.softAP(SSID, PSK, 8, true, 3)) {
      Serial.print("IP Address : ");
      Serial.println(WiFi.softAPIP());
      Serial.print(WiFi.softAPgetStationNum());
      Serial.println(" connected.");
      // WiFi.softAPdisconnect();
    } else {
      Serial.println("softAP() failed!!");
    }
  } else {
    Serial.println("softAPConfig() failed!");
  }
}

void loop() {
}
Server
//  2-Server
// WIFI_STA
#include <ESP8266WiFi.h>
#include <ESP8266WiFiMulti.h>

#define AP_NAME "JarutEx"
#define AP_PASSWD "123456789"

ESP8266WiFiMulti  wifiMulti;
WiFiServer server(3003);
IPAddress ip(192, 168, 1, 100);
IPAddress gateway(192, 168, 1, 1);
IPAddress subnet(255, 255, 255, 0);

void setup() {
  Serial.begin(115200);
  Serial.println("\n\r\n\r");
  WiFi.mode( WIFI_STA );
  wifiMulti.addAP( AP_NAME, AP_PASSWD );
  while (wifiMulti.run() != WL_CONNECTED) {
    delay(500);
  }
  Serial.println(WiFi.localIP());
  server.begin();
  Serial.println("Server begin.");
  Serial.print("Status: "); Serial.println(WiFi.status());
  Serial.print("IP: ");     Serial.println(WiFi.localIP());
  Serial.print("Subnet: "); Serial.println(WiFi.subnetMask());
  Serial.print("Gateway: "); Serial.println(WiFi.gatewayIP());
  Serial.print("SSID: "); Serial.println(WiFi.SSID());
  Serial.print("Signal: "); Serial.println(WiFi.RSSI());
  Serial.print("Networks: "); Serial.println(WiFi.scanNetworks());
}

void loop() {
  if (wifiMulti.run() == WL_CONNECTED) {
    WiFiClient client = server.available();
    if (client) {
      if (client.connected()) {
        String req = client.readStringUntil('\r');
        Serial.print("From client:");
        Serial.println(req);
        client.flush();
        client.println(req);
        client.stop();
      } else {
        delay(5000);
        Serial.print("+");
      }
    }
  }
}
Client
// 3-Client
// WIFI_STA
#include <ESP8266WiFi.h>
#include <ESP8266WiFiMulti.h>
#define AP_NAME "JarutEx"
#define AP_PASSWD "123456789"
ESP8266WiFiMulti wifiMulti;
WiFiClient client;
IPAddress sIP(192, 168, 4, 100);
void setup() {
Serial.begin(115200);
Serial.println("\n\r\ns\r");
WiFi.mode( WIFI_STA );
wifiMulti.addAP( AP_NAME, AP_PASSWD );
while (wifiMulti.run() != WL_CONNECTED) {
delay(500);
}
Serial.println(WiFi.localIP());
Serial.println("Client begin.");
}
void loop() {
if (wifiMulti.run() == WL_CONNECTED) {
if (client.connect( sIP, 3003 )) {
Serial.println("Connected.");
client.println("Hello, World!\r");
while (!client.available());
String echoStr = client.readStringUntil('\r');
client.flush();
Serial.print("From server:");
Serial.println(echoStr);
client.stop();
delay(10000);
}
} else {
delay(5000);
}
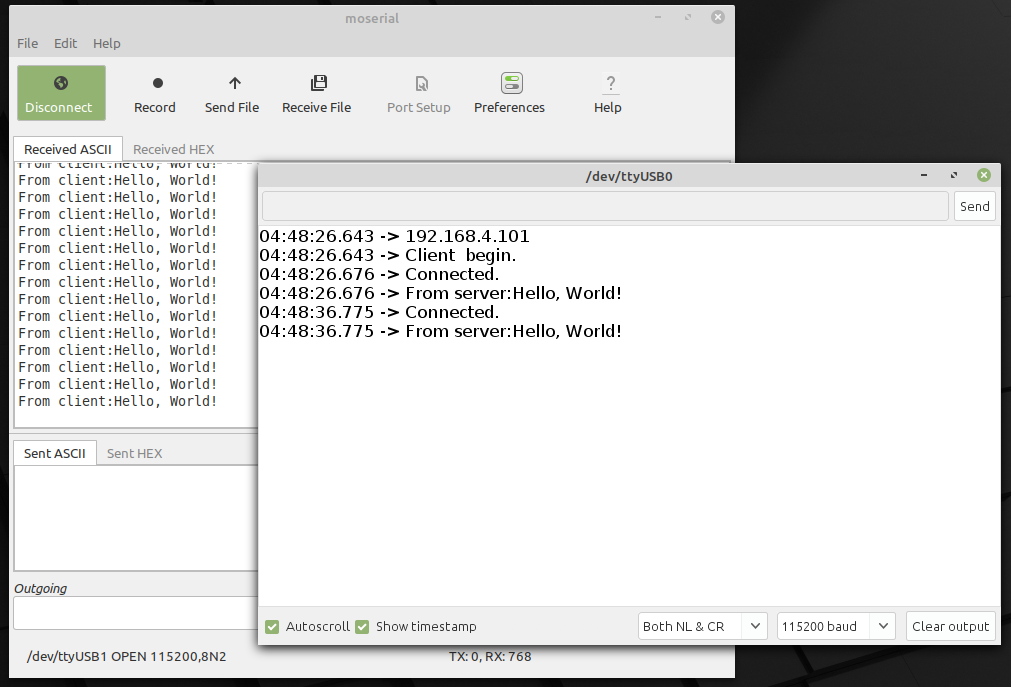
}When the system works by connecting as shown in Figure 1, the result is as shown in Figure 2.
Conclusion
From this example, it is not difficult to use esp8266 as a wireless communication network with the Internet protocol because no wiring is required and microcontrollers already support this work. When connecting the sensor circuit to the generated network, readers are provided with a wireless network of sensors to use. Finally, We hope this article is useful to implement. and have fun with programming
If you want to talk with us, feel free to leave comments below!!
References
- ESP8266 Arduino Core: ESP8266WiFi
- ESP8266 Arduino Core: Server
- Link2004@github: ESP8266 WiFiServer Class Reference
(C) 2021, By Jarut Busarathid and Danai Jedsadathitikul
Updated 2021-11-08