[EN] Hosting Unity WebGL game on the sever

This article discusses bringing a Unity-developed WebGL-style game onto a server running Ubuntu operating system in the Google Compute Engine.

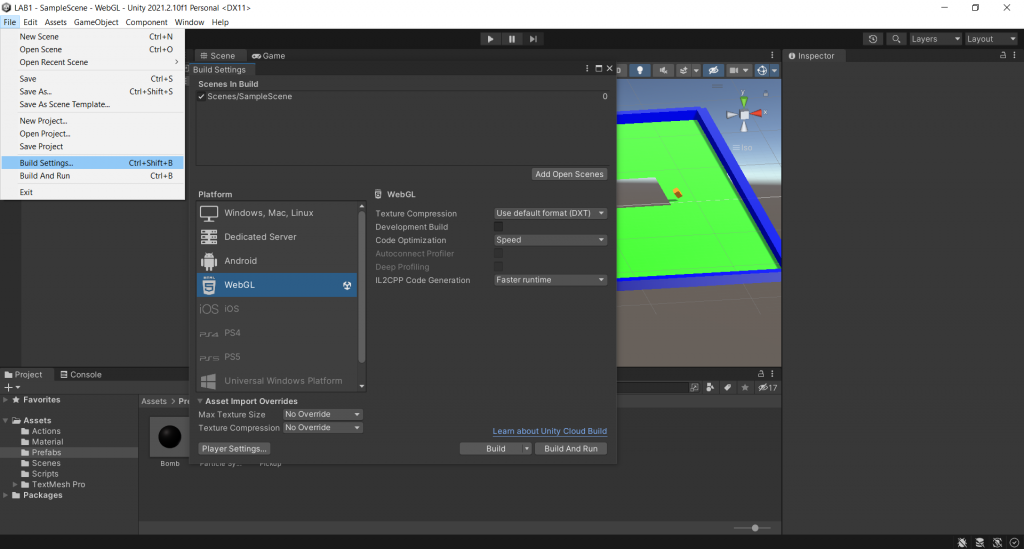
Developing a game with Unity, we can code a game once and create a game on multiple systems, whether it’s Windows, Android or the web, etc. Before we can put our game on the server, we need to modify it. Build target to WebGL first by going to File > Build Settings and selecting Platform as WebGL as shown in Figure 1.

Figure 1 Selecting WebGL platform
Read More

[EN] PIC18F458 Ep.6 ADC

This article uses the GPIO of the PIC18F458 microcontroller connected to an ADC module or an analog-to-digital converter module for reading voltage levels in the 0 to 5V range from the input signal. This allows the system designer to consider the details of the voltage from the circuit, such as from the variable resistor, resistors change their values ​​according to the brightness or microphone values, for example, to process these values or enter the next working condition, such as reading the voltage to report the result as a voltage in the Lo, Hi or unstable level, etc. On the computer architecture experiment board, there are 4 sets of adjustable resistor circuits as shown in Figure 1 makes it possible to study programming to use the ADC module and be able to apply it in the future.

Figure 1 ADC module on the board
Read More

[EN] PIC18F458 Ep.5 GPIO and 7-Segments

This article is the application of GPIO of PIC18F458 to operate the circuit of 8 LEDs arranged in the same position as the numbers shown in Figure 1 by using 8 LED to be rearranged and called 7-Segment that can be applied to display numbers and another number of characters. In addition, the experimental board has installed a 7-Segment of 4 digits, allowing you to write a program to control the display of 4 digits of data.

Figure 1 Display on 7-Segment
Read More

[EN] PIC18F458 Ep.3 An Introduction to Using MPLAB X IDE with XC8.

This article uses the MPLAB X IDE development kit (Figure 1) for use with Microchip’s 8-bit microcontrollers in C language through a translation tool called XC8 as a baseline for the next article’s use. The procedure for developing a program with this tool is as follows:

  1. Create a project file and set the microcontroller chip type to PIC18F458.
  2. Generate a C language file for the XC8 translation Pack.
  3. Generate information about microcontroller settings to be pasted into the program code.
  4. Compile the program.
  5. Bring the resulting file to upload to the board via PICKit2 tool or later.
Figure 1 MPLAB X IDE + XC8 window
Read More

[TH] Filaments

บทความนี้เป็นเรื่องการพิมพ์สามมิติเกี่ยวกับ Filament ซึ่งเป็นพลาสติกที่ถูกหลอมและนำไปขึ้นรูปเป็นวัตถุต่างๆ ตามต้องการได้ โดยพูดถึงคุณสมบัต ของ Filament ที่ได้รับความนิยม ซึ่งมี 3 ชนิดคือ PLA, PETG, ABS

ภาพที่ 1 เส้นพลาสติก PLA+ สีขาว

ในการพิมพ์สามมิติสิ่งสำคัญที่ขาดไม่ได้คือวัตถุดิบตัวกลางในการขึ้นรูป ซึ่งก็คือ Filament นั่นเอง โดยแต่ละชนิดนั้นมีคุณสมบัติที่แตกต่างกันไป

PLA

PLA เป็นพลาสติกที่ได้รับความนิยมอย่างมากในการพิมพ์สามมิติ วัสถุถูกผลิตจากวัสดุจากธรรมชาติ โดยมีคุณสมบัติคือ

  1. เป็นวัสดุที่แข็ง ยืดหยุ่นได้น้อย
  2. ทนความร้อนได้ต่ำ
  3. แข็งตัวได้ไว

จากคุณสมบัติที่กล่าวมาจะเห็นได้ว่า PLA นั้นเป็นวัสดุที่เหมาะสมกับชิ้นงานที่ไม่โดนความร้อนมาก สามารถขึ้นรูปได้ง่าย มีความคงทนพอสมควร แต่ไม่ควรใช้สร้างวัตถุที่ต้องมีการยืดหยุ่นเยอะ เพราะมีลักษณะยอมหักไม่ยอมงอ ในปัจจุบันได้มีการพัฒนาเพิ่มคุณสมบัติให้กับ PLA โดยผู้ผลิตหลายเจ้าโดยการใส่สารเพิ่มเติมลงไปซึ่งเป็นสูตรของแต่ละเจ้าเพื่อให้ PLA นั้นมีความคงทนมากขึ้น ยืดหยุ่นและทนความร้อนมากขึ้น โดยมีชื่อเรียกที่แตกต่างกันไปเช่น PLA+ PLA Pro เป็นต้น

PETG

เป็นพลาสติกที่ได้รับความนิยมในหมู่คนที่เริ่มมีความรู้เพิ่มขึ้นในการพิมพ์สามมิติ เนื่องจากการพิมพ์ต้องมีการปรับจูนพอสมควรเพื่อให้ได้วัตถุที่ต้องการ มีคุณสมบัติคือ

  1. เป็นวัสดุที่แข็ง แต่ยืดหยุ่นได้มาก
  2. ทนความร้อนได้มากขึ้นกว่า PLA
  3. แข็งตัวได้ช้าลงเมื่อเทียบกับ PLA

ในการพิมพ์สามมิติด้วย PETG มีข้อคำนึงเพิ่มขึ้นเพื่อแลกกับคุณสมบัติที่มากขึ้นเช่น ความร้อนของฐานต้องเหมาะสม ความร้อนของหัวพิมพ์ต้องเหมาะสม การเปิดปิดพัดลมเป่าชิ้นงาน เนื่องจาก PETG นั้นแข็งตัวช้ากว่าทำให้การพิมพ์จำเป็นต้องใช้พัดลมที่มีประสิทธิภาพและตรงจุด แต่หากพัดลมเปิดผิดจังหวะอาจทำให้แต่ละชั้นในชิ้นงานไม่ติดกันหรือไม่แข็งแรงได้

ABS

เป็นพลาสติกที่มีความแข็งแรงมากที่สุดจากที่กล่าวมา แต่ก็จำเป็นต้องใช้ความรู้มากเช่นกัน เนื่องจากจำเป็นต้องควบคุมตัวแปรในการพิมพ์ให้เหมาะสมตลอดเวลา ไม่เช่นนั้นชิ้นงานอาจเสียได้ทันที มีคุณสมบัติคือ

  1. มีความแข็งแรงทนทานมาก ยืดหยุ่นได้
  2. ทนความร้อนได้สูงกว่า PETG

การพิมพ์ด้วย ABS นั้นต้องปรับจูนการพิมพ์เพิ่มขึ้นและควบคุมทั้งหมดให้คงที่ตลอดเวลาไม่ว่าจะเป็น อุณหภูมิหัวพิมพ์ อุณหภูมิของฐาน รวมถึงปัจจัยภายนอกเช่น ลมที่พัดเข้ามาจึงอาจต้องมีกล่องครอบเพื่อบังลมให้มากที่สุด เพราะหากอุณหภูมิไม่เหมาะสมเมื่อไรชั้นในชิ้นงานที่กำลังพิมพ์ก็พร้อมที่จะหลุดจากกันได้ทันที

ข้อควรระวัง

ในการพิมพ์ชิ้นงานทั้งหมดไม่ว่าจะใช้ Filament อะไรก็แล้วแต่จำเป็นต้องรักษาคุณภาพของพลาสติกให้ดีอยู่เสมอ ไม่เช่นนั้นอาจพบปัญหาในการพิมพ์ได้ไม่ว่าจะเป็น ชั้นของชิ้นงานไม่ติดกันทั้งที่ปรับจูนเครื่องพิมพ์ดีแล้ว ชิ้นงานไม่เรียบ เส้น Filament หักคาเครื่อง เป็นต้น โดยสิ่งที่ควรระวังคืออย่าให้เส้นมีความชื้น และในการพิมพ์เมื่อแกะห่อแล้วควรใช้ให้หมดโดยเร็วที่สุด และควรเลือกซื้อ Filament จากเจ้าที่น่าไว้ใจ เพราะบางเจ้าอาจขายของค้างสต็อกซึ่งก็ส่งผลถึงคุณภาพการพิมพ์เช่นกัน

ข้อแนะนำในการเลือกใช้ Filament

หากเป็นมือใหม่ควรเริ่มต้นจาก PLA ก่อนเนื่องจากพิมพ์ได้ง่ายมาก (แต่เราดันห้าวไปใช้ PETG ในการพิมพ์ครั้งแรก ถึงกับปวดหัวเลยครับ) การควบคุมปัจจัยต่างๆ ไม่จำเป็นมาก ใช้เวลาน้อยกว่า

แต่เมื่อต้องการชิ้นงานที่มีความทนมากขึ้นระดับกลางก็ให้เปลี่ยนมาใช้ PETG เนื่องจากตัววัสดุสามารถสร้างชิ้นงานที่มีความแข็งได้พอๆกับ PLA แต่สามารถยืดหยุ่น หักงอได้มากกว่ามาก

สุดท้ายเมื่อต้องการใช้ชิ้นงานที่รับแรงกระแทกหรือคงทนมากๆ ก็ให้เปลี่ยนมาใช้ ABS เพราะมีความคงทนมากที่สุด

สรุป

Filament แต่ละชนิดมีคุณสมบัติที่แตกต่างกันและมีปัจจัยควบคุมที่มีความเข้มงวดต่างกัน โดยที่หากเป็นมือใหม่ควรเริ่มจาก PLA ก่อนเพราะพิมพ์ง่าย และหากต้องการชิ้นงานที่ยืดหยุ่นมากขึ้นให้เปลี่ยนมาใช้ PETG ซึ่งมีคุณสมบัติที่ยืดหยุ่นมากขึ้น แต่หากต้องการใช้ชิ้นงานที่ทนแรงกระแทกมากขึ้นอีกก็เปลี่ยนมาใช้ ABS แต่ยิ่งวัสดุมีความคงทนมากเท่าไรการปรับจูนก็จะยิ่งยากขึ้นไปเท่านั้น

(C) 2022, อ.จารุต บุศราทิจ / อ.ดนัย เจษฎาฐิติกุล

ปรับปรุงเมื่อ 2022-03-17, 2022-03-19

[EN] PIC18F458 Ep.2 Into the details

In the previous article, we introduced the boards used in computer architecture labs and the software used in practice. This time, we will discuss the features and diagrams inside the PIC18F458 from Microchip‘s documentation as a basis for programming the capabilities of the microcontroller in the next article (The details of the PIC16F877 can be read from this article.).

Figure 1 Architectural Lab Experiment Board
Read More

[TH] Hosting Unity WebGL game on the sever

บทความนี้กล่าวถึงการนำตัวเกมที่พัฒนาจาก Unity ในลักษณะของ WebGL ขึ้นไปไว้บนเซิฟเวอร์ที่ใช้ระบบปฏิบัติการ Ubuntu ใน Google compute engine

การพัฒนาเกมด้วยโปรแกรม Unity เราสามารถที่จะสร้างเกมเพียงครั้งเดียวและสร้างตัวเกมในหลายระบบได้ ไม่ว่าจะเป็น Windows, Android หรือเว็บ เป็นต้น ก่อนที่เราจะนำเกมของเราขึ้นเซิฟเวอร์ได้ต้องทำการปรับเปลี่ยน build target เป็น WebGL เสียก่อน โดยเข้าที่ File > Build Settings และเลือก Platform เป็น WebGL ดังภาพที่ 1

ภาพที่ 1 เลือก Platform เป็น WebGL

ในเบราเซอร์จะมีการเข้ารหัสบีบอัดไฟล์เพื่อลดการใช้งานข้อมูลลงซึ่งเราจำเป็นต้องเลือกการบีบอัดที่เบราเซอร์สนับสนุนใน Player Settings > Publishing Settings > Compression Format หากเราไม่ต้องการบีบอัดสามารถเลือกเป็น Disabled ได้ครับ

ภาพที่ 2 ปรับ Compression Format เป็น Disabled

จากนั้นทำการ Build และเลือกตำแหน่งที่ต้องการเก็บไฟล์เราจะได้ไฟล์คร่าวๆ ดังภาพที่ 3

ภาพที่ 3 ไฟล์ที่ได้จากการ Build

เกมที่ได้จะสามารถรันบนเว็บได้ให้เรานำไฟล์ที่ได้ทั้งหมดอัพโหลดขึ้นเซิฟเวอร์ได้ทันทีครับ แต่ต้องไม่ลืมตำแหน่งหรือ URL ที่สามารถเข้าถึงจากภายนอกได้ด้วยนะครับ โดยทางเราอัพโหลดไฟล์ไว้ใน apache เพื่อให้เข้าถึงได้ครับ

ภาพที่ 4 ตัวอย่างเกม

หลังจากอัพโหลดและระบุตำแหน่ง URL เรียบร้อยเราสามารถเข้าเล่นเกมได้ทันทีเลยครับ ทุกท่านสามารถเข้าไปทดลองเล่นได้ที่ https://www.jarutex.com/www/html/lab/

สรุป

การอัพโหลดเกมขึ้นเซิฟเวอร์นั้นสามารถทำได้ง่ายดาย เนื่องจากเกมที่ได้จาก Unity เป็นไฟล์ html ทำให้สามารถใช้งานบนเบราเซอร์ได้ทันที แต่ข้อควรระวังคือการบีบอัด หากเบราเซอร์ไม่สนับสนุนการบีบอัดที่กำหนด เกมของเราก็จะไม่สามารถใช้งานได้ครับ

(C) 2022, อ.จารุต บุศราทิจ / อ.ดนัย เจษฎาฐิติกุล

ปรับปรุงเมื่อ 2022-03-10

[EN] Queue data structure with array and Singly Linked List.

This article describes Queue Data Structures previously written in the Python Queue Data Structure article and is frequently used with the MicroPython example, but this article is written in C via Arduino IDE to use with microcontroller board LGT8F328P, SAM-D21, ESP8266, ESP32 and ESP32-S2 as shown in Figure 1 by using an example of the array structure and a single link list as a queued data structure. This article is probably the last article on JarutEx.

Figure 1 ESP32-S2, LGY8P326P and SAM-D21
Read More