[EN] Understand and use the ESP32-C3

We have been using the esp8266, especially the esp-01 and esp-01s modules, to manage the sensor network for quite some time and with the limitation in terms of the number of pins used, the system must be designed to work with STM32F103C8T6 or STM32F401CCU6/STM32F411CEU6. To ensure stable operation, no problems with the esp8266’s WDT were encountered, and over time, espressif released several other microcontrollers such as esp32, esp32-s2, esp32-c3 and esp32-s3.

We have tested and used esp32 almost all the time until esp32-s2 with LILYGO board made us try to order it. The main problem is that the development tools are very late. However, as of now, espressif has released a development kit for Arduino or Arduino Core for ESP32 version 2.0 with support for esp32 esp32-s2 and esp32c3, making it work with ESP32 and ESP32-S2. We got the esp-c3-32s board so this article was born.

This article is compiled from the datasheet of ESP32-C3 WROOM-02, in this article we use the board as shown in Figure 1. The example program is to drive an RGB LED on the board to work by using Arduino Core for ESP32 and the improved ESP-IDF from the article in Ep. 3

(Figure. 1 ESP32-C3)

[EN] Bare Metal Cortex-M Ep.2

From the previous article, we have tried writing a program to study the elements of various files that we need, we found that there are quite a lot of details and steps. But it is an important basis for those who want to seriously and usefully study Cortex-M0 programming via STM32F030F4P6 (Figure 1), Cortex-M3 with STM32F103C (Figure 32) and Cortex-M4 with STM32F401CCU6 (Figure 27) to study of programming structure with programming tool STM32CubeIDE (Figure 2), which is the main tool used in this series of articles. This is because it combines ST’s complete development kit for ARM, including CubeMX for chip design, compiler toolkit, ST-Link program debugging tool and code editor in one tool,  plus it supports both Windows, Linux and macOS operating systems.

(Figure. 1 STM32F030F4P6 and USB–RS232 )

[EN] Bare Metal Cortex-M Ep.1

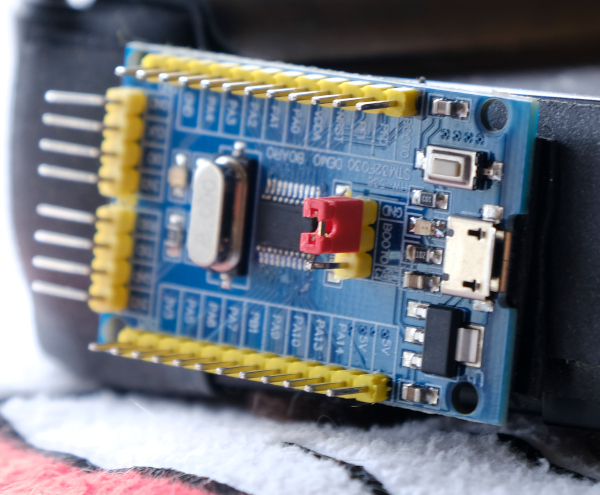
This article is a series of programming articles focused on the Cortex-M0 via the STM32F030F4P6 or any other STM32 microcontroller based on CMSIS, an ARM firmware compiled from vivonomicon.com‘s series of Bare Metal: STM32 Programming articles without using the Arduino framework. In the article EP.1 is a matter of preparation. It consists of creating a link file to link different parts of the code together and the working part file. After that, the result file is uploaded into the microcontroller to complete the program development process.

(Figure. 1 STM32F030F4P6)

[TH] Understand and use the ESP32-C3

หลังจากที่พวกเราใช้งาน  esp8266 โดยเฉพาะโมดูล esp-01 และ esp-01s เพื่อเป็นตัวบริหารจัดการเครือข่ายเซ็นเซอร์มาเป็นระยะเวลาพอสมควร และด้วยขีดจำกัดในเรื่องของจำนวนขาใช้งานทำให้ต้องออกแบบระบบให้ทำงานคู่กับ  STM32F103C8T6 หรือ STM32F401CCU6/STM32F411CEU6 เพื่อให้การทำงานมีความสเถียรไม่ประสบปัญหาเกี่ยวกับ WDT ของ esp8266 และด้วยเวลาที่ผ่านไป ทาง espressif ออกไมโครคอนโทรลเลอร์ตามมาอีกหลายตัว เช่น esp32, esp32-s2, esp32-c3 และ esp32-s3

ทางเราได้ทดสอบและใช้งาน esp32 จนแทบจะเป็นตัวหลักในการทำงาน จน esp32-s2 กับบอร์ดของ LILYGO ทำให้เราลองสั่งมาใช้งาน ปัญหาหลักอยู่ที่เครื่องมือในการพัฒนานั้นออกมาล่าช้ามาก แต่อย่างไรก็ดี ณ​ ตอนนี้ทาง espressif ได้ออกชุดพัฒนาสำหรับ Arduino หรือ Arduino Core for ESP32 รุ่น 2.0 พร้อมรองรับการใช้กับ esp32 esp32-s2 และ esp32c3 ทำให้การใช้งานกับ ESP32 และ ESP32-S2 ใช้งานได้ดี และล่าสุดทางทีมงานเราได้บอร์ด esp-c3-32s มาจึงเกิดมาเป็นบทความนี้

สำหรับบทความนี้เป็นการเรียบเรียงจาก datasheet ของ ESP32-C3 WROOM-02 ซึ่งในบทความนี้เราใช้บอร์ดดังภาพที่ 1 ส่วนตัวอย่างโปรแกรมเป็นการขับหลอด LED แบบ RGB บนบอร์ดให้ทำงานโดยใช้ Arduino Core for ESP32 และ ESP-IDF ที่ปรับปรุงมาจากบทความใน Ep.3

ภาพที่ 1 บอร์ดไมโครคอนโทรลเลอร์ ESP32-C3

[TH] Bare Metal Cortex-M Ep.2

จากบทความก่อนหน้านี้ได้ทดลองเขียนโปรแกรมเพื่อศึกษาองค์ประกอบของไฟล์ต่าง ๆ ที่ต้องใช้งานซึ่งจะพบว่ามีรายละเอียดและขั้นตอนเยอะพอสมควร แต่เป็นพื้นฐานสำคัญสำหรับผู้ต้องการศึกษาการเขียนโปรแกรมควบคุม Cortex-M0 ผ่านชิพ STM32F030F4P6 (ภาพที่ 1), Cortex-M3 ด้วย STM32F103C (ภาพที่ 32) และ Cortex-M4 ด้วย STM32F401CCU6 (ภาพที่ 27) อย่างจริงจัง และมีประโยชน์ต่อการศึกษาโครงสร้างการเขียนโปรแกรมด้วยเครื่องมือเขียนโปรแกรมอย่าง STM32CubeIDE (ภาพที่ 2) ซึ่งเป็นเครื่องมือหลักที่จะใช้ในบทความชุดนี้ เนื่องจากเป็นการรวมชุดพัฒนาสำหรับ ARM ของบริษัท ST แบบครบครันทั้ง CubeMX สำหรับออกแบบการใช้งานชิพ เครื่องมือชุดคอมไพล์เลอร์ เครื่องมือดีบักโปรแกรมผ่าน ST-Link ลงชิพ และชุดแก้ไขโค้ดอยู่ในตัวเดียว แถมรองรับการใช้งานทั้งระบบปฏิบัติการ Windows, Linux และ macOS

ภาพที่ 1 บอร์ด STM32F030F4P6 กับ USB–RS232

[TH] Bare Metal Cortex-M Ep.1

บทความนี้เป็นชุดบทความเขียนโปรแกรมที่มุ่งเน้นกับ Cortex-M0 ผ่านทาง STM32F030F4P6 หรือไมโครคอนโทรลเลอร์ STM32 รุ่นอื่น ๆ ในแบบที่ใช้ CMSIS ซึ่งเป็นเฟิร์มแวร์ (firmware) ของ ARM ที่เรียบเรียงจากชุดบทความ Bare Metal : STM32 Programming ของ vivonomicon.com โดยไม่ใช้เฟรมเวิร์กของ Arduino และในบทความตอนที่ 1 เป็นเรื่องของการเตรียมความพร้อม ประกอบด้วยการสร้างไฟล์ลิงค์สำหรับเชื่อมโยงส่วนต่าง ๆ ของโค้ดเข้าด้วยกัน และไฟล์ส่วนของการทำงาน หลังจากนั้นนำไฟล์ผลลัพธ์อัพโหลดเข้าไมโครคอนโทรลเลอร์เป็นการเสร็จสิ้นขั้นตอนการพัฒนาโปรแกรม

ภาพที่ 1 บอร์ด STM32F030F4P6