[TH] Arduino: Using the ST7735s module with an ESP32-S2 via the TFT_eSPI library.

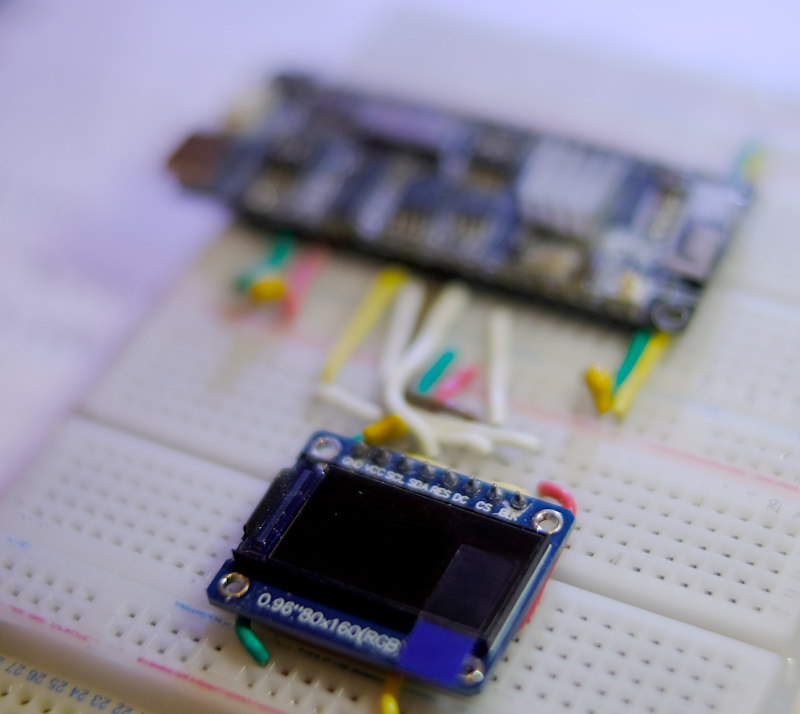
บทความนี้เป็นการใช้โมดูล ST7735s กับไมโครคอนโทรลเลอร์ ESP32-S2 ผ่านไลบรารี TFT_eSPI โดยในก่อนหน้านี้ได้กล่าวถึงการใช้งานกับไมโครคอนโทรลเลอร์ ESP32 และ STM32F103C ไปแล้ว และโมดูล TFT ที่เลือกใช้เป็น REDTAB80x160 (ได้เพิ่มเติมโค้ดสำหรับ GREENTAB80x160 ในตอนท้ายบทความ) แต่สามารถปรับดารตั้งค่าเป็นโมดูลอื่น ๆ ได้ โดยดูรายละเอียดจากไฟล์ User_Setup.h ของไลบรารี TFT_eSPI ดังภาพที่ 1

ภาพที่ 1 โมดูลแสดงผล TFT ขนาด 0.96″ แบบ IPS กับ ESP32-S2
Read More

[EN] How to build MicroPython for esp32-s2.

This article discusses compiling and using MicroPython for an esp32-s2 microcontroller based on the TTGO ESP32-S2 V1.1 or TTGO ESP32-S2-WOOR V1.1 board with a Type-C USB port and supports operation via CH340C and OTG by using a dip switch as shown in Figure 1, enabling MicroPython to be used because the chip program uses the CH340’s circuit programming and Python programming requires a port that works like OTG

TTGO ESP32-S2 V1.1
Figure 1 TTGO ESP32-S2 V1.1
Read More

[EN] ESP-IDF Ep.9 : LEDC (PWM) Output

This article discusses the use of the ESP32’s GPIO to output digital signals such as PWM or Pulse Width Modulation or LEDC (LED Control), which enables frequency generation or adjusts the proportion of 1 and 0 states in 1 waveform. Thus, in the absence of the DAC, we can still adjust the average voltage at that pin as needed and it can be applied to control servo motors as well. Therefore, in this article, we will learn how to use PWM and apply it to frequency transmission instead of DAC (from the previous article) and LED dimming using the experimental board as shown in Figure 1.

LEDC / PWM Labs.
(Figure. 1 Our LEDC)
Read More

[EN] ESP-NOW

The article discusses the use of communication developed by espressif to communicate between its microcontrollers via wireless communication, as an alternative to the development of a non-linear  Client/Server system. It describes the working process of working as a service provider, commander, and a set of related instructions through the Arduino core, along with explaining the working examples that come with both Arduino cores, which are basic and Multi-slave, which can be applied variously.

Read More

[TH] Arduino: ESP32-S2’s DAC&ADC.

หลังจากที่ทดสอบ DAC และ ADC ของทั้ง ESP32, SAM-D21, LGT8F328P และ STM32L432KC เป็นที่เรียบร้อย ครั้งนี้ก็เป็นคราวของ ESP32-S2 ที่ทางเรามีใช้งานอยู่ โดยการทดสอบการทำงานยังคงเป็นเหมือนก่อนหน้านี้ที่ใช้ DAC ส่งคลื่น 3 ลักษณะคือ ฟันปลา สามเหลี่ยม และคลื่นรูปไซน์ออกมา และเขื่อมต่อเข้ากับขาของ ADC เพื่อนอ่านค่า พร้อมทั้งทดสอบดูกราฟว่ามีลักษณะออกมาเป็นอย่างไร

ในการทดลองนี้ได้เชื่อมต่อ DAC1 เข้ากับ ADC ดังภาพที่ 1 โดย ESP32-S2 มี DAC ขนาด 8 บิตจำนวน 2 พอร์ตเรียกว่า DAC1 และ DAC2 ส่วน ADC มีความละเอียด 12 บิต ซึ่งจะเห็นว่ามีคุณสมบัติเหมือนกับ ESP32 แต่จะได้ผลลัพธ์เหมือนกันหรือไม่นั้นคงบอกได้ว่าน่าจะแตกต่างเนื่องจากใช้ไมโครคอนโทรลเลอร์คนละรุ่นกัน โดยใน ESP32-S2 ใช้ตัวเดียวกับ ESP32-S3 ที่มีเพียงแกนเดียว และไม่มี BLE

ภาพที่ 1 บอร์ด Neucleo L432KC เชื่อมต่อขา A3 เข้ากับ D3
Read More

[EN] ulab v3.0

From the previous ulab article, it was found that Micropython can implement the same dataset processing instructions as used in Numpy through the previous ulab library v.0.54.0 which is the older version of ulab (currently v.3.0.1) brought up this article. This article describes how to create a Micropython that integrates the ulab library and uses it with SPIRAM versions of esp32.

(Figure. 1 Module list of ulab)

ulab3

From Figure 1, it can be seen that the structure of the ulab library has changed from the original. This causes the programming from the previous example to have to be modified. Under ulab there are libraries of numpy and scipy. The details of numpy that are supported are as follows.

Read More

[TH] Draw an analog clock using MicroPython.

บทความก่อนหน้านี้ได้กล่าวถึงการปรับปรุงปรับปรุงความเร็วในการแสดงผลด้วยการใช้เทคนิคดับเบิลบัฟเฟอร์ (double buffer) จึงนำมาประยุกต์ใช้สำหรับการแสดงผลเป็นนาฬิกาแบบแอนาล็อกดังภาพที่ 1 ซึ่งวิธีการวาดนั้นใช้การคำนวณตรีโกณมิติเพื่อหาค่าพิกัด (x,y) ของปลายเข็มวินาที นาที และชั่วโมง โดยการทำงานของแต่ละวินาทีจะใช้ตัวตั้งเวลาหรือไทเมอร์ (Timer) เพื่อให้การทำงานนั้นใกล้เคียงกับเวลาจริงมากกว่าการวนรอบหรือการหน่วงเวลา

ภาพที่ 1 ตัวอย่างผลลัพธ์ของการวาดนาฬิกาแบบแอนาล็อก
Read More

[TH] Binary Search Tree data structure programming with Python.

ในบทความก่อนหน้านี้ได้แนะนำการเขียนโปรแกรมเพื่อใช้โครงสร้างข้อมูลแบบคิวไปแล้ว ในบทความนี้จึงแนะนำการเขียนโปรแกรมจัดการโครงสร้างข้อมูล (Data Structure) อีกประเภทหนึ่งซึ่งมีวิธีการจัดเก็บและจัดการที่แตกต่างกันไปอันมีชื่อว่าต้นไม้แบบ BST หรือ Binary Search Tree ดังในภาพที่ 1 ซึ่งเป็นโครงสร้างที่สามารถนำไปประยุกต์เกี่ยวกับการเก็บข้อมูลที่มีคุณลักษณะที่ข้อมูลทางกิ่งด้านซ้ายมีค่าที่น้อยกว่าตัวเอง และกิ่งด้านขวามีค่ามากกว่าต้นเอง หรือทำตรงกันข้ามคือกิ่งซ้ายมีค่ามากกว่า และกิ่งด้านขวามีค่าน้อยกว่า ทำให้การค้นหาข้อมูลในกรณีที่ต้นไม้มีความสมดุลย์ทั้งทางซ้ายและทางขวาบนโครงสร้าง BST ประหยัดเวลาหรือจำนวนครั้งในการค้นหาลงรอบละครึ่งหนึ่งของข้อมูลที่มี เช่น มีข้อมูล 100 ชุด ในรอบแรกถ้าตัวเองยังไม่ใช่ข้อมูลที่กำลังค้นหา จะเหลือทางเลือกให้หาจากกิ่งทางซ้ายหรือขวา ซึ่งการเลือกทำให้ข้อมูลของอีกฝั่งนั้นไม่ถูกพิจารณา หรือตัดทิ้งไปครึ่งหนึ่งโดยประมาณ แต่ถ้าเป็นกรณีที่ Binary Search Tree นั้นขาดความสมดุลย์จะส่งผลให้การค้นหามีความเร็วไม่แตกต่างกับการค้นหาแบบลำดับ (Sequential Search) เท่าใดนัก

ในบทความนี้ใช้ภาษาไพธอนที่ทำงานได้ทั้งบนตัวแปลภาษา Python 3 หรือ MicroPython เพื่อจัดเก็บข้อมูล การเพิ่มข้อมูล การค้นหาข้อมูล เพื่อเป็นตัวอย่างของการนำไปพัฒนาต่อไป

BST : Binary Search Tree
ภาพที่ 1 ตัวอย่าง BST
Read More

[TH] How to build MicroPython for esp32-s2.

บทความนี้กล่าวถึงการคอมไพล์ (build) และใช้งาน MicroPython สำหรับไมโครคอนโทรลเลอร์ esp32-s2 ที่เป็นบอร์ด TTGO ESP32-S2 V1.1 หรือ TTGO ESP32-S2-WOOR V1.1 ซึ่งมีพอร์ต USB แบบ Type-C ที่รองรับการทำงานผ่าน CH340C และแบบ OTG ด้วยการใช้ดิปสวิตช์ดังภาพที่ 1 ทำให้สามารถใช้ MicroPython ได้ เนื่องจากการโปรแกรมชิพใช้การโปรแกรมผ่านทางวงจรของ CH340 และการใช้งานภาษาไพธอนจะต้องอาศัยพอร์ตที่ทำงานแบบ OTG

TTGO ESP32-S2 V1.1
ภาพที่ 1 TTGO ESP32-S2 V1.1
Read More