[EN] Using the DHT22/DHT11 Temperature and Humidity Sensor Module with ESP8266

This article uses the DHT22 and DHT11 temperature and humidity measurer modules with Python. They are sensor modules that operate using a single signal cable which will save the microcontroller’s port connection. In addition, MicroPython has a library prepared for DHT22 and DHT11 implementation, making it convenient, time-saving and reduce errors that may be caused by manual programming.

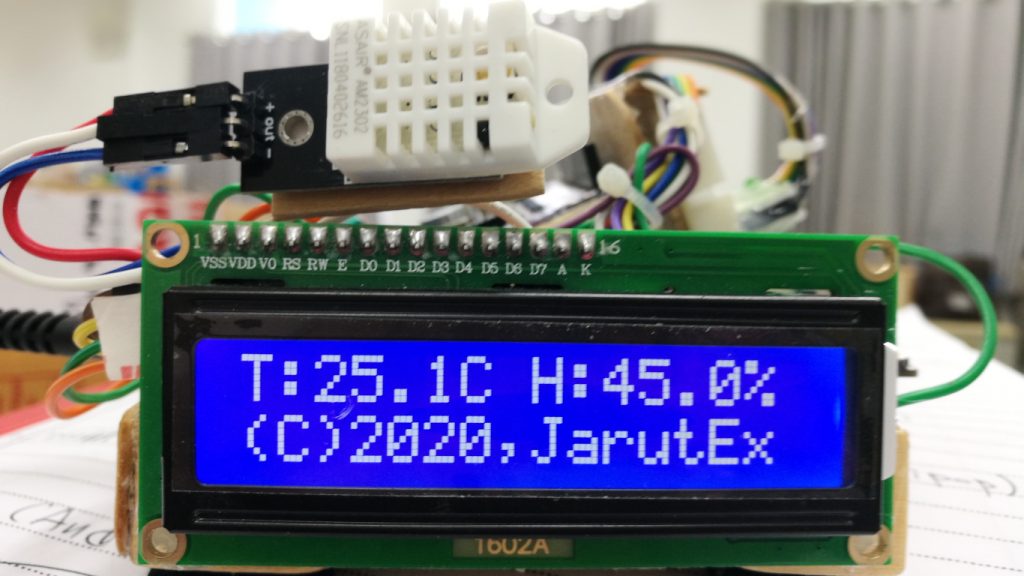
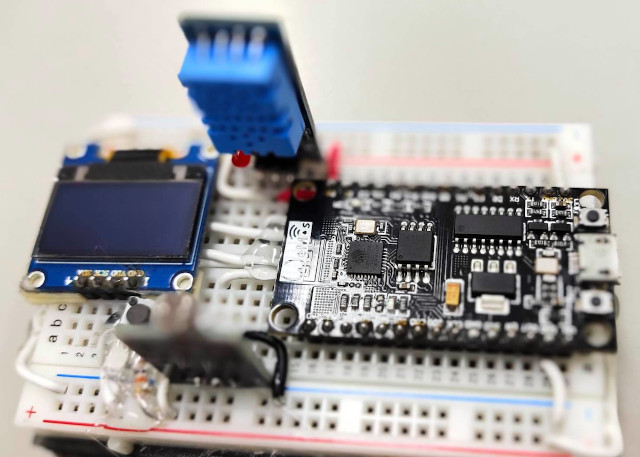
There are 3 examples in this article: code17-1 is a normal reading of values, but code17-2 is a loop to read again. By finding the highest and lowest values and display on the LCD module as shown in Figure 8 and example code17-3 showing the average value of temperature and humidity.

Figure 1 Result from code17-1
Read More

[EN] Arduino: Control robot’s movement via browser with esp8266 Part 2

Based on the previous article that uses a single esp8266 for controlling the Agent, the number of pins that the esp8266 microcontroller (as written in the MicroPython article about machine.Pin) is limited. Many of the pins are used at boot up causing unintended errors such as the wheel spinning when the system starts and stops when the system finishes booting, etc. Therefore, in this article, a microcontroller board LGT8F328P is added as shown in Figure 1, or the reader may change to other Arduino family microcontrollers, such as Arduino Nano or Arduino Uno, etc. by giving that LGT8F328P is part of the Actuator that acts as a movement in the environment. It can be commanded to go forward, backward, turn left, turn right and stop, reducing the workload of the esp8266 and making it more responsive to WiFi communication.

Figure 1 LGT8F328P is integrated into a robotic car system to control the movement
Read More

[EN] Arduino: Control the movement of the robot car through the browser with the esp8266.

From the article Controlling a Servo 2-Wheel Robot in the ESP8266+RoboServo and the DC electric motor in VisionRobo Car: Drive Motor, we have taken the 2nd built-in robot car from the Raspberry Pi to the ESP8266 to operate via WiFi using the guidelines from the ESP-01s+Relay article. Let’s rewrite Arduino’s C/C++ with the WebServer class from the ESP8266 article to MicroPython. Thus, by the end of this article, the robot can be operated in the first example by connecting a phone or communication device. Go to 192.168.4.1 and order it to go forward, backward, turn left, turn right, or stop.

Figure 1 The robot in this article
Read More

[EN] LittleFS Filesystem

The article discusses the use of the LittleFS library and introduces a library developed for use with the esp32 microcontroller, which includes a plugin for the Arduino IDE for uploading files to the microcontroller’s ROM. Make it convenient to load data to store and run. For this reason, if programmers find it difficult to transcode HTML/CSS/JavaScript to be a string manually and switching to uploading files to esp32 and reading the web files directly to use will be something that will require training to use LittleFS as a reliable library.


Read More

[TH] Arduino: ควบคุมการเคลื่อนที่หุ่นยนต์รถผ่านบราวเซอร์ด้วย esp8266 Part 2

จากบทความก่อนหน้าที่ใช้ esp8266 เพียงตัวเดียวสำหรับการควบคุม Agent ซึ่งจำนวนขาที่ไมโครคอนโทรลเลอร์ esp8266 (ตามที่เขียนไว้ในบทความเกี่ยวกับ machine.Pin ของ MicroPython) มีให้นั้นมีจำกัด และหลายขาถูกใช้งานขณะเริ่มระบบทำให้เกิดความผิดพลาดที่ไม่ได้ตั้งใจ เช่น ล้อหมุนเมื่อระบบเริ่มทำงาน และหยุดเมื่อระบบทำการบูตเสร็จ เป็นต้น ดังนั้น ในบทความนี้จึงเพิ่มบอร์ดไมโครคอนโทรลเลอร์ LGT8F328P เข้ามา ดังภาพที่ 1 หรือผู้อ่านอาจจะเปลี่ยนเป็นไมโครคอนโทรลเลอร์ตระกูล Arduino อื่น ๆ แทนได้ เช่น Arduino Nano หรือ Arduino Uno เป็นต้น โดยให้ LGT8F328P นั้นเป็นส่วนของ Actuator ที่ทำหน้าที่เคลื่อนที่ไปในสิ่งแวดล้อม คือ สามารถสั่งให้เดินหน้า ถอยหลัง เลี้ยวซ้าย เลี้ยวขวา และหยุดได้ ทำให้ลดภาระการทำงานของ esp8266 ลง และให้ทำงานตอบสนองการสื่อสาร WiFi ได้มากขึ้น

ภาพที่ 1 บอร์ด LGT8F328P ที่นำมาประกอบเข้ากับระบบหุ่นยนต์รถเพื่อใช้ควบคุมการเคลื่อนที่
Read More

[TH] Arduino: ควบคุมการเคลื่อนที่หุ่นยนต์รถผ่านบราวเซอร์ด้วย esp8266

จากบทความการควบคุมหุ่นยนต์รถ 2 ล้อแบบ Servo ใน ESP8266+RoboServo และมอเตอร์ไฟฟ้ากระแสตรงใน VisionRobo Car: Drive Motor ทางเราได้นำหุ่นยนต์รถในตัวที่ 2 เปลี่ยนจาก Raspberry Pi เป็น ESP8266 เพื่อสั่งงานผ่าน WiFi โดยใช้แนวทางจาก บทความ ESP-01s+Relay มาเขียนใหม่ด้วยภาษา C/C++ ของ Arduino ด้วยคลาส WebServer จากที่ในบทความของ ESP8266 เป็น MicroPython ดังนั้น เมื่อทำตามบทความนี้จนเสร็จจะสามารถสั่งงานหุ่นบนต์ในภาพตัวอย่างที่ 1 ได้ด้วยการเชื่อมต่อโทรศัพท์หรืออุปกรณ์สื่อสารไปที่ 192.168.4.1 และสั่งให้เดินหน้า ถอยหลัง เลี้ยวซ้าย เลี้ยวขวา หรือหยุดได้

ภาพที่ 1 ตัวอย่างหุ่นยนต์รถสำหรับการทดลองในบทความนี้
Read More

[EN] ESP-NOW

The article discusses the use of communication developed by espressif to communicate between its microcontrollers via wireless communication, as an alternative to the development of a non-linear  Client/Server system. It describes the working process of working as a service provider, commander, and a set of related instructions through the Arduino core, along with explaining the working examples that come with both Arduino cores, which are basic and Multi-slave, which can be applied variously.

Read More

[EN] ST7735s

This article describes setting up the Arduino’s TFT_eSPI library to use the ST7735s-controlled TFT LCD that was written as an example in a previous article in Python. We found that there are 2 0.96″ LCD IPS ST7735s models, which are GREENTAB160x80 and REDTAB160x80. Both modules differ in the spacing between them, as shown in Figure 1. This article uses the ESP8266, ESP32 DO-IT DevKit version with ESP32CAM and STM32F103C8T6. It is a board to test the functionality of the program.

(Figure. 1 0.96” IPS TFT module)
Read More

[EN] MicroPython : PWM

This article discusses the use of PWM or Pulse Width Modulation modules under the machine class of MicroPython for esp8266 and esp32, along with an example of using PWM to dim the brightness of an LED and the generation of audio frequencies with PWM, which can be applied in the future.

Read More

[EN] The dCore-espWST

This article recommends using the esp8266 to read temperature and humidity from the DHT11 sensor, the voltage from the LDR sensor, received from the switch, and display via OLED with MicroPython’s Python language, this feature is the dCore-espWST board we are using (Which in the previous article we used the dCore-esp32WST with the same design, but using esp32, but the program code can still be used with the model board) and is a board for use in teaching IoT subjects. The prototype structure of the board is as shown in Figure 1, which is normally used with a battery power supply unit with a solar panel charging circuit.

(Figure. 1 dCore-espWSTprototype)
Read More