[EN] ST7735s

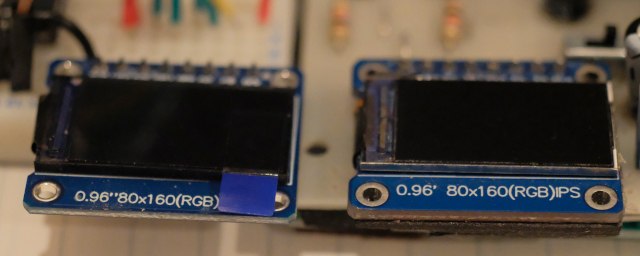
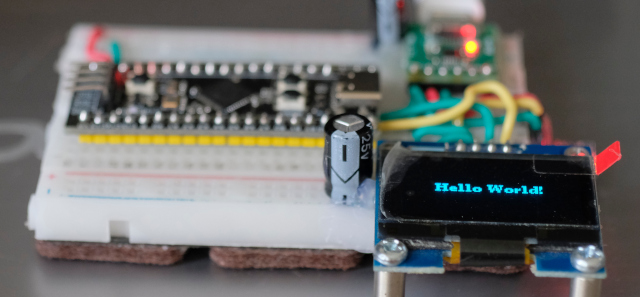
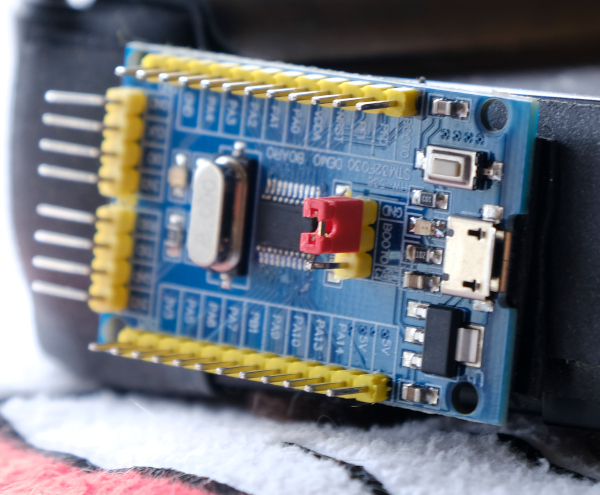
This article describes setting up the Arduino’s TFT_eSPI library to use the ST7735s-controlled TFT LCD that was written as an example in a previous article in Python. We found that there are 2 0.96″ LCD IPS ST7735s models, which are GREENTAB160x80 and REDTAB160x80. Both modules differ in the spacing between them, as shown in Figure 1. This article uses the ESP8266, ESP32 DO-IT DevKit version with ESP32CAM and STM32F103C8T6. It is a board to test the functionality of the program.

(Figure. 1 0.96” IPS TFT module)
Read More

[EN] u8g2 Library

From the article on using the ESP8266 with an OLED graphical display written in Python, you’ll find that it’s fast and easy but when used with other microcontrollers that cannot use Micropython or CircuitPython, what must be done? One of the many options is the u8glib or u8g2 (Universal 8 bit Graphics Library) libraries, designed to work with monochromatic 8-bit graphics over either I2C or SPI communication. In this article, we are using I2C OLED as shown in Figure 1.

(Figure. 1 STM32F401CCU6 with I2C OLED)
Read More

[EN] Bare Metal Cortex-M Ep.3

From the previous article, we have experimented with controlling the digital signal output by driving the LED circuit connected to the STM32 microcontroller board, both Cortex-M0, Cortex-M3 and Cortex-M4. to import digital signals and use an example of connecting a switch circuit to control the on or off of an LED lamp as shown in Figure 1.

(Figure. 1 Our board in this article)
Read More

[EN] Bare Metal Cortex-M Ep.2

From the previous article, we have tried writing a program to study the elements of various files that we need, we found that there are quite a lot of details and steps. But it is an important basis for those who want to seriously and usefully study Cortex-M0 programming via STM32F030F4P6 (Figure 1), Cortex-M3 with STM32F103C (Figure 32) and Cortex-M4 with STM32F401CCU6 (Figure 27) to study of programming structure with programming tool STM32CubeIDE (Figure 2), which is the main tool used in this series of articles. This is because it combines ST’s complete development kit for ARM, including CubeMX for chip design, compiler toolkit, ST-Link program debugging tool and code editor in one tool,  plus it supports both Windows, Linux and macOS operating systems.

(Figure. 1 STM32F030F4P6 and USB–RS232 )
Read More

[EN] Bare Metal Cortex-M Ep.1

This article is a series of programming articles focused on the Cortex-M0 via the STM32F030F4P6 or any other STM32 microcontroller based on CMSIS, an ARM firmware compiled from vivonomicon.com‘s series of Bare Metal: STM32 Programming articles without using the Arduino framework. In the article EP.1 is a matter of preparation. It consists of creating a link file to link different parts of the code together and the working part file. After that, the result file is uploaded into the microcontroller to complete the program development process.

(Figure. 1 STM32F030F4P6)
Read More

[TH] ST7735s

บทความนี้กล่าวถึงการตั้งค่าไลบรารี TFT_eSPI ของ Arduino เพื่อใช้งาน TFT LCD ที่ควบคุมด้วยชิพ ST7735s ที่ได้เคยเขียนเป็นตัวอย่างในบทความก่อนหน้านี้ด้วยภาษาไพธอน แต่จากการใช้งานของทีมงานเราพบว่า ST7735s ที่เป็น LCD IPS ขนาด 0.96″ นั้นมี 2 รุ่น ซึ่งเป็น GREENTAB160x80 กับ REDTAB160x80 โดยโมดูลทั้ง 2 ประเภทแตกต่างกันที่การเว้นวรรคช่องว่างระหว่างกันดังภาพที่ 1 ซึ่งในบทความนี้ใช้ ESP8266, ESP32 รุ่น DO-IT DevKit กับ ESP32CAM และ STM32F103C8T6 เป็นบอร์ดทดสอบการทำงานของโปรแกรม

ภาพที่ 1 โมดูลแสดงผล TFT ขนาด 0.96″ แบบ IPS
Read More

[TH] u8g2 Library

จากบทความการใช้ ESP8266 กับจอแสดงผลกราฟิกแบบ OLED ซึ่งเขียนด้วยภาษาไพธอนจะพบว่าการทำงานนั้นสะดวกรวดเร็วในระดับดี แต่เมื่อต้องใช้กับไมโครคอนโทรลเลอร์ตัวอื่นที่ไม่สามารถใช้ Micropython หรือ CircuitPython ได้นั้นจะต้องทำอย่างไร ซึ่งหนึ่งในหลายทางเลือกคือไลบรารี u8glib หรือ u8g2 (Universal 8 bit Graphics Library) ที่ออกแบบมาเพื่อทำงานกับกราฟิกแบบ 8 บิตแบบโมโนโครมทั้งผ่านการสื่อสารแบบ I2C หรือ SPI โดยบทความนี้ใช้อุปกรณ์ต่อเชื่อมกันดังภาพที่ 1 ด้วยการใช้ OLED แบบ I2C

ภาพที่ 1 การเชื่อมต่อ STM32F401CCU6 กับ OLED แบบ I2C
Read More

[TH] Bare Metal Cortex-M Ep.6

หลังจากได้ใช้คำสั่ง HAL สำหรับสั่งงาน Cortex-M0/M3/M4 ไปกันพอสมควร ครั้งนี้มาประยุกต์เพื่อขับเคลื่อนหุ่นยนต์รถ 2 ล้อให้เดินหน้า ถอยหลัง หันซ้าย หันขวา และหยุดกันบ้าง ดังนั้น ในบทความนี้กล่าวถึงการประยุกต์ใช้ GPIO เพื่อส่งสัญญาณ 0 หรือ 1 ไปยังพอร์ตที่ต่อกับภาคขับมอเตอร์ดังภาพที่ 1 เพื่อให้ตัวหุ่นนั้นเคลื่อนที่

ภาพที่ 1 หุ่นยนต์เคลิื่อนที่ด้วยล้อ
Read More

[TH] Bare Metal Cortex-M Ep.3

จากบทความก่อนหน้านี้ได้ทดลองควบคุมการนำออกสัญญาณดิจิทัลด้วยการขับวงจรแอลอีดีที่เชื่อมต่อกับบอร์ดไมโครคอนโทรลเลอร์ STM32 ทั้งแบบ Cortex-M0, Cortex-M3 และ Cortex-M4 ในบทความนี้กล่าวถึงการใช้งานขาเพื่อนำเข้าสัญญาณดิจิทัล และใช้ตัวอย่างการต่อวงจรสวิตช์เพื่อควบคุมการติดหรือดับของหลอดแอลอีดีดังภาพที่ 1

ภาพที่ 1 ภาพตัวอย่างของการทดลองใน Ep3
Read More

[TH] Bare Metal Cortex-M Ep.5

บทความนี้กล่าวถึงการใช้งาน ADC (Analog to Digital Converter) ของ STM32 ที่มีความละเอียด 12 บิต ทำให้สามารถอธิบายค่าแรงดันแอนาล็อกได้ 4096 ระดับ (0 ถึง 4095) ของแรงดัน 0 ถึง 3V3 ซึ่งสามารถปรับระดับความละเอียดให้เป็น 12บิต 10 บิต 8 บิต หรือ 6 บิตได้เพื่อแลกกับความเร็วในการทำงาน โดยใช้ชุดคำสั่ง HAL ที่มากับชุดพัฒนาของ STM32CubeIDE/STM32CubeMX และในการทดลองได้เลือกใช้อุปกรณ์ดังภาพที่ 1 ซึ่งเป็นบอร์ดต้นแบบของ dCoreM0 ของทางทีมงานเรา

ภาพที่ 1 บอร์ดต้นแบบ dCoreM0 สำหรับทดลอง ADC
Read More